Table of Contents >> Show >> Hide
- Why Build One Instead of Buying?
- Plan First: Measure Like You Mean It
- Choose Your Drawer Style
- Materials and Tools
- Example Size + Quick Cut List (Adjust to Your Bed)
- Step-by-Step: Build a Rolling Underbed Storage Drawer
- 1) Confirm your final drawer dimensions
- 2) Break down plywood cleanly (without turning your garage into confetti)
- 3) Choose your joinery: simple and strong
- 4) Dry fit, then assemble the box square
- 5) Attach the bottom (and decide how “drawer-ish” you want it)
- 6) Reinforce corners (optional, but satisfying)
- 7) Add dividers for sanity
- 8) Install the handle (keep it low-profile)
- 9) Mount the casters (this is where “roll quality” is born)
- 10) Sand, finish, and make it look like furniture (not “garage leftovers”)
- Optional Upgrade: Make It Feel Like a Built-In Drawer (Slides)
- Pro Tips and Common Mistakes
- What to Store (and How to Keep It Fresh)
- FAQ
- Experience Notes: What DIYers Usually Learn After Building One (About )
- Conclusion
- SEO Tags
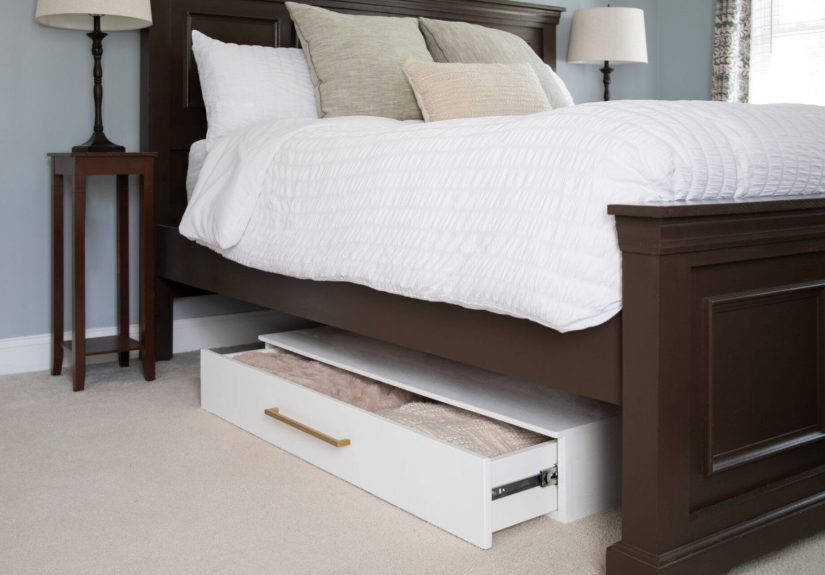
Under your bed is prime real estate. It’s dark, it’s mysterious, and it’s already occupied by at least three dust bunnies that
pay zero rent. A DIY underbed storage drawer turns that wasted space into a smooth-rolling stash spot for off-season
clothes, spare linens, gift wrap, kids’ toys, or that one yoga mat you swear you’re “getting back to.”
The best part? You don’t need fancy cabinetry skills to build a drawer that looks clean, glides nicely, and fits your bed like it
was meant to be there. This guide walks you through planning, a beginner-friendly build (rolling drawer style), and optional
upgrades if you want it to feel like a built-in.
Why Build One Instead of Buying?
Store-bought underbed bins are fineuntil they crack, bow, snag on carpet, or don’t fit your exact clearance. A DIY drawer gives you:
- Perfect fit: sized to your bed frame, floor type, and whatever weird center support bar is lurking under there.
- Better durability: plywood + solid joinery beats brittle plastic (and won’t shatter when you look at it wrong).
- Cleaner look: paint or stain to match your room, add a real pull handle, even add a face panel if you want “furniture vibes.”
- Smarter organization: dividers, labeled zones, or a lid to keep dust out.
Plan First: Measure Like You Mean It
The secret to a drawer that feels amazing is not the wood species or the brand of screws. It’s clearance.
Measure twice now so you don’t have to “custom sand” later (which is a fancy way of saying “oops”).
What to measure
- Under-bed height: floor to the lowest obstacle (bed rail, slats, center beam). Subtract at least 1/2″ for wiggle room.
- Usable width: distance between bed legs or frame parts that might block the drawer.
- Usable depth: how far you can pull the drawer out without hitting a nightstand, dresser, or your own shins.
- Floor type: hardwood, tile, low-pile carpet, high-pile carpetthis affects caster choice.
- Rugs: if a rug edge sits near the drawer path, plan for slightly larger wheels or a recessed handle.
Rule of thumb: Leave about 1/2″ to 1″ total clearance in height and at least 1/4″ to 1/2″ on sides where rubbing could happen.
More if your bed frame is… let’s say “expressive” and flexes when you sit down.
Choose Your Drawer Style
You’ve got two solid approaches. Both count as an underbed storage drawer; one is simpler, one is fancier.
Option A: Rolling drawer on casters (recommended for most people)
This is a drawer-shaped box on wheels. It doesn’t attach to the bed. It rolls out like a champ, works under almost any bed,
and doesn’t require perfect framing.
Option B: Slide-mounted drawer (built-in feel)
This uses full-extension drawer slides mounted to a simple frame (or to the bed structure if it’s designed for it).
It feels like “real furniture,” but it needs more precision and a solid mounting surface.
This article focuses on Option A (rolling drawer) because it’s the most universal and still looks polished.
Then we’ll cover the slide upgrade if you want to level up.
Materials and Tools
Materials (for one drawer)
- Plywood: 1/2″ plywood for sides + 1/2″ plywood for bottom (sturdy and simple), or 1/4″ bottom if you capture it in grooves.
- Optional face/frame boards: 1x material if you want a thicker-looking front or a decorative face panel.
- Casters: 4 low-profile casters (1-1/2″ to 2″ is common). Choose rubber/urethane for hard floors; bigger wheels help on carpet.
- Screws: wood screws (and pocket-hole screws if using a pocket-hole jig).
- Wood glue
- Handle: a pull handle, rope, or a routed handhold. Recessed pulls are great for tight clearances.
- Finish: paint + primer, or water-based polyurethane (less smell for bedrooms).
- Optional: edge banding, dividers, labels, felt pads, a lid panel, magnets, or weatherstrip to reduce dust.
Tools
- Tape measure, pencil, and a square (a speed square is your best friend)
- Circular saw with a straightedge guide (or table saw)
- Drill/driver + bits
- Clamps (helpful, not mandatory, but your future self will thank you)
- Sander or sanding block (120 and 180 grit)
- Optional: pocket-hole jig, router (for grooves/handholds), brad nailer
Example Size + Quick Cut List (Adjust to Your Bed)
Let’s say your measured “safe zone” under the bed is 34″ deep, 24″ wide, and 7″ tall (after subtracting clearance).
A practical drawer might be:
- Outside width: 23″
- Outside depth: 33″
- Outside height: 6-1/2″ (so casters don’t make it too tall)
Example cut list (1/2″ plywood):
- (2) Sides: 33″ x 6″
- (2) Front/Back: 22″ x 6″
- (1) Bottom: 33″ x 23″
- (Optional) Divider(s): height 5-1/2″ x width as needed
- (Optional) Face panel: 23″ x 6-1/2″ (thin plywood or 1x board trimmed to clear floor)
Note: If you use a “captured bottom” (a groove/dado method), your bottom size changes and the joinery changes.
The beginner method below uses a bottom panel attached to the box for speed and strength.
Step-by-Step: Build a Rolling Underbed Storage Drawer
-
1) Confirm your final drawer dimensions
Re-check the under-bed height after accounting for casters. If your casters add 1-3/4″ of height, your drawer box must be shorter
so the total height still clears the bed frame. If in doubt, go slightly shorternobody ever complained about a drawer that rolls smoothly. -
2) Break down plywood cleanly (without turning your garage into confetti)
Cut your panels to size. If you’re using a circular saw, clamp a straightedge guide so your cuts stay straight. Mark pieces clearly:
“SIDE,” “FRONT,” “BOTTOM,” etc. This reduces the risk of building a drawer that’s technically beautiful… and technically backward. -
3) Choose your joinery: simple and strong
For a straightforward build, use glue + screws or pocket holes. Pocket holes are clean and quick, but regular screws work fine
if you pre-drill to prevent splitting.- Fastest: Butt joints + glue + screws through the front/back into the sides.
- Cleaner: Pocket holes in the front/back pieces, screwed into the sides.
- More advanced: Rabbets/dados for a “cabinetry” feel.
-
4) Dry fit, then assemble the box square
Dry fit your sides, front, and back. Check squareness by measuring corner-to-corner diagonals:
if the diagonals match, you’re square. If they don’t match, gently clamp and nudge until they do.
This is how you avoid building a drawer that rolls like it’s angry at you.Apply glue at joints, clamp if you can, then drive screws (or pocket-hole screws). Wipe glue squeeze-out with a damp rag.
-
5) Attach the bottom (and decide how “drawer-ish” you want it)
Place the assembled box on the bottom panel so the edges align. If you want a slightly stronger build, you can inset the bottom panel
so it sits inside the box edges by 1/2″but aligning flush is totally acceptable for a rolling storage drawer.Add glue along the bottom edges of the box, position it on the bottom panel, and screw the bottom into the box every 6–8 inches.
Pre-drill if needed.Alternative (more traditional): Use grooves to capture a 1/4″ bottom panel. That method is excellent for “true drawers,”
especially when you want a lighter drawer that won’t sag, but it’s optional for this underbed build. -
6) Reinforce corners (optional, but satisfying)
If you plan to load the drawer with heavy stuff (books, shoes, dumbbells you also swear you’ll use), add corner blocks inside the box
or use small L-brackets. It’s cheap insurance. -
7) Add dividers for sanity
Dividers turn a drawer from “random pile storage” into “I can actually find things.” Use 1/2″ plywood strips and screw or brad-nail them in place.
Leave a little room near the front so items don’t jam the handle area. -
8) Install the handle (keep it low-profile)
Underbed clearance is tight, so skip big knobs that snag sheets or bruise ankles. Good options:
- Recessed pull (best for tight spaces)
- Rope handle (casual, flexible)
- Cutout handhold (router or jigsaw, then sand smooth)
- Simple bar pull (centered, mounted low)
-
9) Mount the casters (this is where “roll quality” is born)
Flip the drawer upside down. Mark caster locations near the corners, but not so close that screws split the plywood edge.
If you want the wheels to stay protected and avoid bumping bed legs, mount them slightly inboard.Use washers if your caster screws are small and the plywood is soft. Tighten firmly, but don’t over-torque and strip the holes.
If your casters have brakes, put the locking casters on the side you’ll reach easily.Floor tip: For carpet, larger diameter wheels roll easier. For hard floors, rubber or urethane wheels are quieter and kinder.
-
10) Sand, finish, and make it look like furniture (not “garage leftovers”)
Sand all surfaces to 120 grit, then 180. Slightly round over sharp edgesyour fingers (and your sheets) will appreciate it.
Finish options:- Paint: prime first for best durability; consider a satin finish for easy cleaning.
- Clear coat: water-based polyurethane keeps the wood look with less odor and faster dry time.
- Stain + topcoat: looks great, but keep ventilation in mind for indoor bedroom projects.
Optional Upgrade: Make It Feel Like a Built-In Drawer (Slides)
If you want that “real drawer” glide, you can mount full-extension side-mount slides to a simple frame that sits under the bed.
This only works well if you can create a stable, square opening under the bed.
Slide basics (quick and practical)
- Choose full-extension if you want access to the back of the drawer (highly recommended for underbed storage).
- Match slide length to drawer depth (don’t guessmeasure and follow slide specs).
- Plan for clearance: most side-mount slides require space on each side; build the drawer to match the slide’s required clearance.
The slide approach is less forgiving than casters, but the payoff is a drawer that feels upscale. If your bed frame isn’t rigid or doesn’t have
a good mounting surface, stick with castersyou’ll be happier.
Pro Tips and Common Mistakes
Small details that make a big difference
- Keep it low: the most common failure is building too tall. Respect the clearance.
- Square matters: a slightly out-of-square box can still “work,” but it will annoy you forever.
- Don’t skimp on the bottom: if you’ll load it heavily, use thicker bottom material or add a center divider/runner to prevent sag.
- Quiet it down: add felt pads where wood might tap the bed frame; rubber casters reduce noise.
- Dust control: add a simple lid panel, or store items in fabric bins inside the drawer.
- Think about access: a recessed pull beats a chunky knob when you’re half-awake reaching under the bed.
What to Store (and How to Keep It Fresh)
Underbed drawers are perfect for items you don’t need daily but want within reach:
- Seasonal clothing (sweaters, jackets)
- Extra bedding (sheets, blankets, pillowcases)
- Shoes in labeled pouches or bins
- Gift wrap and party supplies
- Kids’ toys (bonus: it rolls out for cleanup time)
Add a label on the front edge, toss in a cedar block for linens, or include a small moisture absorber if you live in a humid area.
Your future self will feel strangely grateful and slightly smug.
FAQ
How tall should an underbed storage drawer be?
As tall as your clearance allows, minus a safety margin. If you’re using casters, remember to subtract the wheel height from your total.
Most practical builds land in the 5–8 inch range, but your bed decides the final answer.
Is plywood strong enough for a drawer?
Yesgood plywood is stable and strong for drawer boxes. Thicker bottoms and/or dividers help prevent sag when loaded with heavier items.
Do I need drawer slides?
Not at all. Casters are simpler and work under more bed types. Slides are great if you want a built-in feel and can mount them properly.
What casters work best on carpet?
Larger diameter wheels generally roll better on carpet, especially if the drawer is loaded. If your carpet is thick, consider taller wheels
or keep the drawer lighter.
How do I keep it from looking like a plywood box?
Edge banding, a face panel, and a clean paint job go a long way. A recessed pull handle also makes it look intentional rather than improvised.
Experience Notes: What DIYers Usually Learn After Building One (About )
The first “experience” most people have with underbed drawers is realizing that the space under a bed is not a perfect rectangle. It’s more like
an obstacle course designed by a minimalist who secretly loves chaos. There are center rails, legs that flare, carpet transitions, and that one
mysterious metal bar that appears to exist solely to snag your knuckles. The practical takeaway: measure at multiple points.
Front, middle, and back. Left side and right side. If anything varies, build to the smallest measurement and leave clearance so the drawer
doesn’t wedge itself under the bed like a stubborn turtle.
The second lesson is about wheels. On paper, any caster looks fine. In real life, wheel choice decides whether your drawer feels like a luxury
upgrade or like you’re dragging a suitcase with a broken handle through an airport. On hardwood or tile, soft rubber or urethane wheels are
quieter and glide smoothly. On carpet, tiny casters can sink and make the drawer feel “sticky,” especially once you fill it with winter sweaters
(which, scientifically speaking, weigh approximately the same as a small planet). If you’re on carpet and want the drawer to roll easily, keep
the wheel diameter a bit larger and avoid loading the drawer like you’re packing for a six-month expedition.
Another common “aha” moment is that handles matter more than you think. Big knobs look cuteuntil you scrape your hand on the
bed frame trying to grab them, or the knob catches fabric and turns bedtime into a tiny wrestling match. A recessed pull or a cutout handhold is
the boring-but-brilliant choice. It’s the kind of detail you stop noticingwhich is exactly what you want. If you do use a bar pull, mounting it
low and centered typically makes it easier to grab without banging the drawer into the bed.
People also tend to underestimate how much dust lives under a bed. You build a drawer, slide it under, and suddenly you’ve created
the perfect lint museum. The good news: you don’t need to over-engineer a seal. Simple solutions workstore items inside fabric bags or bins,
add a thin lid panel, or even line the top edge with a small strip of weatherstrip if you’re feeling extra. A quick vacuum pass before you slide
the drawer back in also makes the whole setup feel cleaner and more “intentional.”
Finally, there’s the organizational reality check: a giant drawer becomes a giant junk drawer unless you give it a little structure.
Dividers are the MVP here. Even one divider turns “everything piled together” into “this section is linens, that section is shoes.”
Labels help too, especially if you build multiple drawers. The experience most people report is that once the drawer is organized, it’s easier to
keep the bedroom tidy because you actually have a home for the overflow. That’s the real win: not just more storage, but less visual clutterand
fewer dust bunnies smugly hoarding your floor space.
Conclusion
A DIY underbed storage drawer is one of those projects that feels almost unfair: low cost, high impact, and instantly useful.
Build a simple rolling drawer with plywood and casters, keep your measurements honest, and focus on the details that matterclearance,
squareness, and wheel choice. Add dividers if you want it to stay organized, finish it so it looks like furniture, and enjoy reclaiming the space
under your bed for something other than mystery socks and dust.