Table of Contents >> Show >> Hide
- Why Use a Bowdabra for a Christmas Tree Topper Bow?
- Supplies You’ll Need for a DIY Tree Topper Bow
- Plan Your Bow Before You Start
- Step-by-Step: How to Make a Large Tree Topper Bow With a Bowdabra
- Pro Tips for a Gorgeous DIY Tree Topper Bow
- Common Mistakes (and Easy Fixes)
- Fun Variations on the Bowdabra Tree Topper Bow
- Storing Your Bow for Next Year
- Extra : Real-Life Experiences With a Bowdabra Tree Topper Bow
- Conclusion: A Professional-Looking Tree Topper You Can Actually Make
Nothing says “holiday magic” like a Christmas tree that looks straight out of a shop window… except you didn’t have to sell a kidney to pay for the decorations. One of the easiest ways to level up your tree is with a big, fluffy Christmas tree topper bow, and a Bowdabra bow maker makes the whole process so much easierno more wrestling 20 feet of wired ribbon while it fights back.
In this guide, we’ll walk through how to make a large DIY Christmas tree topper bow using a Bowdabra bow maker, inspired by the popular Hometalk project and tried-and-true tips from bow-making experts. You’ll learn what supplies to grab, how to layer different ribbons, how to secure and attach your bow to the tree, and how to customize your topper for any stylefrom classic red velvet to glittery glam.
Why Use a Bowdabra for a Christmas Tree Topper Bow?
You can make a big bow by hand, but if you’ve ever ended up with cramped fingers, twisted loops, and a lopsided topper, you already know why bow makers exist. The Bowdabra bow maker is basically a third hand that:
- Holds your ribbon firmly in place while you stack and twist loops.
- Makes it easier to work with several ribbons at once.
- Lets beginners create professional-looking bows without years of practice.
- Handles wired ribbon in different widths, from narrow accents to big, dramatic tails.
For a tree topper bow with a lot of loops and long tails, the Large Bowdabra is especially handy because it has more room for ribbons and fuller designs.
Supplies You’ll Need for a DIY Tree Topper Bow
Before you start, clear a little space on your table. Big bows are like big personalitiesthey spread out.
Basic Tools and Materials
- Bowdabra bow maker (Large Bowdabra is ideal for tree toppers).
- Bowdabra bow wire (or 22-gauge floral wire or pipe cleaners).
- Wired ribbon in coordinating colors:
- 2.5" wired ribbon in 2–3 patterns (plaid, metallic, solids).
- 1.5" wired ribbon for extra loops and texture.
- Optional 4" wired ribbon for a really dramatic, oversized bow.
- Scissors (sharp enough to cut clean ribbon edges).
- Measuring tape or ruler (optional, but helpful if you love symmetry).
- Pipe cleaners, zip ties, or extra bow wire to attach the bow to the tree.
Optional Embellishments
- Glitter picks, faux berries, or small ornaments to tuck into the bow.
- Green floral wire to blend into the tree branches.
- Extra ribbon to create streamers cascading down the top of the tree.
Try to stick with wired ribbon whenever possible. Wired edges hold their shape, fluff beautifully, and can be reshaped year after year.
Plan Your Bow Before You Start
A little planning keeps your topper from looking like the tree got into a fight with the ribbon aisle.
Match Your Tree’s Style
- Classic: Red and gold wired ribbons, velvet, and metallic edges.
- Rustic: Burlap, plaid, twine, and muted greens or creams.
- Glam: Glitter, metallics, sequins, and satin finishes.
- Playful: Bright colors, polka dots, or character-themed ribbon.
Pick two to four coordinating ribbons and repeat them through the bow. This makes it look intentional and layered rather than chaotic.
Choose the Right Bow Size
- For a 6–7 foot tree, aim for a bow that’s about 10–14 inches wide.
- For taller trees, go biggerthink 16–20 inches wide.
- Plan for at least 8–12 loops and generous tails that drape down the top third of the tree.
When in doubt, slightly bigger is better. A tiny bow on a full tree always looks a little shy.
Step-by-Step: How to Make a Large Tree Topper Bow With a Bowdabra
Once your supplies are ready, the Bowdabra does most of the heavy lifting. Here’s a simple process you can follow, even if this is your first time.
Step 1: Prep the Bow Wire
- Cut a length of Bowdabra bow wire, about 20–24 inches long.
- Fold it in half and slip the folded middle down into the Bowdabra’s slot.
- Let the two loose ends hang downthis will become your slipknot later.
- Tuck the ends underneath the Bowdabra so they’re out of your way.
This wire is what will hold the whole bow together, so don’t be stingy with the length.
Step 2: Add the Tails First
For a dramatic tree topper, long tails that cascade down your tree are a must.
- Decide how long you want your tailsmany people like 24–36 inches.
- Cut one or more strips of wide wired ribbon (2.5" or 4") to that length.
- Fold each strip in half to find the center.
- Place the center down into the Bowdabra lengthwise so you have equal tails on both sides.
You can stack different ribbons herelike a plaid ribbon over a plain velvetto give the tails extra dimension.
Step 3: Build the Bow Loops (“Shoe Bow” Style)
Now for the fun part: building up those big, fluffy loops.
- Select your first ribbon for the loops (usually one of your wider ribbons).
- Unroll a section, then fold the ribbon in half to find the center.
- Place that center into the Bowdabra and “scrunch” it down between the towers.
- Pull one side of the ribbon out to create a loop (for example, 5–6 inches), twist the ribbon so the pretty side faces out, and scrunch it into the Bowdabra.
- Repeat on the opposite side to create a matching loop, forming a figure-8 pattern.
- Continue making loops on alternating sides until you’ve added 4–6 loops with that ribbon.
This “shoe bow” method makes neat, symmetrical loops without you having to pinch everything in your hand the whole time.
Step 4: Layer More Ribbons for a Stacked Bow
To get that designer, layered look, switch ribbons and repeat.
- Choose a second ribbon (maybe a narrower 1.5" with a pattern).
- Create slightly shorter loops than the first layer so they show on top.
- Alternate sides as you go, stacking the loops right in the center.
- Add a third or fourth ribbon if you like, adjusting loop lengths so each layer peeks through.
Don’t worry if it looks like a hot mess while it’s in the Bowdabra. The magic happens when you tie it off and fluff it.
Step 5: Compress and Tie Off the Bow
- Use the Bowdabra wand to press all the ribbons down firmly. This packs the center tightly.
- Grab the loose ends of the bow wire underneath and bring them up through the loop at the top.
- Pull tight to cinch the bow in the middle while it’s still in the Bowdabra.
- Lift the bow out, then pull the wire even tighter at the back and tie a double knot.
- Leave the remaining wire or add a pipe cleaner/zip tie if you want a sturdier attachment point.
At this point, the bow will look squished. That’s a good signyou’ve secured it properly.
Step 6: Fluff the Loops Like a Pro
Fluffing is where your basic bow becomes a show-stopping Christmas tree topper.
- Start from the center and gently pull each loop out and away from the middle.
- Alternate directionsup, down, left, rightto create a round, full shape.
- Bend and curve the wired edges so the loops stay open and dimensional.
- Adjust the tails so they flow down the front and sides of the tree.
If a loop looks flat, bend the wired edge into a soft arc. If a tail looks stiff, run your fingers along it to soften the curve.
Step 7: Attach Your Bow to the Christmas Tree
There are a few easy ways to secure your bow without it wobbling or slipping.
- Using bow wire or pipe cleaners: Wrap the wire around a sturdy top branch and twist it tightly at the back.
- Using a zip tie: Zip the bow’s center to a cluster of branches for extra stability.
- Using the tree’s greenery: Twist branch tips around the bow’s center to hold it in place and hide any hardware.
Step back a few feet, check the angle, and adjust until the bow faces the room and crowns the tree nicely.
Pro Tips for a Gorgeous DIY Tree Topper Bow
1. Use Enough Ribbon
Big bows are ribbon-hungry. For a large topper, you might use most of a 25-foot roll of wired ribbon, especially if you’re including long tails and lots of loops. It’s better to have too much than to run out on the last loop.
2. Mix Textures, Not Chaos
Aim for variety with a theme. Try something like:
- One bold patterned ribbon (plaid, snowflakes, stripes).
- One solid velvet or satin ribbon.
- One metallic or glitter accent ribbon.
Keep them all in the same color family so they work together rather than compete.
3. Shape the Tails
Finish the ends of your ribbon tails with a “dovetail” cut:
- Fold the ribbon end in half lengthwise.
- Cut from the folded edge toward the open ends at an angle.
- Unfold to reveal a V-shaped tail that looks polished and intentional.
Then gently curve the tails down the tree instead of letting them hang stiff and straight.
4. Add Picks and Ornaments After Fluffing
If you want extra sparkle, tuck in berry picks, greenery, or small ornaments after you’ve finished fluffing the bow. Slide the stems into the loops or attach them with a bit of wire so they feel like part of the bow, not an afterthought.
5. Don’t Fear Asymmetry
Some of the prettiest tree toppers have loops and tails that aren’t perfectly identical. As long as the overall shape looks balanced, a little asymmetry can make your bow feel more natural and less stiff.
Common Mistakes (and Easy Fixes)
Problem: The Bow Looks Flat
If your bow looks more “pancake” than “puffy,” try:
- Adding more loops with narrower ribbon toward the center.
- Bending the wired edges into arcs instead of straight lines.
- Using a slightly shorter loop length for upper layers to create a domed shape.
Problem: The Bow Keeps Sliding Down the Tree
A heavy topper can migrate south over the season. Fix it by:
- Using two attachment pointsone around the top branch and one just below.
- Choosing a thicker, sturdier branch or even wiring around the central trunk if accessible.
- Adding a second pipe cleaner or zip tie in a hidden spot for extra support.
Problem: The Ribbons Keep Twisting
Make sure you’re twisting the ribbon before you scrunch it into the Bowdabra so the patterned side always faces out. If a loop flips, simply untwist it while you’re fluffing.
Fun Variations on the Bowdabra Tree Topper Bow
Farmhouse Christmas Topper
Combine burlap ribbon, black-and-white buffalo check, and a solid cream ribbon. Add a couple of cotton or pinecone picks, and let burlap tails drape down the front of the tree.
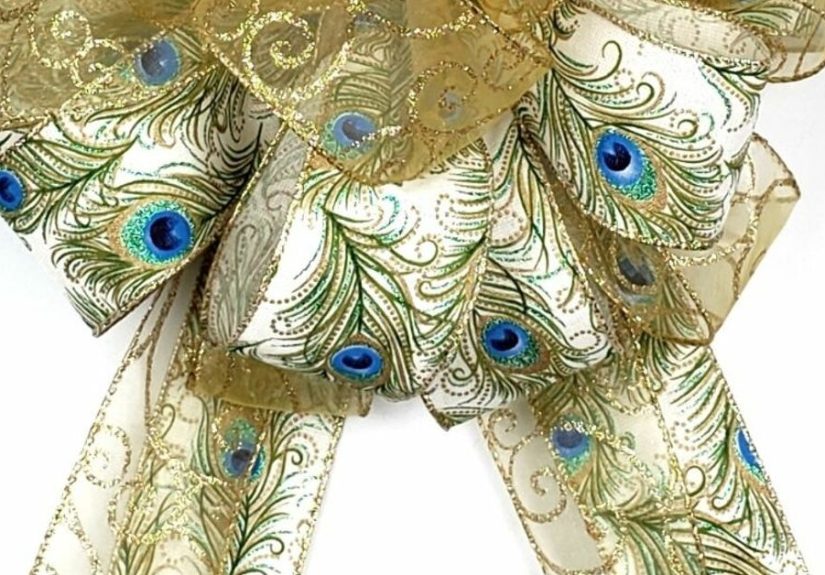
Glam Metallic Topper
Layer gold, champagne, and silver ribbons with lots of sparkle. Use narrow glitter ribbon for extra loops and tuck in metallic leaf or starburst picks for a luxe, high-impact look.
Family-Friendly Color Pop
Use bright red, green, and maybe a patterned ribbon with candy canes or polka dots. Add small jingle bells or plastic ornaments wired into the center for a playful, kid-approved topper.
Storing Your Bow for Next Year
After the holidays, don’t just toss your bow in a bin and hope for the best.
- Lay the bow in a shallow box or bin with plenty of space.
- Loosely stuff the loops with tissue paper to help them keep their shape.
- Store it in a cool, dry place away from heavy items that could crush it.
Next year, you’ll just need a quick fluff, and your bow will be ready for round two.
Extra : Real-Life Experiences With a Bowdabra Tree Topper Bow
The first time many people try to make a tree topper bow, it usually goes something like this: you buy two rolls of ribbon, stand in front of the tree, and start looping, twisting, and pinching by hand. Five minutes later, the ribbon is on the floor, your fingers hurt, and the dog is trying to eat the wired edges. That’s where the Bowdabra quietly saves Christmas.
One of the biggest “aha” moments crafters talk about is realizing how much easier it is to work in layers when the Bowdabra is holding everything for you. Instead of trying to juggle loops from three different ribbons in one hand, you just drop each loop into the slot, scrunch, and move on. If you decide you want more loops in one color, you can simply add a few more before you tie everything off. It feels more like building a bow than wrestling one.
Another common experience: underestimating how much ribbon a truly impressive topper takes. Many DIYers start with one roll and quickly realize that if you want long tails, multiple layers of loops, and a full, rounded shape, you’re going to use most of that rollsometimes all of it. The good news is that once you’ve made a few bows, you get a feel for it: tall tree, bigger loops, longer tails? Grab the extra roll. Smaller tree or simpler style? One roll might be enough.
People also discover that the tree topper bow is usually the first thing guests notice when they walk into the room. Even if the rest of the tree is decorated with simple ornaments, a big, well-made bow at the top instantly gives it a finished, professional look. That’s why many home decorators and DIYers use the same basic method every year but switch up the ribbon colors and textures. One year the bow might be traditional red and gold; the next year it’s all neutrals and champagne tones, but the Bowdabra steps stay the same.
If you decorate with kids, the Bowdabra can turn bow-making into a group project instead of a solo stress event. Older kids can help measure and cut tails, choose which ribbon goes next, or fluff loops once the bow is tied off. Younger kids love helping shape the tails and “petting” the loops to puff them up. Because the Bowdabra holds the center, you’re not relying on little hands to pinch everything tightly, which keeps things fun instead of frustrating.
Storage is another area where people learn by trial and error. The first year, it’s tempting to cram the bow into whichever holiday bin still has room. By the next season, it comes out flat and crooked. After that, most people give the bow its own box or a spot on top of the ornament bins. Some even hang the bow on a hanger in a closet to protect it. A few minutes of careful packing means you don’t have to remake your topper from scratch every December.
Finally, many DIYers find that once they’ve mastered a large Bowdabra tree topper bow, they start using the same technique for wreaths, staircase garlands, mailbox decor, and even big outdoor porch bows. The process becomes second nature: wire, tails, loops, layers, tie, fluff, attach. The confidence you build on your Christmas tree ends up spilling over into the rest of your holiday decorating, and that’s a pretty fun bonus for a simple tool and a few rolls of ribbon.
Conclusion: A Professional-Looking Tree Topper You Can Actually Make
Making a DIY Christmas tree topper bow with a Bowdabra bow maker takes the stress out of working with long lengths of wired ribbon and turns it into a satisfying, almost relaxing project. With a little planning, a few coordinating ribbons, and the step-by-step process above, you can create a large bow that looks like it came from a high-end boutiquewithout the high-end price tag.
Whether you favor classic red and gold, rustic farmhouse textures, or modern metallics, the Bowdabra method works the same way. Once you get the hang of layering loops and fluffing them into shape, you’ll have a go-to technique you can reuse year after year, on any tree, in any style. Your only problem might be that once friends and family see your topper, they’ll start asking you to make one for their trees too.