Table of Contents >> Show >> Hide
- Why your phone gets dirty so fast
- What you need before you start
- What you should never use on your phone
- How to clean your phone the right way
- How to clean the charging port without making your week worse
- How to clean speakers, microphones, and camera lenses
- How to clean your phone case the right way
- How often should you clean your phone?
- Common phone-cleaning mistakes
- Phone hygiene habits that actually help
- Experience: what people learn after cleaning phones the wrong way and the right way
- Conclusion
Your phone goes everywhere with you. It rides in your pocket, lands on restaurant tables, sits beside your bed, gets tapped with snack fingers, and somehow ends up covered in fingerprints five minutes after you cleaned it. In other words, your phone lives a very full life. Unfortunately, that life is also a little gross.
The good news is that cleaning a phone is not complicated. The bad news is that a lot of people still do it the wrong way. They spray cleaner straight onto the screen, attack the charging port like they are digging for treasure, or scrub the display with a paper towel as if it were a greasy stovetop. That is how a simple cleaning session turns into screen damage, streaks, worn coatings, or a repair bill that ruins your afternoon.
If you want to know how to actually clean your phone the right way, this guide breaks it down step by step. You will learn what to use, what to avoid, how to clean tricky areas like ports and camera lenses, how often to do it, and why “water-resistant” does not mean “please wash me under the faucet.”
Why your phone gets dirty so fast
Phones are classic high-touch objects. You touch them dozens, sometimes hundreds, of times a day. That means they collect skin oil, makeup, sunscreen, lint, crumbs, dust, pocket fuzz, and whatever mystery residue was living on the coffee shop counter. Add a phone case into the mix and grime has even more places to hide.
There is also an important difference between cleaning and disinfecting. Cleaning removes dirt, oils, and a lot of everyday mess. Disinfecting is about using the right product, the right way, to reduce or kill germs on the surface. In real life, most people need both at different times. If your phone is visibly dirty, cleaning comes first. A disinfecting wipe over a greasy, smudged screen is basically putting a tuxedo on a raccoon.
What you need before you start
You do not need a laboratory, a hazmat suit, or a suspicious blue liquid from the bottom shelf of a discount store. You just need the right basics.
- A soft, lint-free microfiber cloth
- A dry cloth for dust and fingerprints
- A slightly damp cloth for stubborn smudges
- If needed, a manufacturer-safe disinfecting wipe or a 70% isopropyl alcohol wipe for exterior surfaces
- A clean, dry area where the phone can fully air-dry
That is the core kit. For some phones, screen wipes or eyeglasses cleaner may be acceptable on the display. For many cases, especially silicone or plastic ones, mild soap and water work well. The trick is to match the cleaner to the material instead of declaring chemical warfare on everything at once.
What you should never use on your phone
This part matters because bad cleaning habits are incredibly common. Some products sound harmless but can damage the finish, leave residue behind, or wear down protective coatings on the screen.
- Paper towels, napkins, tissues, or other rough materials
- Window cleaner or household cleaning sprays
- Bleach-based products unless the manufacturer specifically allows a certain wipe type
- Hydrogen peroxide cleaners on devices that warn against them
- Abrasive cleaners or gritty cloths
- Spraying liquid directly onto the phone
- Soaking the device or letting moisture pool in openings
- Metal tools, pins, paper clips, or anything stabby for the charging port
If a cleaning method sounds like it would also work on a frying pan, car window, or bathroom mirror, it probably does not belong on your phone.
How to clean your phone the right way
1. Turn it off and unplug everything
Before cleaning, power the phone down and disconnect any charging cable or accessory. This is the boring step people skip right before they do something dramatic, like wiping moisture toward a charging port. Turn it off first. You are not losing productivity. You are gaining common sense.
2. Remove the case and accessories
Take off the case, pop off any wallet attachment, remove the ring grip, and separate anything that is trapping dirt against the phone. A lot of grime hides along the edges where the case presses against the frame. If you clean only the screen and ignore the case, congratulations, you have cleaned half the sandwich.
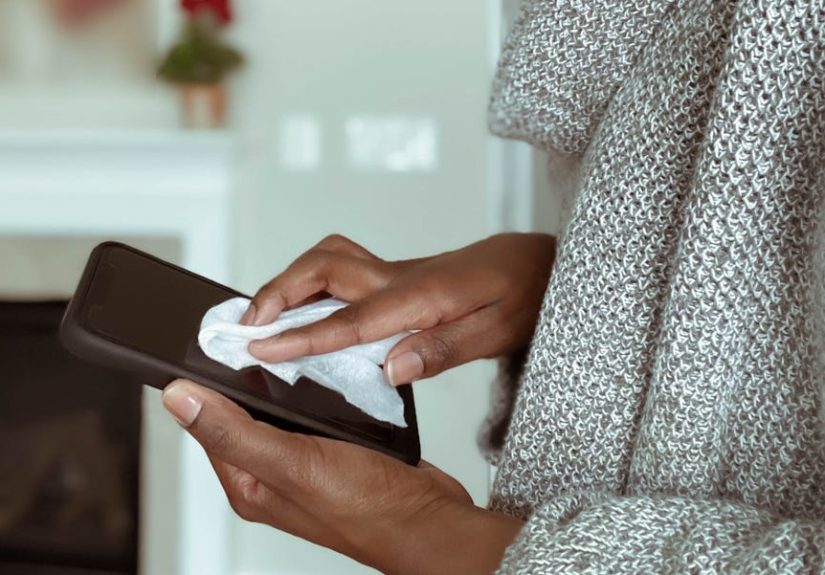
3. Start with a dry microfiber cloth
For basic fingerprints, dust, and light smudges, a dry microfiber cloth is usually enough. Wipe the front, back, and sides gently. Do not scrub like you are trying to erase a bad decision. Slow, light passes work better and are kinder to the finish.
This step is especially important because many modern phones have coatings designed to resist fingerprints. Those coatings do not love rough treatment. A microfiber cloth helps you clean the glass without grinding dust into it or wearing things down faster than necessary.
4. For stubborn grime, use a slightly damp cloth or an approved wipe
If dry wiping does not cut it, lightly dampen one corner of the microfiber cloth with water, or use a manufacturer-approved disinfecting wipe for the exterior. The cloth should be damp, not wet. “Slightly damp” means there is no dripping, pooling, or liquid auditioning for a waterfall scene.
If you are disinfecting the phone, wipe the exterior gently and evenly. Do not flood the buttons, speakers, microphones, or charging port. Also, do not spray cleaner directly on the device. Put the product on the cloth or use a ready-made wipe. That is one of the most consistent rules across device makers for a reason.
5. Pay attention to the screen, back, and edges
The screen gets the spotlight, but the frame and camera bump usually collect just as much grime. Wipe around the edges where dust and pocket lint settle. For the back glass, move in smooth strokes instead of harsh circles. For the camera area, use a fresh section of the microfiber cloth so you are not just smearing oily residue from the rest of the phone onto the lens.
6. Let everything dry completely
Once you finish, let the phone air-dry before turning it back on or plugging it in. This is not the moment to get impatient and jam a cable into a damp charging port. Give it a minute. Your battery percentage can survive the wait.
How to clean the charging port without making your week worse
The charging port is where good intentions go to die. It is also where people turn into self-appointed phone surgeons. That rarely ends well.
If the port looks dusty, do not start poking around with a paper clip, sewing needle, toothpick, or the corner of a takeout menu. The metal contacts inside are delicate. Bend one pin and suddenly you are googling repair shops with the desperation of a person who has 3% battery and no backup plan.
The safest approach at home is conservative:
- Power the phone off first
- Do not put liquid or alcohol into the port
- Do not blow into it with your mouth
- Do not use cotton swabs that leave fibers behind
- If lint appears packed in or charging is inconsistent, get professional cleaning instead of improvising
Some repair guides suggest very gentle air cleaning for ports, but device makers often warn against compressed air on phones in general. So if you are not sure what your specific device allows, the safest move is simple: stop at exterior cleaning and let a professional handle stubborn buildup.
How to clean speakers, microphones, and camera lenses
Speakers and microphones
These openings are small, easy to clog, and even easier to damage. Wipe around them with a dry microfiber cloth. Do not drip cleaner into them. Do not attack them with a pin because you read a “life hack” online posted by someone whose confidence far exceeded their judgment.
Camera lenses
Use a clean section of the microfiber cloth or a lens-safe wipe. A greasy lens is one of the most common reasons phone photos suddenly look soft or hazy. People blame the camera. The camera blames your face oil. The camera is usually right.
How to clean your phone case the right way
Your case needs cleaning too, because it traps sweat, dust, skin oil, and pocket debris against the phone. Cleaning the phone but not the case is like washing your hair and putting on the same sweaty hat.
Silicone and plastic cases
These are usually the easiest. Warm water and mild soap work well. Wash gently, rinse lightly, and dry thoroughly before putting the case back on the phone.
Clear cases
Clear cases can be cleaned the same way, though some eventually yellow with age and sunlight. Cleaning helps with grime, but it will not reverse chemistry. Sometimes a yellowing case is not dirty. It is just honest.
Leather cases
Leather needs more care. Use a mild cleaner sparingly and know that the color or finish may change over time. If your leather case develops character, that is the polite version of saying it may never look exactly new again.
How often should you clean your phone?
There is no one-size-fits-all schedule, but there is a useful rule: clean it regularly, and disinfect it when your phone has had a particularly adventurous day.
A good rhythm looks like this:
- Daily or near-daily: quick microfiber wipe for fingerprints and grime
- After public outings, the gym, travel, or shared surfaces: more thorough wipe-down or approved disinfecting wipe
- Weekly: remove the case and clean both the phone and the case properly
- As needed: clean immediately if the phone gets makeup, sunscreen, lotion, food, or sticky residue on it
If you use your phone while cooking, working out, commuting, or eating fries in the car, you already know when it needs attention. Your screen starts looking like it lost a fight with a bag of potato chips.
Common phone-cleaning mistakes
- Spraying cleaner directly onto the phone
- Using too much liquid
- Using paper towels or rough cloths
- Forgetting to remove the case
- Cleaning the screen but ignoring the sides and camera bump
- Using harsh household chemicals
- Digging into the charging port with random objects
- Plugging the phone back in before it is fully dry
These mistakes are common because they feel efficient. In reality, they are just fast routes to scratches, streaks, worn coatings, and repair-shop small talk you never wanted to have.
Phone hygiene habits that actually help
Cleaning is easier when your phone does not get filthy in the first place. No, this is not a lecture. It is maintenance strategy with less drama.
- Wash your hands more often, especially before meals and after public transit
- Keep the phone out of lint-heavy pockets and dusty bags
- Use a case that is easy to remove and wash
- Avoid using the phone with lotion, sunscreen, or wet hands when possible
- Wipe the screen briefly at the end of the day instead of waiting for a full grime festival
A little routine care keeps the phone cleaner, protects the finish, and reduces the urge to over-clean it with stronger products later.
Experience: what people learn after cleaning phones the wrong way and the right way
One of the most useful things about learning how to clean your phone properly is that it usually comes from experience. Not perfect, elegant, magazine-cover experience, either. More often, it comes from the messy kind: the moment someone notices the charging cable will not click in, the camera photos start looking cloudy, or the screen suddenly has a strange streak that will not leave because the wrong cleaner was used.
A very common experience is the “shirt wipe” habit. Almost everyone has done it. You pull the phone from your pocket, notice fingerprints all over the display, and rub it against a T-shirt, hoodie, or whatever fabric is closest. It feels harmless, but over time it is not great. Clothes can trap dust, and dust plus pressure equals micro-scratches. The result may not be obvious in one day, but after months of rough wiping, the screen never looks quite as crisp.
Another familiar lesson comes from the overconfident spray bottle. People assume that if a cleaner works on eyeglasses, countertops, mirrors, and laptop desks, it should work on a phone too. Then they spray directly onto the device, and the liquid sneaks toward the speaker holes or charging port. Even when nothing catastrophic happens, the phone can end up streaky, smeared, or oddly sticky. That is usually the moment people discover that “more cleaner” does not mean “more clean.”
Charging ports create their own category of regret. Plenty of users have had that moment when the charger feels loose, so they grab whatever thin object is nearby and start digging. A toothpick sounds gentle. A paper clip looks efficient. A sewing pin feels precise. In practice, that is exactly how small debris problems become hardware problems. People often do not realize how delicate those internal contacts are until the cable only works at one angle and panic enters the chat.
On the other hand, people who switch to a simple cleaning routine usually notice that their phones look better with less effort. A microfiber cloth in a desk drawer, nightstand, or backpack pocket solves a surprising amount of daily grime. A quick wipe at night prevents buildup. Removing the case once a week keeps hidden dust from grinding along the frame. Cleaning the camera lens before taking photos makes an immediate difference, especially for night shots and indoor pictures that otherwise look soft or foggy.
There is also the oddly satisfying experience of cleaning a phone correctly for the first time. You power it off, remove the case, wipe it down slowly, clean the edges, polish the lens, and let everything dry. Suddenly the device looks newer, feels nicer to hold, and even seems more expensive, despite being the exact same phone you were angrily judging an hour earlier. Good cleaning does not just remove grime. It changes how the device looks, how it photographs, and how long it stays in good condition.
The biggest lesson from all these experiences is simple: phones do not need aggressive cleaning. They need smart cleaning. Gentle materials, a little patience, and the right products beat brute force every time. The best phone-cleaning routine is not dramatic, flashy, or complicated. It is consistent. That is what keeps a device looking sharp without accidentally turning basic maintenance into a repair story.
Conclusion
If you want to clean your phone the right way, keep it simple: turn it off, remove the case, use a soft lint-free cloth, use only a small amount of approved moisture when necessary, never spray the phone directly, and treat the charging port like a fragile part instead of a lint cave you need to excavate. Clean first, disinfect when needed, and do both with products your device can actually handle.
Your phone is one of the most-used things you own. It deserves better than mystery spray, a crusty paper towel, and blind optimism.