Table of Contents >> Show >> Hide
- What Is Crème Brûlée, Really?
- Why This Creme Brulee Recipe Works
- Ingredients
- Equipment You’ll Want (But Don’t Panic If You Don’t Have It All)
- Step-by-Step: Classic Creme Brulee Recipe
- 1) Heat the oven and prep the pan
- 2) Infuse (or warm) the cream
- 3) Whisk yolks, sugar, and salt
- 4) Temper the yolks (aka “Don’t Make Sweet Scrambled Eggs”)
- 5) Strain for ultra-smooth custard
- 6) Fill ramekins
- 7) Add the water bath (bain-marie)
- 8) Bake until just set
- 9) Cool, then chill
- 10) Brûlée the top right before serving
- Custard Science (The Useful Kind)
- Troubleshooting: Common Problems (and How to Fix Them)
- Flavor Variations (Because Vanilla Isn’t the Only Main Character)
- Make-Ahead, Storage, and Serving Tips
- FAQ: Creme Brulee Recipe Questions
- Conclusion
- Creme Brulee Experiences: What It’s Like Making It at Home (The Real-Life Part)
- SEO Tags
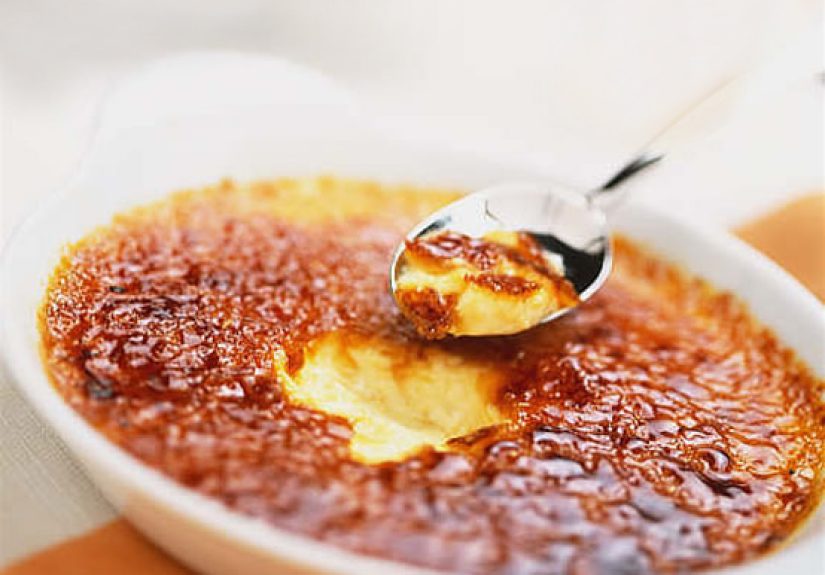
Cracking through that glassy caramel lid with a spoon is one of life’s tiny, dramatic joys. (It’s like dessert ASMR, but edible.)
This Creme Brulee Recipe walks you through a classic vanilla custard that’s silky underneath and gloriously crunchy on toprestaurant vibes, no tuxedo required.
What Is Crème Brûlée, Really?
Crème brûlée is a rich baked custardusually vanillaserved cold with a thin layer of sugar caramelized into a brittle, crackly crust.
You get contrast: cold, creamy custard + warm(ish), shattery caramel. It’s fancy because it sounds fancy, not because it’s impossible.
The “secret” is gentle baking (hello, water bath) and stopping before the custard gets pushy and overcooked. Think “set with a wobble,” not “stiff like a bad handshake.”
Why This Creme Brulee Recipe Works
- Egg yolks only for a lush, creamy texture (whole eggs can set firmer and less dreamy).
- Water bath baking cushions the heat, helping the custard cook evenly without curdling around the edges.
- Straining removes any stubborn bits (and instantly upgrades your “chef energy”).
- Chilling gives the custard time to fully set, so the topping can be torched without turning your dessert into crème brûlée soup.
Ingredients
Makes: 6 servings (4–6 oz ramekins)
For the Custard
- 2 cups (480 ml) heavy cream
- 5 large egg yolks
- 1/3 cup (65–70 g) granulated sugar
- Pinch of salt (tiny ingredient, big impact)
- 1 vanilla bean (split and scraped) or 2 teaspoons pure vanilla extract or 1–2 teaspoons vanilla bean paste
For the Caramelized Sugar Topping
- 6–8 teaspoons granulated sugar (about 1–1 1/2 teaspoons per ramekin)
Note on sugar: Regular granulated sugar caramelizes predictably and evenly. Coarser “raw” sugars can work, but they’re harder to melt uniformly and can trick you into over-torching.
Equipment You’ll Want (But Don’t Panic If You Don’t Have It All)
- 6 ramekins (4–6 oz is ideal; shallower ramekins give you more of that iconic sugar crust)
- Roasting pan or deep baking dish for the water bath
- Kettle or saucepan to heat water
- Whisk and mixing bowl
- Fine-mesh strainer
- Kitchen torch (best) or your oven broiler (works, but needs attention like a toddler with markers)
- Instant-read thermometer (optional, but very helpful for confidence)
Step-by-Step: Classic Creme Brulee Recipe
1) Heat the oven and prep the pan
Preheat your oven to 325°F. Arrange ramekins in a roasting pan with high sides.
Put a kettle of water on to heat (you’ll want it hot for the water bath).
2) Infuse (or warm) the cream
Pour the heavy cream into a saucepan. If using a vanilla bean, split it lengthwise and scrape the seeds into the cream; toss in the pod too.
Warm the cream over medium heat until it’s steaming and just shy of simmering (small bubbles around the edges, not a rolling boil).
Turn off the heat and let it sit 10 minutes to steep. Remove the pod.
If using vanilla extract instead, add it later after tempering (extract is delicate and doesn’t love prolonged heat).
3) Whisk yolks, sugar, and salt
In a bowl, whisk egg yolks, granulated sugar, and salt until the sugar begins to dissolve and the mixture looks slightly lighter.
You’re not trying to whip air into itno custard needs a bubble personality.
4) Temper the yolks (aka “Don’t Make Sweet Scrambled Eggs”)
Slowly drizzle about 1/2 cup of warm cream into the yolk mixture while whisking constantly.
Then gradually whisk in the rest of the cream. If using vanilla extract, whisk it in now.
5) Strain for ultra-smooth custard
Pour the mixture through a fine-mesh strainer into a large measuring cup or bowl with a spout.
This catches any tiny bits and helps your final texture feel professionally smug.
6) Fill ramekins
Divide custard evenly among ramekins. If you see bubbles on top, gently skim them or let the ramekins sit for a minute so bubbles pop.
7) Add the water bath (bain-marie)
Place the roasting pan on the oven rack (pulled out slightly). Carefully pour hot water into the pan until it reaches about halfway up the sides of the ramekins.
Try not to splash water into the custardthis is crème brûlée, not crème “surprise puddle.”
Pro tip: Hot water that’s just off the boil is ideal; you’re building a gentle heat blanket, not a jacuzzi set to “lobster.”
8) Bake until just set
Bake at 325°F until the edges are set and the centers still wobble slightly when nudged:
- 4 oz ramekins: about 30–35 minutes
- 6 oz ramekins: about 35–45 minutes
If you’re using a thermometer, aim for about 170–176°F in the center. Over that, and the custard can turn grainy.
9) Cool, then chill
Carefully remove ramekins from the water bath (use tongs or a towel). Cool at room temperature for 15–20 minutes,
then refrigerate at least 2 hours, ideally overnight.
10) Brûlée the top right before serving
Right before serving, blot any condensation on the custard surface with a paper towel (dry top = better crack).
Sprinkle 1–1 1/2 teaspoons sugar evenly over each custard in a thin layer.
With a torch: Move the flame in small circles, melting sugar evenly until it turns amber and glossy.
Let sit 1–2 minutes to harden into that iconic “tap tap CRACK.”
With a broiler: Place ramekins on a tray, broil close to the heat, and watch like it’s the final minute of a playoff game.
It can go from “golden” to “burnt campfire” fast. Rotate if needed for even browning.
Custard Science (The Useful Kind)
Why the water bath matters
Custards hate aggressive heat. A water bath keeps the cooking gentle and more even, so edges don’t over-set before centers catch up.
It’s the difference between “silky” and “why does this taste like sweet omelet?”
How to know it’s done
The center should jiggle like set Jell-O, not slosh like a latte. Custard continues to set as it cools, and fully firms in the fridge.
If you bake until it’s completely firm in the oven, it’s usually already gone too far.
Troubleshooting: Common Problems (and How to Fix Them)
My custard is grainy or curdled
That usually means it baked too hot or too long. Next time, pull it earlier, lean on the water bath, and consider checking temperature near the end.
There are lots of bubbles on top
You may have whisked too vigorously or poured too quickly. Straining helps, and letting the custard rest briefly before baking can reduce bubbles.
It’s too loose or watery
It may be underbaked or under-chilled. Make sure the custard jiggles but isn’t liquid in the center, and chill at least 2 hours.
The sugar won’t melt evenly
Use a thinner, even layer of sugar. If it’s piled up, it melts unevenly. Also, keep the torch movinghovering in one spot makes bitter patches.
My topping turned soft after torching
Sugar attracts moisture. Torch right before serving, and blot the custard surface dry first. Humid kitchens are basically sugar’s nemesis.
Flavor Variations (Because Vanilla Isn’t the Only Main Character)
Citrus
Add 1–2 teaspoons finely grated orange or lemon zest to the warm cream. Strain well so the custard stays smooth.
Coffee
Dissolve 1–2 teaspoons espresso powder into the warm cream. It adds a grown-up bitterness that plays beautifully with caramel.
Chocolate
Stir 3–4 ounces melted bittersweet chocolate into the warm cream before tempering. Keep the bake gentlechocolate custards can overcook too.
Maple
Replace part of the sugar with pure maple syrup (start with 2–3 tablespoons) for a deeper, cozy sweetness. Taste the custard base before baking.
Entertaining-friendly “big dish” brûlée
You can bake crème brûlée in a wider, shallow baking dish (instead of ramekins) for a shareable versionmore surface area means more caramelized sugar per bite.
Just adjust bake time and watch closely.
Make-Ahead, Storage, and Serving Tips
Make-ahead
Bake the custards up to 2 days ahead. Keep them covered in the refrigerator. Torch the sugar topping right before serving for best crunch.
Storage
Plain custards keep well in the fridge. Once you brûlée the top, it’s best eaten sooncrispy sugar and time are not close friends.
Serving ideas
- Fresh berries (strawberries, raspberries) for bright contrast
- Espresso or strong coffee (caramel loves caffeine)
- A small cookie on the side if you want extra crunch without extra torching
FAQ: Creme Brulee Recipe Questions
Do I really need a kitchen torch?
It’s the easiest way to get an even crust without overheating the custard. But if you don’t have one, a broiler can workjust watch closely and rotate for even browning.
Can I use half-and-half instead of heavy cream?
You can swap in some half-and-half for a lighter custard, but the classic luxurious texture comes from heavy cream. If you go lighter, be extra careful not to overbake.
Why does my crème brûlée taste “eggy”?
Usually it’s from overheating or overbaking, not from using yolks. Bake gently and stop when the center still wobbles slightly.
How thick should the sugar topping be?
Thin and even. If it’s too thick, it can taste bitter and take longer to meltmeaning the custard below gets warmer than it wants to be.
Conclusion
If you can whisk, pour, and resist the urge to bake “just five more minutes,” you can master this Creme Brulee Recipe.
The payoff is huge: a silky vanilla bean custard with a caramelized sugar topping that cracks like stained glass.
Make it once for a dinner party and you’ll immediately become “the person who makes crème brûlée.”
(This is a powerful social title. Use it wisely.)
Creme Brulee Experiences: What It’s Like Making It at Home (The Real-Life Part)
The first time most home cooks try crème brûlée, the nerves arrive right on scheduleusually around the moment the hot cream meets the egg yolks.
It’s normal to hover over the bowl like it’s defusing a dessert bomb. The good news: once you understand tempering (slowly warming the yolks so they don’t scramble),
the whole process suddenly feels less like a high-stakes cooking show and more like a calm, satisfying routine.
One of the most common “aha” moments happens at the oven. People expect the custard to look fully firm when it’s donebecause that’s what cakes do.
Custard is different. The best batches come out with a gentle jiggle in the center, which can feel wrong until you chill it and realize: the fridge finishes the job.
If you’ve ever baked it until completely solid, then wondered why it was grainy the next day, you’ve met the classic overbake lesson.
The experience teaches patience in a very sweet way.
Then comes the toppingthe part that turns a simple custard into a party trick. Using a kitchen torch for the first time is often hilarious:
people either hold it too close (creating a tiny sugar volcano) or too far (warming the sugar but not caramelizing it, like dessert sunbathing).
After a ramekin or two, muscle memory kicks in: keep the flame moving, aim for even amber, and stop the second it smells like caramel instead of “campfire.”
That first clean crack with the spoon? Instant pride. It’s hard not to grin like you just won a tiny trophy.
Real-life kitchens also bring real-life improvisations. Maybe you don’t have a torch, so you try the broiler and learn that it’s fastvery fast.
People often end up standing there with the oven door cracked, rotating the pan every few seconds, refusing to blink.
When it works, it’s a victory story. When it doesn’t, it’s still edibleand you learn to broil with the same focus you’d use to watch a pet near an open bag of treats.
Crème brûlée also becomes a personal “hosting signature” for many folks because it’s make-ahead friendly.
The custards can chill overnight, which means you’re not scrambling to bake dessert while guests are arriving.
The torching happens at the end, so you get a fresh crunch at the tableand a little moment of theater.
Some people even set up a “brûlée station” where everyone torches their own ramekin (carefully), which turns dessert into an activity instead of a formality.
Over time, home cooks start customizing: orange zest in winter, espresso for dinner parties, a whisper of maple when brunch needs a glow-up.
The dessert becomes less intimidating and more like a reliable friendalways impressive, rarely difficult, and ready to make you look like you planned your life better than you actually did.
And honestly, that might be the best part of the crème brûlée experience: it teaches technique, rewards patience, and delivers a crackly top that feels like applause.