Table of Contents >> Show >> Hide
- Step 1: Decide What Kind of Stone Wall You’re Building
- Step 2: Plan the Layout and Design
- Step 3: Gather Tools and Materials
- Step 4: Lay Out and Excavate the Trench
- Step 5: Set the First Course (The Make-or-Break Layer)
- Step 6: Build Up the Wall with Batter and Tie Stones
- Step 7: Drainage and Backfilling (The Secret to a Wall That Lasts)
- Step 8: Cap and Finish the Wall
- Design Tips to Make Your Stone Wall Beautiful
- Safety, Permits, and When to Call a Pro
- Basic Maintenance for a Long-Lived Stone Wall
- Real-World Experiences: What You Learn Once You Start Moving Rocks
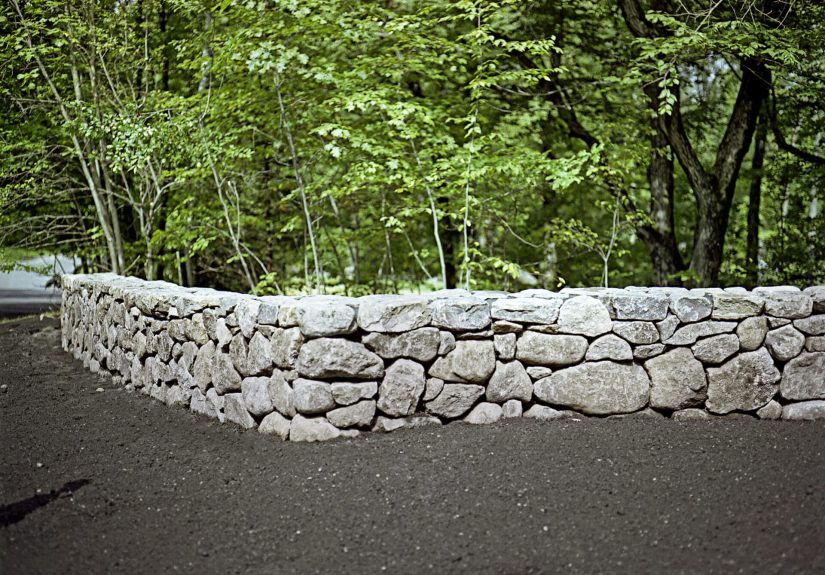
There’s something wonderfully old-soul about a stone wall. It’s part fence, part sculpture, and part “I can absolutely move this 80-pound rock myself” confidence booster.
Whether you’re channeling classic This Old House vibes or just want a solid, good-looking boundary for your yard, building a stone wall is one of those DIY projects that can outlast youin a good way.
In this guide, we’ll walk through how to build a functional and beautiful stone wall, from planning and layout to the last capstone. We’ll talk about drainage (because water is sneaky), appearance (because curb appeal is real), and the small pro tricks that turn a pile of stone into a wall that looks like it’s always been there.
Step 1: Decide What Kind of Stone Wall You’re Building
Before you rent a plate compactor and start digging up your yard, get clear on what kind of wall you’re actually building. Different wall types have different structural needs.
Freestanding vs. Retaining Wall
- Freestanding stone wall: A wall that sits on level ground and doesn’t hold back soil. Think classic garden border, property line, or decorative seating-height wall.
- Retaining wall: A wall that holds back a slope or terrace. This type deals with lateral soil pressure and needs special attention to drainage, height limits, and structural details.
For most homeowners, a low freestanding or short retaining wall (under about 3 feet) is the sweet spot for a DIY project. Anything taller usually calls for engineering, permits, or a pro masonespecially where frost, heavy rainfall, or steep grades are involved.
Dry-Stacked vs. Mortared vs. Prefab
- Dry-stacked stone wall: Built by carefully stacking stones without mortar, usually over a compacted crushed-stone base. It drains well and looks traditional.
- Mortared stone wall: Stones are set in mortar over a concrete or masonry base. Strong and durable, but more work, more tools, and less forgiving if water can’t escape properly.
- Prefab stone system: Factory-built panels or modular blocks with a stone facing. Faster and more predictable, great if you love the stone look but not the idea of fitting every rock by hand.
In classic This Old House fashion, we’ll focus on a dry-stacked or lightly mortared fieldstone-style wallsomething you can build with patience, a weekend or three, and a good back brace.
Step 2: Plan the Layout and Design
A good stone wall starts on paper, not in a pile of rocks on your driveway.
Sketch the Wall
- Measure the length, desired height, and approximate thickness of the wall.
- Plan gentle curves instead of sharp corners; they’re easier to build and look more natural.
- Decide whether the wall will end in square “pillars” or fade softly into the landscape.
As a rule of thumb, many dry stone experts suggest the wall thickness be roughly half the wall’s height for stability (for example, a 3-foot-tall wall is about 18 inches thick at the base). A slight lean (called “batter”) of about 2 inches back toward the soil for every foot of height helps the wall resist outward pressure and look intentional rather than tipsy.
Choose the Right Stone
Your stone choice affects both looks and buildability:
- Fieldstone: Rounded or irregular stones with tons of character. Gorgeous, but requires more puzzle-solving.
- Quarried stone: More regular sizes and shapes (like rectangles or flat “ledge” stone). Easier to stack, cleaner lines.
- Local stone: Matches your region’s look and often costs less. Plus, it helps your wall look like it grew out of the site.
You’ll want a mix of:
- Big base stones: For the first course.
- Shaping stones: Medium pieces to build up the face and interior.
- Tie stones: Long stones that run from the front of the wall to the back, literally tying the two sides together.
- Capstones: Flat stones for the top course for sitting, leaning, or balancing coffee mugs.
Step 3: Gather Tools and Materials
At minimum, you’ll need:
- Stake and string line
- Tape measure
- Shovel and trenching spade
- Hand tamper or plate compactor (highly recommended)
- Wheelbarrow
- Landscape fabric
- Crushed stone or gravel (typically 3/4-inch angular stone)
- Work gloves, safety glasses, steel-toed boots
- Masonry hammer and/or chisel for shaping stones
- Level (2- to 4-foot) and torpedo level for checking individual stones
For a wall that’s both functional and long-lasting, don’t skimp on base gravel and drainage materials. Those are the “boring” parts that keep your pretty wall from bulging or collapsing a few winters from now.
Step 4: Lay Out and Excavate the Trench
Mark the wall location using stakes and a taut string line at the planned front edge. This keeps things straight (or smoothly curved) and prevents the classic “I swear it looked straight yesterday” problem.
Dig the Footing Trench
Dig a trench centered under your string line:
- Depth: Typically 6–8 inches below grade for a low garden wall; deeper in cold climates or for taller walls.
- Width: At least twice the width of the wall, so you have a stable base and room for drainage stone.
Remove any soft topsoil, roots, or organic materialyour wall should sit on stable subsoil, not decomposing muck. Slope the bottom of the trench very slightly to direct water away from structures, or to a place where it can drain harmlessly.
Add Landscape Fabric and Base Gravel
Line the trench with landscape fabric, overlapping seams by about 12 inches. This keeps soil from migrating into your gravel base while still letting water pass through. Then:
- Pour in a few inches of 3/4-inch crushed stone.
- Compact it thoroughly with a plate compactor or hand tamper.
- Add more gravel in 2-inch “lifts,” compacting between each layer until you have a dense base.
Aim to stop the top of the base gravel about 6–8 inches below final grade, leaving room for your first course of buried stones. Some pros bury roughly 2 inches of stone for every foot of wall height to lock the base course into the ground and resist movement.
Step 5: Set the First Course (The Make-or-Break Layer)
The first course is like the foundation of a houseif it’s crooked, everything above it will try to follow.
- Choose your largest, flattest stones for the bottom row. These are your “footers.”
- Set each stone on the compacted base, seating it firmly into the gravel. If a stone wobbles, pull it, add or remove a bit of gravel, and reset.
- Keep the front faces aligned with your string line and check the tops with a level. The wall can follow the terrain, but each individual stone should feel stable.
Take your time here. It’s much easier to fuss over level and alignment in the first course than to correct a tilting wall three feet in the air.
Step 6: Build Up the Wall with Batter and Tie Stones
Once the base course is solid, you can start stacking. This is the part where your inner stonemason gets to play Tetris in three dimensions.
Break the Joints
Avoid having vertical joints line up between courses. Each stone should overlap the joint beneath it, like brickwork. This interlocks the wall and keeps it from splitting along weak lines.
Pitch Stones Toward the Center
Instead of letting stones tilt outward, pitch them slightly into the wall. That way, gravity pushes them in toward the core, not out onto your toes.
Add Tie Stones
Every few feet along the wall and every couple of courses, place a long “tie stone” that spans the full width of the wall. These work like rungs on a ladder, knitting the front and back together and creating a single, unified structure instead of two stacked faces.
Maintain the Batter
Use a simple batter board or a template to keep the wall leaning very slightly back toward the soil it’s retaining. For many dry stone walls, a batter of about 1–2 inches per vertical foot is common. It’s subtle to the eye but makes a big difference in stability.
Step 7: Drainage and Backfilling (The Secret to a Wall That Lasts)
Water is the quiet villain of retaining walls. Without a way out, it builds up pressure and pushes on the wall from behind.
As you build:
- Backfill behind the wall with free-draining gravel, not soil, especially for retaining walls.
- Compact the backfill in layers as you go so it doesn’t settle later and pull on the wall.
- In wetter areas or for taller retaining walls, add a perforated drain pipe at the base of the wall, sloped to daylight.
For decorative freestanding walls, you may not need a full drainage system, but it’s still smart to avoid trapping water. A gravel core between the two faces of the wall is a simple way to let rainwater pass through instead of pushing outward.
Step 8: Cap and Finish the Wall
When you reach your target height, it’s time for the finishing touch that makes the wall feel intentional: the capstones.
- Pick the flattest, widest stones for the top course so the wall is comfortable to sit on and visually “finished.”
- For a mortared top, you can butter the capstones with mortar and set them for added stability and a more formal look.
- Slightly overhang the capstones on each side to shed water and protect the face of the wall.
Once the cap is on, backfill any final low spots behind the wall, rake your soil smooth, and add mulch, plants, or gravel paths to integrate the wall into the landscape.
Design Tips to Make Your Stone Wall Beautiful
A functional wall is great. A wall that looks like it belongs on the cover of a landscape magazine is better.
- Stay consistent with stone: Mixing too many stone types can look chaotic. Stick to one main type, or at least one dominant color.
- Vary stone sizes: Use large stones at the bottom, medium in the middle, and smaller ones for infill and the upper courses to create a stable, natural progression.
- Repeat special stones: If you have a particularly striking stone, echo its color or shape elsewhere so it doesn’t feel random.
- Layer with planting: Low-growing perennials, ornamental grasses, and creeping thyme soften the edges and make the wall feel like part of the garden, not just a boundary line.
- Mind the height: A 16–24-inch wall makes a perfect casual seat. Taller than that and it becomes more of a barrier; shorter and it reads as edging.
Safety, Permits, and When to Call a Pro
Stone walls look old-fashioned, but local building codes are very modern. Some areas require permits or even engineering for walls above a certain height (often around 3–4 feet), especially retaining walls near driveways or structures.
Consider hiring a pro or at least getting professional advice if:
- The wall will be taller than 3–4 feet.
- It’s close to a house foundation, driveway, or public sidewalk.
- You’re dealing with steep slopes, heavy clay soil, or drainage issues.
- You have limited mobility or are not used to heavy physical workstone is no joke.
Even for smaller projects, protect yourself with good gloves, steel-toed boots, and proper lifting techniques. Stones don’t bounce.
Basic Maintenance for a Long-Lived Stone Wall
The beauty of a well-built stone wall is how little maintenance it really needs. Still, a quick annual checkup keeps small issues from becoming big repairs.
- Inspect after winter for bulging, loose stones, or fresh cracks.
- Clear vegetation that’s trying to grow through the wall, especially woody roots.
- Brush off moss if you prefer a clean look, or leave it if you like that ancient-farmhouse aesthetic.
- Replace or reset any loose stones before they shift more and destabilize higher courses.
A little attention goes a long way. A good stone wall doesn’t need to be perfect; it just needs to stay solid and safe while it slowly develops character.
Real-World Experiences: What You Learn Once You Start Moving Rocks
You can read all the guides in the worldand you shouldbut building a stone wall also teaches you things you only discover when you’re knee-deep in gravel and wondering why that one weirdly shaped stone refuses to fit anywhere.
1. Stone Walls Are Built with Time as Much as Muscle
The first surprise for most DIYers is how long it really takes. A 20-foot-long, 2-foot-high wall seems small on paper, but each stone you place is a decision. You’ll try a rock in one spot, realize it leaves a gap, rotate it, move it, trade it for another, and suddenly 20 minutes have passed on a single course. That’s normal. The result looks effortless precisely because you put in the effort.
A smart approach is to treat the project in sections. Instead of trying to build the whole wall in one grueling weekend, break it into manageable runssay, 6–8 feet at a time. That way your body, and your motivation, don’t give up halfway through.
2. Sorting Stones First Saves You Later
One of the best “why didn’t I do this earlier?” moments comes when you start sorting your stone pile. Instead of grabbing randomly, take an hour to group stones: big footers in one stack, medium face stones in another, skinny fillers somewhere else, and capstones off to the side.
When the wall is underway, you’ll be able to walk over and think, “I need a tall face stone with a flat top,” and actually find one. The wall grows faster, and you wind up with more consistent, attractive courses instead of random stone chaos.
3. Gravity Is Your Frenemy
You quickly learn that a stone that looks fine from the front might be waiting to roll outward over time. That’s why pitching stones slightly inward and keeping that batter is so important. When you set a stone, give it a “wiggle test”: push on the face, see if it rocks or feels like it’s trying to walk out of the wall.
If a stone feels even slightly unstable when you place it, fix it right then. Add a bit more gravel behind, swap it with a better-shaped rock, or use a smaller stone to wedge it in place. Hoping it will “settle in later” usually means revisiting that spot next spring with a bigger problem.
4. Drainage Is BoringUntil It Isn’t
Most people don’t get excited about perforated pipe and crushed stone. But if you’ve ever seen a wall bow outward or crack a few years after it’s built, you know water was probably the culprit. Once soil gets saturated and can’t drain, it pushes hard on anything in its way.
The DIYers who are happiest five years later are almost always the ones who spent extra time on drainagedigging the trench just a bit deeper to fit gravel, laying a pipe where water collects, and making sure there’s somewhere for that water to go. The wall gets the compliments, but the drainage system is the quiet hero.
5. Your Wall Changes Your Yard More Than You Expect
Building a stone wall doesn’t just add a line of rock; it subtly redraws how you use your space. A low wall might become a favorite seat for morning coffee, an impromptu kids’ balance beam, or a place to tuck planters and lanterns. A retaining wall can turn a steep, awkward hillside into a usable terrace where you can actually put a chairor a grill, if you’re living the dream.
Many homeowners find themselves designing around the wall once it’s in place: adding a path along it, planting a row of lavender at the base, or using it to frame a fire pit area. That’s the real beauty of a well-built stone wall: it doesn’t just sit there. It reshapes how your home feels and functions, the way the best This Old House projects always do.
6. Imperfections Make It Charming
Finally, there’s the mindset shift. At first, you may obsess over every tiny gap or less-than-perfectly-square corner. But traditional stone walls were never machine-perfect. They follow the land, they lean a little, they carry the memory of the hands that built them.
As long as your wall is structurally soundsolid base, good batter, properly stacked coursesthose small imperfections are exactly what makes it beautiful. The goal isn’t to build a concrete wall wearing a stone costume. It’s to create something that looks like it belongs to your site and could plausibly have been there for decades, even if you finished it yesterday.
In the end, building a functional and beautiful stone wall is part engineering, part art, and part stubbornness. But when you step back and see that ribbon of stone tracing across your yard, knowing every rock is there because you put it there, it’s hard not to feel just a little bit like a This Old House crew member on your own property.