Table of Contents >> Show >> Hide
- Is a Plywood Spiral Staircase Actually a Good Idea?
- A Quick Reality Check: Codes, Permits, and Your Future Self
- Three Plywood-Friendly Spiral Stair Designs That Actually Work
- Planning Like a Pro: Layout, Math, and Not “Vibes”
- Materials: What Plywood to Buy (and What to Avoid)
- Tools You’ll Actually Use
- Build Process: A Practical, Repeatable Workflow
- Step 1: Model the staircase (even if it’s “simple”)
- Step 2: Make a master tread template
- Step 3: Cut your treads (and keep them identical)
- Step 4: Build the supporting structure
- Step 5: Dry-fit everything (yes, everything)
- Step 6: Final assembly and reinforcement
- Step 7: Guardrails and handrails (the part everyone forgets)
- Finishing: Make Plywood Look Like a Design Choice (Because It Is)
- Common Mistakes (and How to Avoid Them)
- Cost and Time: What to Expect
- Conclusion: Build It Like You Plan to Use It
- Real-World Lessons From the Sawdust Zone (Experience + Wisdom + Minor Regrets)
If you’ve ever looked at a spiral staircase and thought, “Wow, that’s beautiful… and also probably expensive,” welcome. You are among friends. The good news: a plywood spiral staircase can be a legitimate, sturdy, show-off-worthy project. The slightly-less-good news: it’s also the kind of project that rewards planning and punishes “winging it” with the emotional maturity of a honey badger.
This guide walks you through practical design approaches, material choices, layout logic, assembly strategy, and the not-so-glamorous safety realities that keep your staircase from becoming a viral “DIY fail” montage. We’ll keep it fun, but we won’t keep it reckless.
Is a Plywood Spiral Staircase Actually a Good Idea?
It can beif you design it like a staircase and not like a decorative shelf that happens to be shaped like a staircase.
When plywood shines
- Interior feature stairs where you want a clean, modern look (think layered edges, Baltic birch vibes, and “architectural” energy).
- Space-saving access to a loft, studio, reading nook, or mezzanine.
- Custom geometryplywood is easy to template, repeat, and refine.
When plywood is… not the hero
- High-traffic main stairs in a busy household unless you engineer it carefully and build guard/handrail like you mean it.
- Exterior exposure (rain, sun, humidity) unless you’re using exterior-rated materials, excellent sealing, and you enjoy annual maintenance like it’s a hobby.
- Anything structural you’re guessing atspiral loads can be sneaky. If you’re unsure, consult a structural pro. Pride is cheaper than a hospital visit, but only barely.
A Quick Reality Check: Codes, Permits, and Your Future Self
Spiral stairs are heavily scrutinized in many jurisdictions because they’re compact, steep-ish, and easy to make unsafe with tiny errors. Local rules vary, and many places require permits for new stairs, especially if the staircase is part of a required exit path.
Translation: Before you cut plywood, check local building requirements. Don’t treat online “standard measurements” as universal truth. What’s allowed for a loft-access spiral may not be allowed for a primary stair serving bedrooms. Also, your inspector will not accept “but the internet said…” as a structural calculation.
Three Plywood-Friendly Spiral Stair Designs That Actually Work
Most successful plywood spiral staircases fall into one of these categories. Pick the approach that matches your tools, timeline, and tolerance for sanding.
1) The Center-Column Stair (Plywood treads + a real structural post)
This is the “smart shortcut” option: use plywood for the treads and visual structure, while a steel pipe or engineered wood column handles the heavy structural job. The treads attach to brackets or a hub system around the post, then tie into an outer stringer or rim for stiffness.
Why it’s popular: it separates “looks” from “loads,” which is generally a life-enhancing strategy.
2) The Laminated Helical Stringer (bent lamination meets patience)
Here, you build curved stringers by laminating thin layers over forms, creating a smooth spiral frame. The treads then sit on (or between) the stringers. This is gorgeous and very “custom home magazine,” but it’s also form-building, glue-up heavy, and requires consistent accuracy.
Why it’s worth it: the finished result can look like sculpture you happen to walk on.
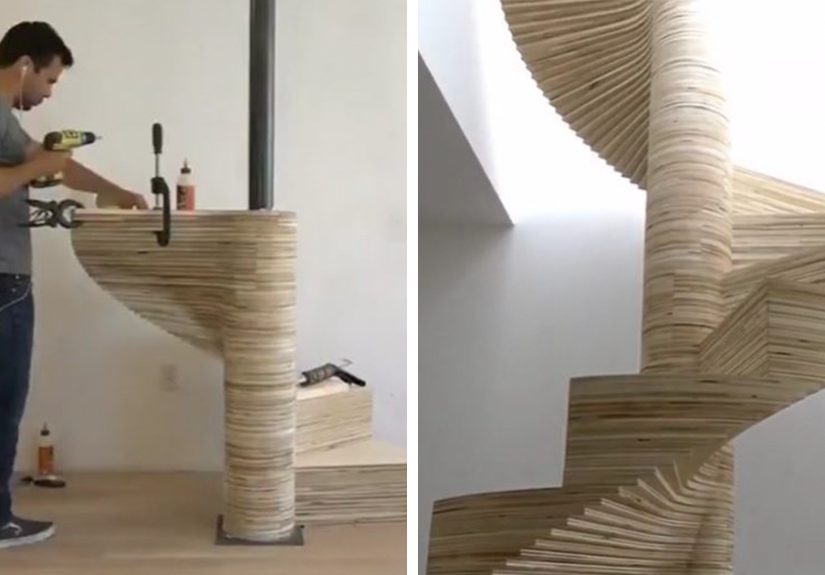
3) The “Layer Cake” Stair (stacked plywood profiles)
Think of each step as a thick block made by laminating multiple plywood layers. If you have CNC access (or you’re very good with templates and a router), you can cut repeatable profiles, stack them, and create a staircase that’s strong, modern, and visually striking.
Why makers love it: repeatability. Also, the layered edge looks cool enough to convince your guests you own at least one turtleneck.
Planning Like a Pro: Layout, Math, and Not “Vibes”
Spiral stairs are geometry with consequences. The two big goals are:
- Comfort: consistent step height and a walkable path that doesn’t feel like tiptoeing around a drain.
- Safety: enough tread depth where people actually step (the “walk line”), plus guard/handrail that prevents “casual falling.”
Start with the space
- Floor-to-floor height: measure finished floor to finished floor (not subfloor, not “close enough”).
- Available diameter: include clearance for handrail, body space, and any nearby doors or windows.
- Landing needs: the top exit mattersspirals can’t just dump you into a corner like a cartoon trapdoor.
Then define the “walk line”
People don’t walk on the narrow inner tip of a spiral tread. They walk farther out. Most codes and good design practices evaluate tread depth at a measured distance from the narrow edge. Your design should make that walking band feel stable, predictable, and non-panicky.
Mockups beat optimism
Make a full-size tread template early. Put it on the floor. Stand on it. Rotate it around an imaginary center. Ask yourself: “Would I carry a laundry basket up this without bargaining with the universe?” If the answer is “absolutely not,” adjust nowbefore you’ve laminated twelve layers into a beautiful mistake.
Materials: What Plywood to Buy (and What to Avoid)
You want plywood that’s flat, strong, and void-free. The cheap stuff can have internal gaps that weaken edges and make fasteners sad.
Recommended plywood types
- Baltic birch (or similar multi-ply panels): great for layered edges, strong, stable, and finishes beautifully.
- Furniture-grade hardwood plywood: good faces, but inspect core quality (voids matter).
- Exterior-rated plywood: if there’s humidity risk, or if you’re sealing aggressively.
Adhesives and fasteners
- Glue: a high-quality wood glue for interior laminations; consider moisture-resistant glue if conditions demand it.
- Screws: don’t rely on screws alone for laminationsglue does the real work, screws are the clamps with benefits.
- Hardware: for posts/brackets/rail connections, use purpose-built hardware or engineered connectionsno “mystery brackets” from a random drawer.
Tools You’ll Actually Use
- Track saw or table saw (for breaking down sheets safely)
- Jigsaw/bandsaw (for curves) or CNC (if you’re living the dream)
- Router + pattern bit (templates are your best friend)
- Drill/driver, clamps (all of them), squares, levels
- Sander (and a willingness to become one with dust)
Build Process: A Practical, Repeatable Workflow
Below is a broadly applicable process that works whether you’re doing a center-post stair or a laminated-frame stair. Adjust details for your chosen design, but keep the sequence: plan → template → repeat → dry-fit → commit.
Step 1: Model the staircase (even if it’s “simple”)
You don’t need a PhD in CAD, but you do need a plan. SketchUp or similar tools are great, but a careful scaled drawing works too. Define:
- Number of steps (based on total rise and comfortable step height)
- Rotation per step (how many degrees each tread turns)
- Outer radius and inner radius (and where people actually step)
- Handrail path and guard locations
Step 2: Make a master tread template
Cut one tread template from MDF or cheap plywood. This is your “truth.” Refine it until you love it. Check that the tread feels stable at the walk line and that the nose doesn’t create a toe-catching situation.
Pro move: mark centerlines, drill reference holes, and label “top/bottom” so you don’t accidentally mirror parts in the most annoying way possible.
Step 3: Cut your treads (and keep them identical)
Spiral stairs look classy when the steps are consistentand feel terrifying when they aren’t. Use your template and a flush-trim router bit for repeatability.
- If you’re laminating thickness: rough-cut layers slightly oversized, glue them up, then trim to final shape.
- If you’re adding a hardwood cap: plan your edge treatment early (banding, solid nosing, or exposed ply).
Step 4: Build the supporting structure
This is where your chosen design matters:
- Center-post stair: install the post plumb, anchor it properly, then fit brackets/hubs that hold each tread securely.
- Laminated stringer stair: build forms, laminate your curved members, then true them up so every tread lands cleanly.
- Layer-cake stair: laminate each tread block, maintain consistent thickness, and plan how blocks connect to the core support and to each other.
Step 5: Dry-fit everything (yes, everything)
Assemble the staircase without glue where possible. Check:
- Step height consistency (small changes feel huge on stairs)
- Rotation alignment (your top landing should land where you intendpreferably not into a wall)
- Head clearance along the path
- Guard locations and handrail grip comfort
If something is off, fix it now. Dry-fit is the phase where you’re allowed to be wrong without it becoming permanent.
Step 6: Final assembly and reinforcement
Once you’re confident, assemble for real. Use glue where your design intends glue, and mechanical fasteners where your design intends fasteners. If you’re unsure whether a joint is structural, treat it as structural and upgrade your connection strategy.
Step 7: Guardrails and handrails (the part everyone forgets)
A spiral staircase without a reliable handrail is just an expensive way to practice balance. Plan the rail early, because it affects clear width, comfort, and code compliance. Common options include:
- Wood rail with vertical balusters: classic, sturdy, friendly to hands.
- Metal balusters with wood top rail: modern and strong.
- Panel guard (glass/acrylic): sleek, but requires careful mounting and thickness choices.
Finishing: Make Plywood Look Like a Design Choice (Because It Is)
The secret to “high-end plywood” is edge strategy plus a durable finish.
Edge options
- Exposed ply: sand it smooth, ease edges, and own the modern look.
- Edge banding: cleaner, more “furniture,” less industrial.
- Solid nosing: protects the front edge and takes stain consistently.
Finish options
- Floor-grade polyurethane: tough, common, reliable.
- Hardwax oil: beautiful and repairable, but follow cure times like your safety depends on it (because traction does).
- Painted risers + clear treads: a classic look that hides scuffs where they happen most.
Don’t skip sealing: plywood edges drink finish like they’ve been hiking in the desert. Seal them properly to prevent fuzzing, moisture uptake, and delamination drama.
Common Mistakes (and How to Avoid Them)
- Inconsistent riser height: this is the #1 way to make stairs feel unsafe. Measure, jig, repeat.
- Designing for the inner point: people step farther out. Make that path comfortable.
- Weak rail planning: guard/handrail needs solid anchoring, not hope and small screws.
- Ignoring head clearance: you should not have to duck like you’re entering a submarine.
- Skipping templates: templates turn “hard” into “repeatable.”
Cost and Time: What to Expect
A plywood spiral can be significantly cheaper than a custom steel spiral, but it’s not “cheap” if you use quality materials, hardware, and finishes. Budget for:
- Good plywood (often multiple sheets)
- Adhesives and fasteners (more than you think)
- Hardware for post/rails (where quality matters)
- Finish products and abrasives (sandpaper is the real currency of DIY)
Time-wise: if you’re doing templates, laminations, and a clean finish, plan on weekendsnot hours. Glue cure time alone will teach you patience. Or at least force you into it.
Conclusion: Build It Like You Plan to Use It
A DIY plywood spiral staircase can be a jaw-dropper: compact, sculptural, and surprisingly strong when designed correctly. The key is separating “looks cool” from “works safely,” then refusing to compromise on the parts that keep humans uprightconsistent step geometry, solid structure, and a properly anchored handrail/guard.
If you do the planning, template your parts, dry-fit obsessively, and finish with durability in mind, you’ll end up with a staircase that feels intentionalnot experimental. And you’ll get the rare DIY reward: something you can brag about and walk on confidently.
Real-World Lessons From the Sawdust Zone (Experience + Wisdom + Minor Regrets)
Let me tell you what nobody puts in the glossy photos: spiral stairs are a relationship test between you and measurement tools. You think you’re detail-orienteduntil you’ve labeled sixteen identical tread blanks and still manage to rotate one the wrong way like it’s auditioning for a “gotcha” prank show.
The first time you build a tread template, you’ll feel weirdly powerful. “Look at me,” you’ll think, “creating geometry.” Then you’ll place it on the floor, stand on it, and realize you’ve designed a step that works beautifully for a raccoon wearing minimalist shoes. That’s normal. Templates are supposed to reveal uncomfortable truths early. Embrace the cringe, because it’s cheaper than rebuilding.
Another lesson: plywood has moods. On paper it’s stable; in real life, it’s stable if you store it flat, acclimate it, and don’t leave it leaning in a damp garage like a sad, soggy tortilla chip. If you laminate thick treads, you’ll learn that clamping pressure is a skillnot a quantity. “More clamps” helps, sure, but “even pressure” is the part that keeps layers from quietly plotting separation.
Also: sanding layered plywood edges is a spiritual journey. At first you’re confident, then you’re dusty, then you’re questioning your life choices, and eventually you reach acceptance. The trick is easing edges early (before finishing) so the stair doesn’t feel sharp or look like it was cut by a pirate. Small roundovers make a huge difference in comfort and durabilityespecially on the tread nose where feet, dogs, and vacuum cleaners collide daily.
Handrails deserve their own confession: it’s easy to treat them like “decor,” right up until you grab one for balance and feel it flex like a pool noodle. If you remember nothing else, remember this: a spiral stair’s handrail is not optional emotionally, even if your brain insists it’s optional aesthetically. Build it sturdy, anchor it into real structure, and test it like you’re the clumsiest person you know. (If you can’t think of anyone, congratulationsyou’re the test subject.)
One of the most practical “experience hacks” is to do a cardboard or cheap-MDF rehearsal. Make a mock tread. Stack a few with spacers to mimic risers. Walk it carefully. Try turning as you climb, because spirals are about turning. You’ll notice immediately whether your walk line feels comfortable or whether your toes are negotiating a narrow edge like they’re trying to parallel park.
Finally, finishing teaches humility. Floors and stairs are not the same as a bookshelf. You need a finish that can take abrasion, occasional moisture, and the reality of grit stuck under shoes. Let finishes cure fully. Don’t rush it because you “just want to try the stairs.” That’s how you end up with a permanent footprint memorialized in polyurethane. Ask me how I know. (Don’t. I will tell you anyway.)
The upside? When it’s done, a plywood spiral staircase feels like functional art. People will run their hand along the layered edge and say, “Waityou built this?” And you’ll casually answer, “Yeah,” while internally screaming, “AND I SURVIVED THE TEMPLATE PHASE.” That’s the DIY glow-up: equal parts craft, math, and stubborn joy.