Table of Contents >> Show >> Hide
- Before You Build: Quick Planning That Saves Money (and Swearing)
- 32 DIY Headboard Ideas (Budget-Friendly, Big Impact)
- 1) Classic Plywood Upholstered Panel
- 2) No-Sew Curtain Headboard
- 3) Tufted Button Headboard (Hotel Energy, DIY Budget)
- 4) Channel-Tufted Look with Simple Batts
- 5) Nailhead Trim Border (Instant “Custom”)
- 6) “Wingback” Headboard (The Cozy Cocoon)
- 7) Pool-Noodle Padded Headboard Hack
- 8) Foam-Tile Headboard Panels
- 9) Fabric-Wrapped Wall Panels (High-End on a Low-End Budget)
- 10) Hanging Quilt “Headboard”
- 11) Rug Headboard (Texture for Days)
- 12) Tapestry with a Slim Wood Frame
- 13) Cane Webbing Insert (Airy, Retro, Trend-Proof)
- 14) Rattan or Bamboo Reed Weave
- 15) Slatted Wood Headboard (Clean and Modern)
- 16) Horizontal Plank Headboard (Beginner-Friendly)
- 17) Shiplap-Style Headboard (Real or Faux)
- 18) Chevron Plank Pattern
- 19) Herringbone Headboard
- 20) Wood Shim Mosaic (Big Style, Small Pieces)
- 21) Painted Arch Faux Headboard
- 22) Wallpaper “Headboard” Panel
- 23) Peel-and-Stick Plank Accent (Wood Look, Less Work)
- 24) Washi Tape Geometry (Dorm-Friendly and Surprisingly Chic)
- 25) Repurposed Door Headboard
- 26) Window Frame Headboard (Charming Cottage Vibes)
- 27) Shutter Headboard (Textured, Lightweight, Easy to Paint)
- 28) Pallet Wood Headboard (Rustic on a Dime)
- 29) Pallet Headboard with Integrated Lights
- 30) Bookshelf Headboard (Storage + Style)
- 31) Floating Headboard with Built-In Nightstands
- 32) Board-and-Batten Wall Headboard (Architectural and Polished)
- Finishing Touches That Make Any DIY Headboard Look Expensive
- Extra: Real-World “DIY Headboard” Experiences (About )
- Conclusion: Your Bedroom Refresh Starts Behind the Pillows
If your bedroom feels a little “meh,” you don’t need a full renovation (or a second job) to fix it.
A headboard is one of the fastest ways to make your bed look intentionallike it belongs in a magazine
instead of “I moved in yesterday and never recovered.”
The best part: DIY headboard ideas range from real woodworking to renter-friendly “fake it” upgrades.
You can go soft and upholstered, rustic and woodsy, modern and geometric, or cozy-boho with textiles.
Most projects here can be done with basic tools, a modest budget, and a willingness to measure twice
(or at least once… with optimism).
Before You Build: Quick Planning That Saves Money (and Swearing)
Pick your “type”
- Bed-attached: Mounts to the bed frame. Good if you move often.
- Wall-mounted: Looks high-end and can go wider than the bed.
- Floor-standing: Leans or attaches lightly; great for apartments and tall designs.
- Faux headboard: Paint, wallpaper, fabric, or decalsmaximum style, minimum commitment.
Get the sizing right
- Width: Match the mattress width, or go 2–12 inches wider for a custom look.
- Height: 24–36 inches above the mattress is common; taller if you want drama.
- Comfort check: If you sit up in bed often, upholstery or a padded top edge is your best friend.
Budget tool kit (no fancy workshop required)
Many of these low-cost headboard builds only need a drill/driver, measuring tape, level, stud finder (for wall mounts),
sandpaper, and paint or a staple gun depending on the style. If you own none of these, pick the “no-build” or “soft build”
projects belowand congratulate yourself on being emotionally mature.
32 DIY Headboard Ideas (Budget-Friendly, Big Impact)
1) Classic Plywood Upholstered Panel
Wrap a plywood rectangle with foam, batting, and fabric, then staple on the back. It’s the gateway project to an
upholstered headboard: clean, customizable, and surprisingly forgiving if your staples look like modern art.
2) No-Sew Curtain Headboard
Use a thick curtain panel as your “fabric,” padding behind it with a cheap mattress topper or foam. Staple it around a board,
hang it, and enjoy the “I totally planned this” vibe for less than a dinner out.
3) Tufted Button Headboard (Hotel Energy, DIY Budget)
Drill button holes in plywood, add foam and fabric, then pull covered buttons through and tie off in back.
The result looks expensiveeven if your button spacing was guided by “close enough.”
4) Channel-Tufted Look with Simple Batts
Create vertical channels using thin foam strips or batting lines under fabric. This delivers that modern, tailored look
without the full tufting commitment (or the emotional roller coaster).
5) Nailhead Trim Border (Instant “Custom”)
Add nailhead strips along the edges of an upholstered board. It’s the design equivalent of putting on a blazer
suddenly your headboard is “dressed.”
6) “Wingback” Headboard (The Cozy Cocoon)
Add side “wings” to an upholstered frame for a boutique-hotel silhouette. Great if your bed sits in the middle of the room
and you want it to look finished from every angle.
7) Pool-Noodle Padded Headboard Hack
For a soft, ribbed look on a small budget, foam pool noodles can create plush ridges under fabric.
It’s delightfully weirdand weirdly effective.
8) Foam-Tile Headboard Panels
Upholstery foam tiles (or acoustic tiles covered in fabric) can be arranged into a grid. This is modular, easy to replace,
and perfect if you like changing your mind seasonally.
9) Fabric-Wrapped Wall Panels (High-End on a Low-End Budget)
Wrap several thin boards in matching fabric and mount them side-by-side for a wide, luxe look. Bonus: seams read as “intentional design,”
not “I ran out of plywood.”
10) Hanging Quilt “Headboard”
Hang a favorite quilt or textile from a rod above the bed. It adds pattern, warmth, and sound-softening textureplus you can swap it out
whenever you find a thrift-store treasure.
11) Rug Headboard (Texture for Days)
Mount a small rug or runner behind the bed for instant boho texture. It’s a great way to use that gorgeous rug you love…
but don’t want to vacuum daily.
12) Tapestry with a Slim Wood Frame
Stretch a tapestry over a simple frame so it stays taut (no sad sagging). This keeps the look crisp while staying renter-friendly.
13) Cane Webbing Insert (Airy, Retro, Trend-Proof)
Build a basic wood frame and staple cane webbing inside. It’s lightweight, breathable, and nails that vintage-meets-modern feel.
14) Rattan or Bamboo Reed Weave
Create a crisscross or woven pattern using bamboo reeds or rattan. It reads artisan and intentionaleven if you listened to a podcast
the whole time and forgot what day it was.
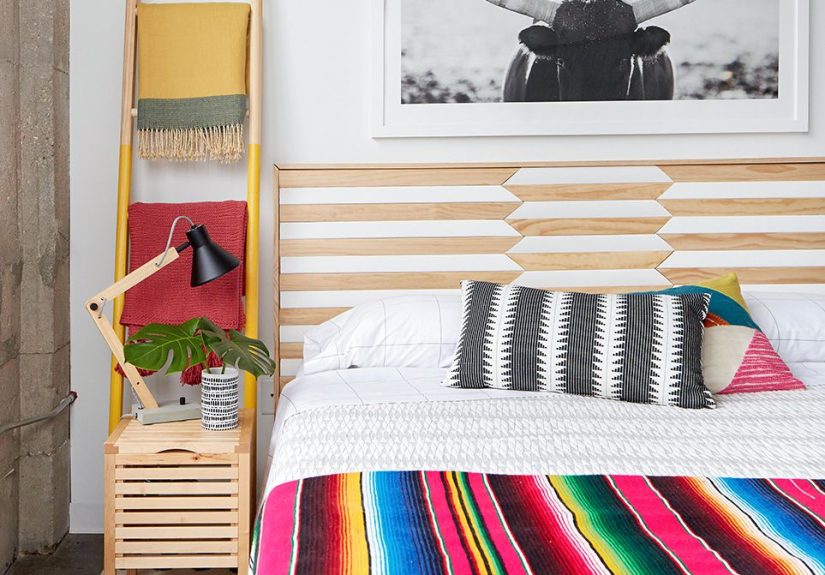
15) Slatted Wood Headboard (Clean and Modern)
Evenly spaced vertical slats make your bed look architect-designed. Paint it black for modern, stain it for warm, or go natural for Scandinavian calm.
16) Horizontal Plank Headboard (Beginner-Friendly)
Attach planks across a backer board, then sand and stain. This is one of the most approachable wood headboard builds,
and it looks great in farmhouse, rustic, or casual bedrooms.
17) Shiplap-Style Headboard (Real or Faux)
Use boards, MDF strips, or even thin paneling to get that shiplap look. Paint it bright for coastal, or moody for “modern cabin retreat.”
18) Chevron Plank Pattern
Cut boards at angles to form a chevron. This looks high-end because your brain knows it required mathwhich is basically luxury.
19) Herringbone Headboard
Similar to chevron, but with staggered “L” joints. It’s timeless, looks custom, and makes even plain bedding feel more intentional.
20) Wood Shim Mosaic (Big Style, Small Pieces)
Wood shims are inexpensive and easy to cut. Arrange them in a geometric pattern, stain, and seal. The result: a textured feature that costs far less than it looks.
21) Painted Arch Faux Headboard
Paint a large arch behind the bed to mimic a headboard shape. Perfect for renters (with removable paint options where allowed) and
for people who want a refresh without lifting anything heavier than a paintbrush.
22) Wallpaper “Headboard” Panel
Apply peel-and-stick wallpaper to a large board or directly on the wall in a headboard shape. This gives you pattern and color without a bulky build.
23) Peel-and-Stick Plank Accent (Wood Look, Less Work)
Peel-and-stick planks can mimic reclaimed wood with less cutting and sanding. Add a trim border for a finished, built-in look.
24) Washi Tape Geometry (Dorm-Friendly and Surprisingly Chic)
Use washi tape to create stripes, triangles, or a minimalist “outline headboard.” It’s cheap, temporary, and a great option if you change your mind a lot
(which is also known as “having taste”).
25) Repurposed Door Headboard
Old doors make stunning headboardsespecially paneled ones. Sand, paint, or stain, then mount securely.
It’s thrifted character with instant height and presence.
26) Window Frame Headboard (Charming Cottage Vibes)
A salvaged window frame can create a light, airy focal point. Add a shelf ledge across the bottom for a practical spot for art, a phone,
or that water glass you swear you’ll finish.
27) Shutter Headboard (Textured, Lightweight, Easy to Paint)
Old shutters are made for this job. Mount them side-by-side, paint them one bold color, and you’ve got a headboard that looks curated, not cobbled.
28) Pallet Wood Headboard (Rustic on a Dime)
Pallet planks can be disassembled, sanded, and attached to a frame or backer board. Choose this if you love rustic texture and don’t mind a little extra sanding therapy.
29) Pallet Headboard with Integrated Lights
Add LED strip lighting or small puck lights for a glow-up that’s literal. Keep cords tidy, use safe-rated lighting, and route power thoughtfully.
Cozy lighting can make a budget bedroom feel boutique.
30) Bookshelf Headboard (Storage + Style)
Build a shallow ledge or full shelf unit behind the bed for books, art, plants, and chargers. It’s a headboard that earns its keeplike a roommate who does dishes.
31) Floating Headboard with Built-In Nightstands
Create a wall-mounted headboard panel that extends beyond the bed, then add small floating shelves as nightstands.
It looks custom, saves floor space, and makes tiny rooms feel smarter.
32) Board-and-Batten Wall Headboard (Architectural and Polished)
Build a board-and-batten treatment behind the bed to frame it like a feature wall. Paint it the same color as the wall for subtle texture
or go contrasting for maximum statement.
Finishing Touches That Make Any DIY Headboard Look Expensive
Sand, seal, and soften edges
For wood builds, a quick sand and a protective topcoat help your headboard age well (and avoid splintersbecause nothing ruins a relaxing bedroom like surprise lumber attack).
Mount safely (especially wall-mounted designs)
Use a stud finder and appropriate hardware, and keep heavier pieces anchored securely. If you’re not sure, choose a floor-standing design or a faux headboard approach.
Go wider than the bed for designer impact
Extending a headboard 6–12 inches beyond each side of the mattress can make the entire bed look more customwithout much extra cost.
Extra: Real-World “DIY Headboard” Experiences (About )
DIY headboards are one of those projects that seem simple until you’re standing in a home improvement aisle holding two different types of screws,
wondering which one speaks your love language. The good news is that most headboard mishaps are the harmless kind: a crooked line, a fabric wrinkle,
a stain that looks different under bedroom lighting than it did in the garage. In other words: totally fixable.
One common experience is realizing that the wall behind your bed is not as level as you thought. You might measure carefully,
cut perfectly, and still end up with a headboard that looks slightly tiltedbecause the floor or baseboard is off. That’s why leveling from the wall
(not the floor) matters, and why a French cleat or multiple mounting points can save you from that “why does it look like it’s sliding into the sea?”
optical illusion.
Upholstery projects bring their own learning curve. The first time you wrap batting and fabric around a board, you’ll probably pull too tight in one spot
and not tight enough in another. It helps to staple in a “north-south-east-west” pattern firstone staple at the top, bottom, left, and rightthen work
outward evenly. Wrinkles happen, but they’re usually not permanent. Most of the time, you can remove a few staples, re-stretch, and try again.
The project isn’t ruined; it’s just negotiating with you.
Thrifted and upcycled headboardsdoors, shutters, window framesoften come with the experience of surprise prep work. Old paint may need sanding,
hardware holes may need filling, and sometimes you discover a smell that can only be described as “vintage basement.” Primer is your best friend here.
It seals in stains and odors and helps your topcoat look smooth. If you want the chippy, distressed look, do it intentionallydon’t rely on accidental flaking
as your design strategy.
If you try a faux headboard (paint, wallpaper, decals, fabric), the experience is usually the opposite: it goes fast, looks great, and then you get bold.
You start thinking, “What if I add a second color? What if I make it wider? What if I do an arch plus stripes?” That’s the trapbecause suddenly your
“simple refresh” becomes an entire weekend of creative experimentation. The trick is to pick one strong idea and execute it cleanly. A crisp edge and a
confident shape can look more expensive than a complicated pattern you’re tired of halfway through.
Finally, nearly everyone who builds a headboard learns the same lesson: the little details do the heavy lifting.
Hidden cord management for lighting, a soft top edge where your shoulders land, a finish coat that feels smooth, and hardware that doesn’t wobble
those are the things that make a budget headboard feel like a real upgrade. And once it’s done, you’ll probably stand back and think,
“Wait… that’s it?” Yep. That’s the magic: one change, big refresh.
Conclusion: Your Bedroom Refresh Starts Behind the Pillows
A headboard is a small project with an outsized payoff: it frames your bed, adds texture and color, and turns “basic bedroom” into “finished space.”
Whether you build a planked wood headboard, upholster a plush panel, or paint a faux arch, you can get a high-impact look without a high price tag.
Pick the style that fits your tools, your rental rules, and your patience leveland remember: perfection is optional, but a strong focal point is not.