Table of Contents >> Show >> Hide
- What Makes It “Texas-Style”?
- Ingredients and Equipment
- Step 1: Pick the Right Brisket
- Step 2: Trim Like You Mean It (But Don’t Get Weird)
- Step 3: Season Simply (Dry Brine If You Can)
- Step 4: Set Up the Smoker for Clean, Steady Heat
- Step 5: Smoke the Brisket
- Step 6: The Stall, the Wrap, and the “Texas Crutch”
- Step 7: Finish to “Probe Tender” (Not a Single Number)
- Step 8: Rest (This Is Where Great Brisket Happens)
- Step 9: Slice Like a Texan
- Timing Game Plan (So Dinner Isn’t at Midnight)
- Troubleshooting: Fix the Usual Brisket Drama
- Serving It the Texas Way
- Storage and Reheating (Without Turning It into Sawdust)
- of Real-World Brisket Experiences (What It Actually Feels Like)
- Conclusion
Texas brisket is the most honest kind of flex: a big hunk of beef, a simple rub, clean smoke, and enough patience
to question every life choice you’ve ever made. Done right, you get a peppery bark, a rosy smoke ring, slices that
bend without breaking, and a point that’s basically beef candy. Done wrong… well, you still get brisket. (And brisket
can always be “chili.”)
This guide walks you through a classic Central Texas-style smoked brisketsalt, black pepper, post oak vibes (or the
closest wood you can find), a smart wrap, and a real rest. It’s written for backyard smokers, pellet grills, offsets,
kettles, and anyone who has ever stared at a stalled thermometer like it personally betrayed them.
What Makes It “Texas-Style”?
Central Texas brisket is famously minimalist. The star is the beef, supported by a coarse salt-and-pepper crust and
clean hardwood smoke. Sauce is optional (and sometimes quietly judged). The goal is balance: deep beef flavor, bold
pepper, and a bark that crackles just a little before melting into tenderness.
- Rub: Primarily kosher salt + coarse black pepper (often close to a 1:1 blend by volume).
- Smoke: Traditionally post oak; oak/pecan are great stand-ins; hickory works if you keep it clean.
- Technique: Low-and-slow (or “medium-and-steady”), wrap when the bark is set, then rest like it’s your job.
- Texture test: “Probe tender” beats chasing a single magic temperature number.
Ingredients and Equipment
Ingredients
- 1 whole packer brisket, 12–16 lb (USDA Prime is the cheat code; Choice works great if you shop for marbling)
- 2–3 tbsp kosher salt (Diamond Crystal is less salty by volume than Morton’s; adjust if needed)
- 2–3 tbsp 16-mesh coarse black pepper (or the coarsest grind you can reasonably get)
- Optional binder: yellow mustard or a little neutral oil (helps rub stick; doesn’t make it taste like mustard)
- Optional spritz: water + a splash of apple cider vinegar (or just water)
Equipment
- Smoker or grill set up for indirect cooking (offset, pellet, ceramic, kettlebring what you’ve got)
- Hardwood chunks/splits (oak/post oak if possible)
- Instant-read thermometer and/or leave-in probe
- Pink butcher paper (unwaxed) or heavy-duty foil
- Sharp knife (brisket slicing knife if you’re feeling fancy) + cutting board
- Cooler or warm oven for resting/holding (the “faux cambro” method)
Step 1: Pick the Right Brisket
Buy a whole packer (flat + point together). Flats alone are leaner and less forgiving, especially for beginners.
Look for flexibility (a brisket that bends easily in the package often has better fat distribution) and
marbling in the flat. Prime helps a lot, but a well-marbled Choice brisket can absolutely win the day.
Plan portions realistically: raw brisket loses a lot of weight during trimming and cooking. A common planning number
is roughly 1/2 lb cooked brisket per person (more if your crowd is made entirely of linebackers and teenagers).
Step 2: Trim Like You Mean It (But Don’t Get Weird)
Trimming matters because brisket cooks for a long time, and airflow/shape affect how evenly it renders. Your goal is
a brisket that’s smooth and aerodynamic, with hard fat removed and a fat cap that protects without turning
into a rubbery raincoat.
Quick trimming checklist
- Remove any hard, waxy fat (it won’t render nicely).
- Trim the fat cap to about 1/4 inch in most areas.
- Square up thin, dangly edges that will burn or dry out.
- On the meat side, remove thick silverskin so seasoning and smoke can do their thing.
Keep the trimmings if you want: you can render them into tallow, grind for burgers, or cook them into beans. Texas
barbecue is big on “waste not,” mostly because brisket isn’t cheap and also because brisket trimmings are delicious.
Step 3: Season Simply (Dry Brine If You Can)
Mix kosher salt and coarse black pepper. A classic approach is a bold, even coatpepper-forward, not timid. If you
want the cleanest brisket flavor, skip sugar-heavy rubs; they can scorch during long cooks.
Two great timing options
- Best: Season and refrigerate uncovered 12–24 hours (dry brine). This improves seasoning penetration and bark.
- Still solid: Season 45–60 minutes before smoking while the brisket chills and the smoker heats up.
Optional binder (mustard/oil) is fine, especially if your brisket is a little damp. If you don’t use it, you’re not
“less Texas.” You’re just… stickier in a different way.
Step 4: Set Up the Smoker for Clean, Steady Heat
Preheat your smoker to 250–275°F. Some folks run closer to 225°F; others live happily at 275°F. In practice,
consistency matters more than picking the “correct” number. You want clean smokethink thin and blue, not thick and
white like a tire fire trying to send you a message.
Wood choice (Texas-style)
- Post oak: The classic Central Texas flavormellow, steady, beef-friendly.
- Oak: The easiest substitute almost anywhere; still very “Texas.”
- Pecan: Slightly sweeter, great with beef.
- Hickory/mesquite: Stronger; use a light hand to avoid bitterness.
If you’re on a pellet grill, you can still make excellent Texas-style brisket. Your biggest “upgrade” is often
managing moisture and bark: keep temps steady, avoid opening the lid too much, and don’t wrap too early.
Step 5: Smoke the Brisket
Place the brisket on the smoker with the thicker point aimed toward the hotter area. Whether you cook
fat cap up or down depends on your cooker:
- Heat from below (many offsets/pellets): fat cap down can shield the flat.
- Heat from above or very even convection: fat cap up can help self-baste the surface a bit.
Close the lid and let smoke do its work. For the first few hours, resist the urge to fuss. Brisket is a long
relationship, not a quick text back.
Optional spritzing
After the bark begins forming (often around 3–4 hours in), you can spritz lightly every 45–60 minutes if the surface
looks dry. Don’t soak itspritzing is meant to help bark development and smoke adhesion, not to give your brisket a bath.
Step 6: The Stall, the Wrap, and the “Texas Crutch”
At some pointoften in the 150–170°F internal rangethe brisket may “stall,” where the temperature stops
climbing for what feels like multiple seasons of a prestige TV drama. This is normal. Evaporative cooling is doing
its thing.
You have three good options:
Option A: Wrap in butcher paper (most Texas-joint vibes)
When the bark is a deep mahogany and feels set (not mushy), wrap tightly in unwaxed pink butcher paper. Paper helps
push through the stall while preserving bark texture better than foil.
Option B: Wrap in foil (fastest, softest bark)
Foil powers through the stall and retains moisture aggressively, but the bark can soften. If you like a softer bark
or you’re racing the clock, it’s a valid move.
Option C: Don’t wrap (bold bark, longer cook)
No-wrap can deliver incredible bark, but it typically takes longer and demands steadier pit control to avoid drying
the flat.
For a classic Texas-style smoked brisket recipe at home, butcher paper is the sweet spot: traditional feel, great bark,
and reliable timing.
Step 7: Finish to “Probe Tender” (Not a Single Number)
After wrapping, return the brisket to the smoker at 250–275°F. Start checking tenderness when the flat is
around 195°F. Many briskets finish somewhere around 200–205°F, but the real test is feel:
a probe or skewer should slide into the flat with little resistancelike room-temperature butter.
If the point feels perfect but the flat is still tight, keep going. Briskets aren’t synchronized swimmers; they’re
more like siblings arguing in the back seat. You’re waiting for the flat to calm down.
Step 8: Rest (This Is Where Great Brisket Happens)
Resting is not optional if you want juicy slices. When the brisket is done, keep it wrapped and let it rest
at least 1–2 hours. Even better: 2–4 hours.
Easy rest methods
- Cooler hold (faux cambro): Wrap the brisket (still in paper/foil) in a towel and place in an empty cooler.
- Warm oven hold: Set your oven to its lowest setting (often 150–170°F), and hold the brisket wrapped.
The goal is a slow, gentle rest so juices redistribute and the collagen finishes relaxing. Bonus: resting makes slicing
cleaner and less “shreddy.”
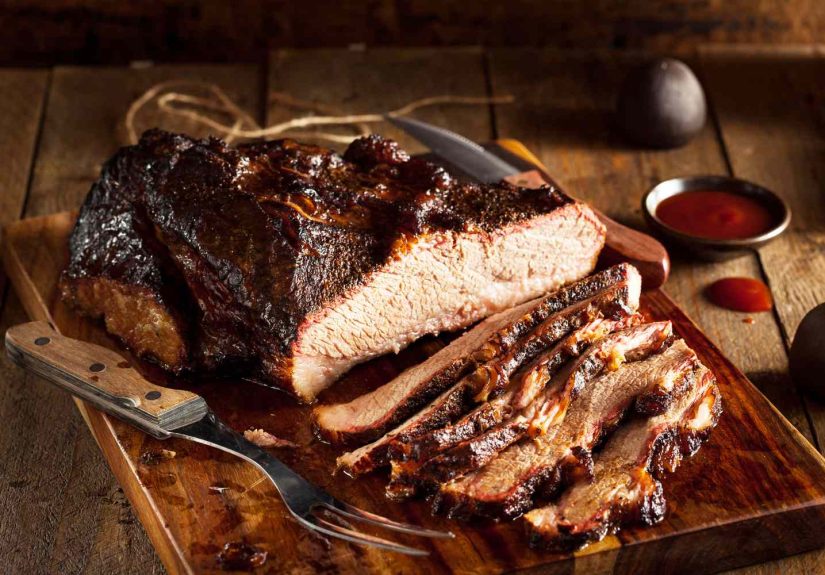
Step 9: Slice Like a Texan
Slicing is where many great briskets turn into “brisket salad.” Take your time.
How to slice a whole packer brisket
- Unwrap and save any juices (drizzle a little over slices if needed).
- Identify the grain direction on the flat (it usually runs lengthwise).
- Slice the flat against the grain into 1/4-inch slices (pencil-thick is a good visual).
- Separate the point from the flat along the natural fat seam.
- Rotate the point (grain changes direction) and slice against the grain. Cube for burnt ends if you want to get fancy.
A classic “bend test” slice should drape over your finger and pull apart with a gentle tug. If it crumbles like sand,
it may be overcooked. If it snaps like jerky, it likely needs more time or a longer rest.
Timing Game Plan (So Dinner Isn’t at Midnight)
Brisket timing is famously unpredictable, but you can plan smart. A whole packer often takes 10–16+ hours
depending on size, pit temp, and wrap strategyplus rest.
| Target | Typical Range | What You’re Looking For |
|---|---|---|
| Smoke temp | 250–275°F | Steady heat + clean smoke |
| Wrap | 155–170°F (or “bark is set”) | Deep color, dry-to-the-touch bark |
| Start probing | ~195°F | Flat loosening up |
| Finish | ~200–205°F (varies) | Probe slides in with minimal resistance |
| Rest | 2–4 hours | Juicier slices, calmer brisket |
Pro tip: if you need to serve at 6 p.m., aim to have the brisket done cooking by early afternoon.
Brisket holds beautifully when wrapped and kept warm, and extra rest is rarely a problem.
Troubleshooting: Fix the Usual Brisket Drama
“My brisket is tough”
- Most common cause: it needed more time (collagen hadn’t fully broken down).
- Confirm you sliced against the grainwrong direction can mimic toughness.
- Next time: start probing earlier and cook until the flat is truly tender.
“My brisket is dry”
- Flat overcooked or under-rested is common.
- Choose a brisket with better marbling; consider Prime.
- Don’t trim too aggressively; keep that protective fat cap reasonable.
- Rest longer and slice only what you’ll serve immediately.
“My bark got soft”
- Foil wrap and heavy spritzing can soften bark.
- Use butcher paper, wrap later (when bark is set), and avoid soaking the surface.
- If needed, unwrap and put it back on the smoker for 10–20 minutes to firm up (watch closely).
“It tastes bitter or smoky in a bad way”
- That’s usually dirty smoke: too much smoldering wood, not enough airflow.
- Use well-seasoned wood, run a clean fire, and wait for thin smoke before adding meat.
Serving It the Texas Way
The classic tray is simple: brisket slices, white bread, pickles, onions, and jalapeños. If you serve sauce, keep it
on the side. A thin, tangy sauce can be greatbut you shouldn’t need it to make the brisket enjoyable.
Storage and Reheating (Without Turning It into Sawdust)
Brisket is best the day it’s made, but leftovers can be fantastic if you treat them kindly.
- Store: Slice only what you’ll eat. Keep the rest whole, wrapped, and refrigerated.
- Reheat: Gentle heat winswrapped brisket in a low oven until warmed through. Add a splash of reserved juices if you have them.
- Leftover ideas: breakfast tacos, brisket grilled cheese, chopped brisket sandwiches, brisket fried rice (don’t knock it).
of Real-World Brisket Experiences (What It Actually Feels Like)
The first time you smoke a Texas-style brisket, you learn a new unit of time: “brisket hours.” Regular hours have
structure. Brisket hours are a foggy wilderness where you swear the thermometer hasn’t moved since the Obama
administration, but somehow it’s also noon already. You start the morning confidentcoffee in hand, smoker humming,
brisket looking like a museum exhibit called Hope. Then the stall hits, and your brisket enters its rebellious
phase. You check the temperature. It’s the same. You check again. Still the same. You Google “brisket stall how long”
and the internet calmly replies, “Yes.”
Somewhere around hour five, you become emotionally attached to bark. You open the lid “just for a second” to admire
the color, then immediately close it like you caught the brisket changing clothes. You begin to understand why Texas
pitmasters talk about clean smoke the way sommeliers talk about wine. Thin blue smoke feels elegant; thick white smoke
feels like your brisket is filing a complaint. You start adjusting airflow with the seriousness of a NASA engineer,
because apparently today you are both mission control and dinner.
Wrapping is the moment you feel like you’re doing something official. Butcher paper makes you feel like you’ve been
promoted to “assistant pitmaster,” even if your resume is mostly instant ramen. You tuck the brisket in like it’s
going on a long road trip. Then you wait again, and this is where brisket teaches the big lesson: you can’t rush
tenderness. Brisket does not respond to deadlines, persuasive speeches, or threats. It responds to steady heat and time.
The best “aha” moment for most cooks is realizing that finish temperature is a guide, not a law. You learn what “probe
tender” actually means when the thermometer slides in and out of the flat with barely any resistance and you
involuntarily whisper, “Oh.” It’s not dramatic like fireworks; it’s subtle like a door that finally stops sticking.
That’s when you pull it, and for the first time all day, you feel calm.
Then comes the restarguably the hardest part because the brisket is done and you are not. You wrap it in towels,
tuck it into a cooler, and spend the next couple hours acting like a parent who put a kid down for a nap. You tiptoe
around. You check the clock. You tell everyone, “Don’t open the cooler.” Someone asks if it’s ready yet and you
experience a new level of spiritual growth: patience through clenched teeth.
Finally, slicing is equal parts triumph and truth serum. If you nailed it, the slices bend, glisten, and make you
consider texting your ex just to brag (don’t). If it’s slightly tight, you learnquicklythat chopping brisket for
sandwiches is not a failure; it’s a pivot. Either way, you end up feeding people, and that’s the real Texas tradition:
simple food, done with care, shared loudly. The brisket disappears, the compliments roll in, and you immediately start
planning the next onebecause brisket isn’t just a recipe. It’s a hobby that smells amazing.
Conclusion
A great Texas-style smoked brisket recipe comes down to a few fundamentals: pick a well-marbled packer, trim with purpose,
season simply, run clean smoke, wrap when the bark is ready, cook until the flat is probe tender, and rest longer than
you think you need to. Do that, and you’ll serve brisket that tastes like it came from a serious barbecue jointeven if
it was made in your driveway while you wore socks with sandals.