Table of Contents >> Show >> Hide
- What Usually Causes a Leaky Drain Plug?
- Tools and Materials You May Need
- Step 1: Confirm Where the Leak Is Coming From
- Step 2: Shut Off the Water and Prep the Area
- Step 3: Remove the P-Trap
- Step 4: Disconnect the Stopper Linkage
- Step 5: Remove the Old Drain Assembly
- Step 6: Clean the Sink Drain Opening Thoroughly
- Step 7: Reseal and Reinstall the Drain Flange
- Step 8: Reinstall or Replace the Stopper and Pivot Rod
- Step 9: Reattach the P-Trap
- Step 10: Test for Leaks the Smart Way
- How to Know Whether You Need a Repair or a Full Replacement
- Common Mistakes to Avoid
- When to Call a Plumber
- Final Thoughts
- Bonus: Real-World Repair Experiences and Lessons From the Job
A leaky drain plug has a special talent: it can make a perfectly normal sink feel like it’s plotting against you. One minute you’re washing your hands like a civilized adult, and the next you’ve got water creeping under the basin, a mystery drip on the P-trap, or a sink that refuses to hold water for more than 30 seconds. The good news is that repairing a leaky drain plug is usually a very manageable DIY plumbing fix.
In most bathrooms, the “drain plug” is part of a pop-up drain assembly. That assembly includes the drain flange at the top of the sink, the body and tailpiece underneath, the pivot rod and clevis strap that move the stopper, and the gasket and locknut that help everything stay watertight. When one part loosens, shifts, cracks, or wears out, leaks happen. Thankfully, most of those problems can be fixed with basic tools, a little patience, and a willingness to spend quality time crouched under a sink like a raccoon with a wrench.
This step-by-step guide walks you through how to diagnose the problem, fix the leak, test the repair, and know when a simple adjustment is enough versus when you should replace the whole drain assembly.
What Usually Causes a Leaky Drain Plug?
Before you start taking things apart, it helps to know what typically goes wrong. A bathroom sink drain plug can leak in a few common places:
1. The drain flange seal has failed
The metal ring you see inside the sink is the drain flange. If the plumber’s putty or sealant under that flange dries out, shifts, or was installed poorly, water can slip past it and leak beneath the sink.
2. The gasket or locknut underneath is loose
The gasket under the sink compresses against the drain body to form a seal. If the locknut loosens over time, the drain body can wobble and leak.
3. The pivot rod connection is leaking
If water drips from the little horizontal rod entering the drain body, the pivot rod nut, washer, or seat may be worn, misaligned, or overtightened.
4. The stopper isn’t sealing properly
Sometimes the leak is not under the sink at all. Sometimes the problem is that the stopper won’t fully seal, so water drains out of the basin even when the plug is “closed.” In that case, the linkage may need adjustment, or the stopper seal may be dirty, cracked, or worn out.
5. The drain body is corroded or cracked
Older metal drains can corrode. Plastic drains can crack. Once that happens, patch jobs usually become temporary at best. Replacement is the smarter move.
Tools and Materials You May Need
Gather everything before you begin. Plumbing projects become much less fun when you’re halfway through and realize the new gasket is still at the store.
- Bucket or shallow pan
- Old towel or rag
- Tongue-and-groove pliers or channel-lock pliers
- Pipe wrench or adjustable wrench
- Putty knife
- Sponge or cleaning cloth
- Replacement pop-up drain or repair kit, if needed
- Plumber’s putty or 100% silicone, depending on sink material
- Pipe joint compound, if recommended by the drain manufacturer
- Flashlight
- Gloves
Important: If your sink is acrylic, ABS, or paired with natural stone such as granite or marble, check the sealant instructions before using regular plumber’s putty. In some cases, stain-free putty or 100% silicone is the better choice.
Step 1: Confirm Where the Leak Is Coming From
Start with a simple test. Dry everything under the sink with a towel, then run water while watching closely with a flashlight.
Ask these questions:
- Is the leak appearing right under the drain flange?
- Is it dripping from the pivot rod nut?
- Is it coming from the P-trap instead of the drain plug assembly?
- Does the sink fail to hold standing water even though the stopper is down?
This matters because a leaky drain plug and a leaky P-trap are neighbors, not twins. They live close together, but they are not the same repair.
Step 2: Shut Off the Water and Prep the Area
Even though you’re working on the drain, not the supply lines, it’s smart to shut off the water valves under the sink so nobody turns the faucet on mid-repair. Place a bucket beneath the P-trap to catch standing water. Lay down an old towel because plumbing jobs rarely end without at least one dramatic splash.
Remove any items stored under the sink. Yes, including that half-used cleaning spray and the bag of mystery hardware you swear you’ll organize someday.
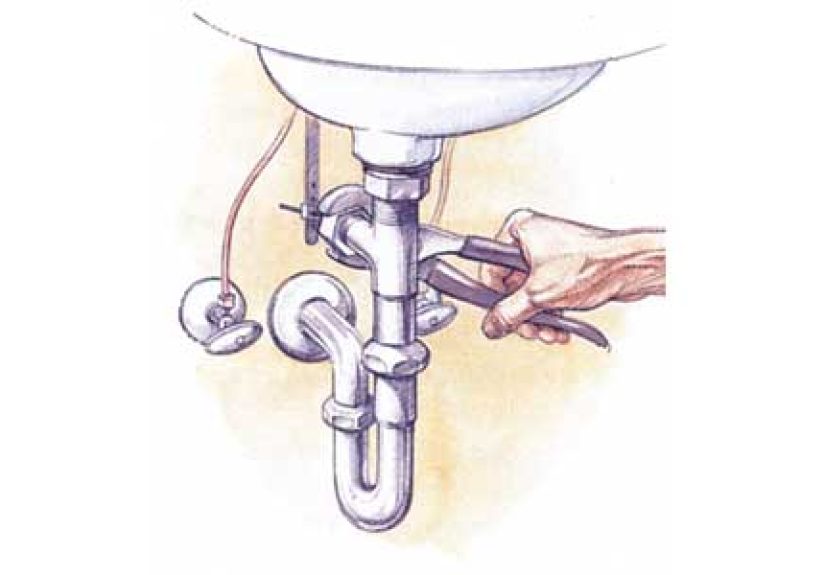
Step 3: Remove the P-Trap
To access the drain assembly comfortably, remove the P-trap. Loosen the slip-joint nuts by hand or with pliers, then lower the trap carefully into the bucket. Pour out the trapped water and set the P-trap aside.
This is also the perfect time to clean it. A sink repair plus bonus sludge removal? That’s value.
Step 4: Disconnect the Stopper Linkage
Next, disconnect the pop-up mechanism. Remove the spring clip from the clevis strap, slide out the pivot rod, and lift the stopper out from above the sink. Keep the small parts together so they don’t vanish into the same dimension as missing socks and screwdriver bits.
If your stopper was not sealing well, inspect it now. Soap scum, hair, corrosion, and worn rubber are all common culprits.
Step 5: Remove the Old Drain Assembly
Loosen the mounting nut on the drain body underneath the sink. Once the nut and gasket are free, push the tailpiece upward and remove the drain flange from above. If the assembly is stuck, gentle twisting usually breaks the old seal.
Inspect every part as you remove it. Look for:
- Flattened or cracked gaskets
- Corroded threads
- A bent pivot rod
- A damaged pivot ball seat
- Visible cracks in plastic parts
If only one small part is worn, you may be able to repair the leak with a replacement rod, gasket, or stopper. If multiple parts are tired, installing a new drain assembly is usually faster and more reliable.
Step 6: Clean the Sink Drain Opening Thoroughly
This step is boring, but it’s also one of the most important. Scrape away all old putty, caulk, grime, and mineral buildup from the sink opening and the underside around the drain hole. Wipe everything clean and dry.
A fresh seal only works on a clean surface. Applying new putty over old residue is like putting a Band-Aid on a wet banana. Technically possible. Emotionally upsetting. Not recommended.
Step 7: Reseal and Reinstall the Drain Flange
Now it’s time to rebuild the seal.
If your sink material allows it, roll plumber’s putty into a rope and place it under the underside of the drain flange. Then insert the flange into the drain hole from above. If your sink requires silicone instead, apply a smooth, even bead according to the product directions.
From underneath the sink, slide the gasket and washer into place, then thread on the mounting nut. Tighten by hand first, then snug it with pliers. The goal is a firm seal, not a personal grudge match with the hardware.
Pro tip: Make sure the opening for the pivot rod faces the back of the sink before final tightening. If it ends up off to one side, the stopper linkage may not work correctly.
Step 8: Reinstall or Replace the Stopper and Pivot Rod
Insert the stopper from above, making sure the hole in the stopper faces the back. Slide the pivot rod through the drain body opening so it catches the stopper. Then reinstall the pivot nut or ball nut.
Reconnect the pivot rod to the clevis strap with the spring clip, then reconnect the lift rod. Test the action by pulling the lift rod up and down. The stopper should rise and lower smoothly.
If the stopper does not fully close, move the pivot rod to a different hole in the clevis strap. If it sticks or feels stiff, the pivot nut may be too tight.
Step 9: Reattach the P-Trap
Reconnect the P-trap to the tailpiece and wall drain. Hand-tighten the slip nuts first, then give them a small additional turn if needed. Avoid overtightening plastic nuts, which can crack or distort the washers.
If the trap washers look old, misshapen, or brittle, replace them now. It’s cheaper than discovering tomorrow that you fixed one leak and adopted another.
Step 10: Test for Leaks the Smart Way
With everything reassembled, turn the water back on and run a slow stream first. Watch the drain assembly from below. Then increase the flow and check again.
Next, close the stopper and fill the sink partway with water. Let it sit for several minutes while checking underneath for drips. Then release the stopper and watch the assembly drain under full flow.
Pay close attention to these areas:
- The underside of the flange
- The mounting nut and gasket
- The pivot rod nut
- The P-trap slip-joint nuts
If you see a drip at a compression fitting, tighten slightly. If the leak continues, disassemble that connection and reseat the washer. If the leak is around the flange, the putty or sealant may need to be removed and reapplied fresh.
How to Know Whether You Need a Repair or a Full Replacement
Choose a simple repair when:
- The stopper linkage only needs adjustment
- The pivot rod seat or nut is the only worn part
- The flange seal failed, but the drain body is still in good shape
Choose a full replacement when:
- The drain body is corroded or cracked
- The stopper no longer seals even after adjustment
- The threads are stripped
- Multiple components are worn out at once
- The old finish is beyond saving and you’re updating the faucet anyway
In many cases, a complete pop-up drain kit is inexpensive and saves time compared with piecing together several individual repair parts.
Common Mistakes to Avoid
Using the wrong sealant
Regular plumber’s putty is not the right choice for every surface. Check compatibility first.
Overtightening everything
Overtightening can warp gaskets, crack plastic nuts, distort the drain body, and even create leaks instead of preventing them.
Skipping the cleaning step
Old putty and residue prevent a watertight seal.
Forgetting drain orientation
If the pivot opening is not pointed toward the back wall, the stopper linkage won’t line up correctly.
Testing too quickly
Always test with both flowing water and standing water. Some leaks only appear when the basin is full.
When to Call a Plumber
Call a professional if the leak is coming from inside the wall, the sink drain alignment is badly off, corrosion has spread into connected plumbing, or repeated resealing still does not stop the water. Also get help if your sink uses a nonstandard drain assembly and replacement parts are unclear.
There is no shame in calling a plumber. Sometimes the most cost-effective repair is the one that does not end with you Googling “why is there water in my vanity drawer” at 11:43 p.m.
Final Thoughts
Repairing a leaky drain plug is one of those home fixes that sounds annoying but often turns out to be surprisingly doable. The secret is not brute force. It’s diagnosis, clean surfaces, the right sealant, careful reassembly, and patient testing. Once you understand how the flange, gasket, stopper, and pivot rod work together, the repair becomes a lot less mysterious.
Take your time, keep a bucket nearby, and resist the universal DIY urge to tighten everything until it fears you. In many cases, that little leak under the sink can be solved in an afternoon with a few basic parts and a smarter seal.
Bonus: Real-World Repair Experiences and Lessons From the Job
One of the most common homeowner experiences with a leaky drain plug is misdiagnosing the source of the problem. People often assume the P-trap is leaking because that’s where the drip becomes visible. In reality, water may be starting higher up at the drain flange or pivot rod connection and then traveling downward before finally dripping off the lowest point. That is why experienced DIYers dry everything first, then watch the assembly while water is running. It saves time, parts, and a surprising amount of muttering.
Another common experience is discovering that the old drain assembly was “fixed” before by someone with a creative interpretation of plumbing standards. You may find too much putty, the wrong washer, mismatched nuts, or a heroic amount of tape where tape had no business being. This is normal. Annoying, yes. Rare, no. When that happens, a full replacement kit is often easier than trying to decode the plumbing choices of a stranger from 2014.
Many people also underestimate how much difference proper cleaning makes. A drain that leaked for months can look fine until you remove it and find layers of old sealant, mineral crust, and soap residue around the opening. Reinstalling a new flange without cleaning that surface almost guarantees another leak. Experienced repairers know the “boring prep” part is often the part that makes the repair actually last.
There is also the classic first-time DIY experience of overtightening. It feels logical in the moment. Leak equals tighten, right? But drain assemblies often seal through compression, not force. Too much force can deform the gasket, crack a plastic nut, or shift the flange out of alignment. A lot of successful sink repairs happen when the installer backs off, reseats the parts, and tightens them evenly instead of aggressively.
Homeowners frequently report that the most satisfying moment in the process is not actually the repair itself. It is the leak test. You run the water, hold your flashlight under the sink, stare at the connections like a detective in a crime drama, and nothing happens. No drip. No bead of water. Just silence and dry pipes. That moment is deeply rewarding for a repair that costs far less than a service call.
Finally, one of the best lessons people take from fixing a leaky drain plug is that small plumbing issues rarely stay small forever. A tiny drip can stain cabinetry, create odors, encourage mildew, and weaken particleboard vanities over time. Fixing it early is not just about stopping a nuisance. It is about protecting the sink, cabinet, and surrounding finishes before a minor repair becomes a bigger project. In that sense, repairing a leaky drain plug is not just a plumbing chore. It is preventive home maintenance with a very satisfying ending.