Table of Contents >> Show >> Hide
- Why Tiny Cats Make the Perfect Valentine’s Day Craft
- Supplies I Used (And What You Can Swap In)
- The Stitching Basics That Made These Cats Look “Handmade” (In a Good Way)
- How I Made Each Mini Cat (Simple, Repeatable Steps)
- 24 Pics: My Miniature Hand-Stitched Valentine Cats Gallery
- Common Problems (And the Fixes That Saved My Sanity)
- How I Gifted Them (Without Making It Weird)
- Extra: of Real Experience From Making 24 Tiny Cats
- Conclusion
This year I skipped the predictable Valentine’s Day stuff (the roses that instantly die, the heart-shaped chocolate that tastes like a candle)
and made something that lasts: miniature hand-stitched catstiny enough to perch on a coffee mug, dramatic enough to look like they’re judging my life choices.
If you’re here for the 24 pics, I respect that deeply. But if you’re also curious how these little stitched gremlins came to life,
I’ll walk you through what worked, what didn’t, and why one cat ended up looking like an anxious potato with whiskers.
Why Tiny Cats Make the Perfect Valentine’s Day Craft
Valentine’s Day gifts don’t have to be expensive to feel personal. The best ones usually aren’t. A hand-stitched cat says,
“I thought of you,” and also, “I was willing to wrestle embroidery floss into submission for you.”
That’s romance. That’s commitment. That’s also mild eye strain.
Mini felt cats are especially great because they’re:
- Fast to finish (tiny seams = tiny time commitment).
- Beginner-friendly (hand sewing, not couture-level tailoring).
- Easy to customize (colors, expressions, accessories, dramatic backstories).
- Giftable (bag charm, desk buddy, keychain, or “emotional support cat”).
Supplies I Used (And What You Can Swap In)
Core materials
- Felt: wool felt or high-quality craft felt (wool feels smoother and sturdier; craft felt is budget-friendly and widely available).
- Embroidery floss: perfect for visible, cute stitching (you can separate strands to control thickness).
- Hand sewing needle: embroidery needle (bigger eye) or a sharp hand needle for tighter seams.
- Stuffing: polyester fiberfill, cotton stuffing, or fabric scraps for an eco-ish vibe.
- Sharp scissors: one for paper templates and one reserved for fabric if you want cleaner cuts.
- Fabric marker or chalk: to trace the pattern lightly.
Optional upgrades
- Beads or sequins: for tiny “collars” or heart accents (best for display-only gifts).
- Ribbon: to turn cats into ornaments or gift toppers.
- Keychain hardware: jump rings, lobster clasp, or a mini split ring.
- Fabric glue: helpful for securing small details (use sparingly so it doesn’t stiffen the felt).
Important safety note: If your cats are going to babies, toddlers, or pets, skip anything small and detachable (like beads, buttons, or plastic eyes).
For little kids, embroidered eyes and stitched-on details are the safer, saner choice.
The Stitching Basics That Made These Cats Look “Handmade” (In a Good Way)
1) Blanket stitch for the edge
The blanket stitch is the MVP for felt projects. It closes seams and gives that decorative border that screams,
“Yes, I did this on purpose.” It’s especially forgiving on felt because the fabric doesn’t fray.
2) Backstitch for crisp lines
I used backstitch for tiny mouths, eyebrows, and any line that needed to look clean. It’s sturdier than a running stitch and makes faces look intentional.
3) French knots (tiny but mighty)
French knots make adorable eyes or little “buttons.” They’re also a test of patience. Keep your wraps consistent and pull gently so they sit neatly.
4) Whip stitch when you want speed
If you’re making a batch (hello, 24 cats), whip stitch is faster. The edge looks simpler, but still cutelike the difference between eyeliner wings and “I tried.”
How I Made Each Mini Cat (Simple, Repeatable Steps)
- Sketch the template: a chubby oval body with two triangle ears. Keep it simpletiny details are cute until they become tiny regrets.
- Cut two body pieces: front and back. If you want contrast, use a different color for the back so the cat looks “designed,” not accidental.
- Add face details to the front piece first: eyes, nose, mouth, whiskers. It’s much easier before stuffing and closing the seam.
- Align pieces and start stitching: blanket stitch around the edge, leaving a small opening at the bottom or side.
- Stuff lightly: tiny cats look best when gently puffy, not overstuffed like a stressed-out marshmallow.
- Close the opening neatly: keep your last stitches consistent so the “finish line” doesn’t look like a plot twist.
- Add Valentine flair: a stitched heart, a mini bow, a tiny tag, or a pink collarwhatever matches your gift vibe.
Batch-making tip: do assembly-line style. Cut all pieces first, stitch all faces next, then sew and stuff.
It’s weirdly satisfying, like being a tiny cat factory with better music.
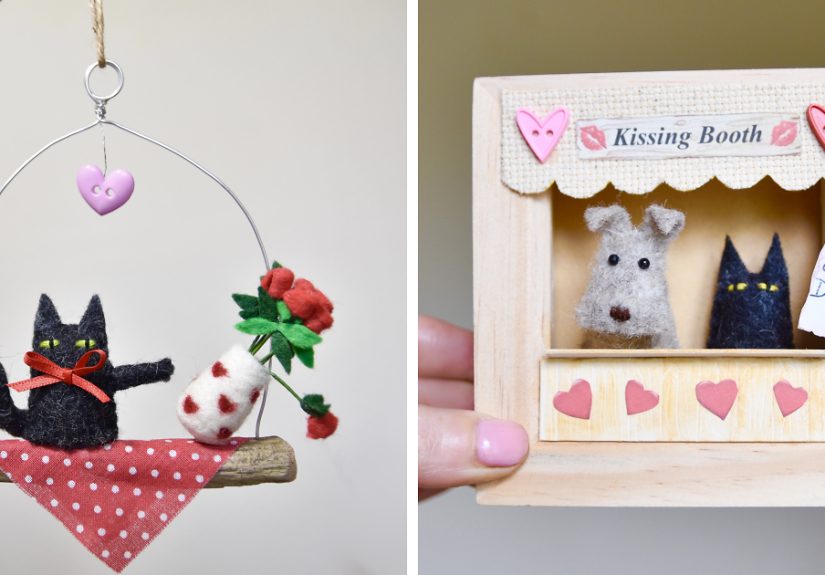
24 Pics: My Miniature Hand-Stitched Valentine Cats Gallery
Below are the 24 “pics” as a gallery layout you can use on your site. Swap in your real image filenames and keep the captions (or tweak them to match your cats’ personalities).


Photo tip: Tiny plushies photograph best near something familiar for scalecoins, a teacup, a paperback bookso readers instantly understand how miniature they are.
Natural window light will make the stitching texture pop without harsh shadows.
Common Problems (And the Fixes That Saved My Sanity)
My stitches look uneven
Keep your stitch spacing consistent: pick a rhythm (for example, “needle in, pull, loop, snug”) and repeat. On felt, slightly larger, evenly spaced stitches
usually look better than tiny uneven onesespecially for a decorative blanket stitch edge.
My felt is fuzzy or pilling
Craft felt varies a lot. If it pills easily, use a sharper needle and avoid over-handling the edges. Wool felt is smoother and tends to hold crisp cuts better.
Also: cut with sharp scissorsdull blades can rough up the edges.
My cat looks lumpy
Stuffing is a “little at a time” situation. Use a chopstick or blunt tool to nudge stuffing into corners (like ears),
then smooth the body by pinching and redistributing the fill.
My face embroidery looks… haunted
Tiny faces need fewer features than you think. If the eyes are too big, switch to fewer strands of floss,
or use small knots. And if the expression still looks possessed, call it “whimsical.” Works every time.
How I Gifted Them (Without Making It Weird)
Mini cats can be a gift on their own, but they also work as:
- Gift toppers (tie one to a ribbon and suddenly you’re a gift-wrapping genius).
- Classroom valentines (simple, cute, and not candy-based).
- Desk buddies (the silent coworker who never schedules meetings).
- Bag charms (especially if you reinforce the attachment point).
If you’re mailing them, tuck each cat into a small box so it doesn’t get squished. Felt is sturdy, but it shouldn’t have to experience the postal system unprotected.
Extra: of Real Experience From Making 24 Tiny Cats
Making one miniature hand-stitched cat is adorable. Making twenty-four is a lifestyle choicelike deciding to run a marathon, except your training plan is
“sit in a chair and become one with embroidery floss.” Somewhere around cat number six, I realized two important truths: first, consistency is easier when you stop
reinventing the pattern every time; and second, every craft project has a moment where it tries to convince you you’ve never been good at anything in your life.
It’s lying. It always lies.
The biggest lesson was that tiny projects magnify everything. If your stitches are messy, they look messier when they’re only an inch long. If your ears are uneven,
the whole cat suddenly looks like it heard some shocking gossip. I started cutting paper templates and tracing them carefully because “eyeballing it” was producing
cats shaped like vaguely emotional pears. Once I standardized the patternsame body shape, same ear triangles, same placement markseverything got faster and cleaner.
I still changed colors and expressions, but the base stayed the same. Think of it like meal prep… if meal prep involved felt and tiny whiskers.
I also learned that stuffing is basically mood management. Understuffed cats look tired. Overstuffed cats look stressed. Light, even stuffing made them feel “soft”
without turning them into tiny footballs. The ears were the trickiest: they’re small corners that want to stay flat. A blunt tool (even the back end of a paintbrush)
helped poke a whisper of stuffing into each ear, and then I pinched the seam to shape it. Suddenly the cats had actual ears instead of “head bumps.”
Faces were their own emotional journey. The first few cats got ambitious: big eyes, detailed mouths, extra whiskers. They looked… intense. Eventually I dialed it back:
smaller eyes, fewer lines, simple expressions. It turns out “minimal” reads as cute at miniature scale. A tiny smile is charming. A big grin is a jump scare.
And if one cat still came out weird, I didn’t scrap itI made it the “grumpy” one. People love the grumpy one. The grumpy one is relatable.
By the end, I had a weird sense of pride I didn’t expect. Not because they were perfect (they weren’t), but because they were unmistakably handmade.
Every stitch was a little decision. Every color combo was a tiny personality. And Valentine’s Day suddenly felt less like a holiday you shop for
and more like a holiday you makeone tiny cat at a time, with a cup of something warm nearby and the quiet satisfaction of finishing a seam neatly.
If you’ve been looking for a craft that’s equal parts calming and hilarious, miniature hand-stitched cats are it. Just be warned: once you make one,
your hands will immediately start planning cat number two.