Table of Contents >> Show >> Hide
Have you ever looked at a piece of furniture and thought, “This needs a makeover?” That’s exactly what happened when I set my eyes on my old, worn-out kitchen table. I’ve always dreamed of having a beautiful farmhouse-style kitchen, and I figured why not start with the heart of the kitchenthe table. With a little creativity, elbow grease, and some guidance from DIY experts, I turned my tired kitchen table into a stunning centerpiece. Here’s how I did it, step-by-step, and how you can too!
The Inspiration for the Makeover
Farmhouse style is all about simplicity, rustic charm, and a sense of warmth. Think natural wood, neutral colors, and a cozy, inviting atmosphere. My kitchen table was a typical, run-of-the-mill piecenothing special. It was functional but lacked personality. I envisioned a farmhouse-style table that would blend seamlessly into my kitchen, creating a warm gathering spot for family meals. Inspired by various home décor sources and the farmhouse trends I found on platforms like Hometalk, I set out to give it a new life.
Step 1: Assessing the Table
The first step in any makeover project is assessing the piece of furniture you’re working with. My kitchen table was made of solid wood but had a few scratches and dings, as well as a dated finish. The legs were sturdy, but the top had been stained with spills over the years. Rather than throw it out and buy a new one, I decided to give it a fresh new look by sanding it down and restoring its natural beauty.
Tip: Be sure to evaluate the condition of your table before starting. If it’s structurally sound, you’re in good shape for a makeover!
Step 2: Sanding and Stripping the Old Finish
With my table in the center of the room, I began by sanding the surface. I used a combination of coarse and fine-grit sandpaper to remove the old finish. This process was surprisingly therapeutic, as I could feel the table’s original wood start to shine through. For the best results, I used a power sander to speed things up, but a good old hand-sanding method works just as well. It’s all about patience and paying attention to the details.
If you’re tackling this at home, be sure to wear a mask and eye protection, as the dust can be quite a mess!
Step 3: Choosing the Right Paint and Stain
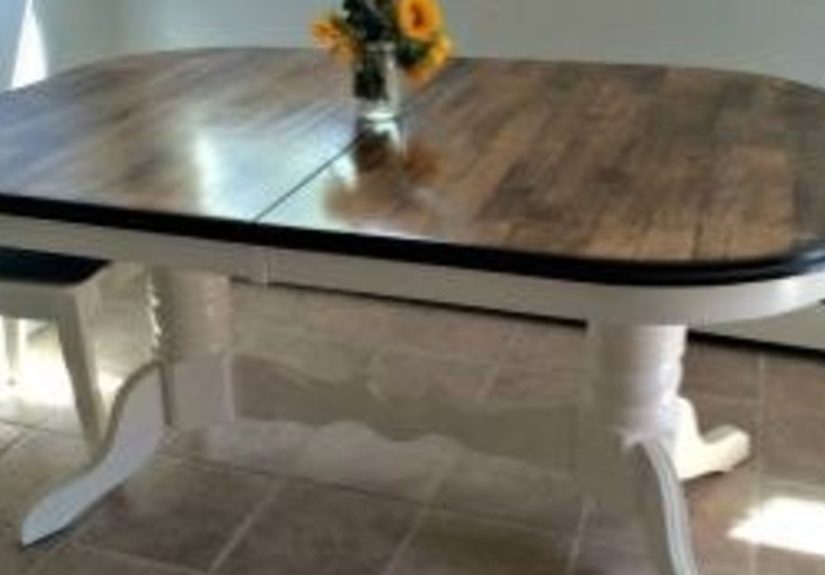
Once the table was smooth and free from the previous finish, it was time to decide on the paint and stain. For a classic farmhouse look, I chose a two-tone design: a deep walnut stain for the tabletop and a creamy white paint for the legs. The rich stain would highlight the natural grain of the wood, while the white would brighten up the space and offer that airy farmhouse feel.
For the stain, I applied a generous amount with a clean cloth, rubbing it in and wiping off the excess as I went. This gave the wood a beautiful, deep hue while still allowing the natural texture to show through. For the legs, I opted for a chalky white paint that would give the table an antique vibe. After a couple of coats of paint, the table was starting to look like the piece I had always imagined!
Pro Tip: Be sure to allow each coat of stain and paint to dry completely before applying the next layer. This ensures a smooth, flawless finish.
Step 4: Sealing the Table
After the paint and stain were completely dry, I sealed the entire table with a polyurethane finish. I chose a matte finish to keep the rustic charm intact, as I didn’t want the table to have too much shine. Sealing is an important step to protect your hard work and ensure the table withstands the test of time, especially in a busy kitchen environment.
I applied a light coat of polyurethane with a foam brush and allowed it to dry before lightly sanding it to create a smooth surface. I repeated this process two more times to ensure the table was adequately sealed.
Step 5: Adding the Final Touches
With the table fully restored, I decided to add a few personal touches to really make it my own. I replaced the old chairs with a set of mismatched wooden chairs, each painted in varying shades of white and gray, which gave the table a curated, eclectic look. I also added a simple farmhouse-style runner and a vase of fresh flowers to bring in a pop of color.
Final Tip: Personal touches, such as adding unique décor or mismatched furniture pieces, can elevate the farmhouse style and give it a cozy, lived-in feel.
Step 6: Enjoying the New Look!
Once everything was dry and set, I stood back and admired my work. The transformation was incredible! My kitchen table now looked like a beautiful farmhouse centerpiece, and it had that charming, rustic vibe I had envisioned. The natural wood top was warm and inviting, while the white-painted legs added a sense of brightness and airiness. It was everything I wanted and more.
The best part? The whole project only took a weekend! It was an affordable and rewarding DIY makeover that completely changed the look of my kitchen. Plus, it gave me a sense of accomplishment knowing I had transformed a simple, outdated piece into something beautiful and functional.
Experiences Related to the Makeover
Undertaking a kitchen table makeover is an enriching experience, especially if you’re new to DIY projects. One of the things I learned during this process was that no matter how daunting a task seems at first, breaking it down into manageable steps makes it all the more achievable. It was a huge relief to realize that I could give my table a new life without needing any professional help or spending a fortune on a new one.
Another aspect of this project that was both challenging and rewarding was choosing the perfect paint and stain combination. There are so many options out there, and finding the right one for my table’s vibe took some trial and error. I recommend experimenting with different colors and finishes before committing to the final look. Sometimes, the most unexpected combinations create the most beautiful results!
Additionally, the sanding and stripping process was a bit time-consuming, but it was essential for achieving a clean, smooth surface. I recommend being patient during this step and taking the time to really smooth out any imperfections before applying the new stain or paint. Trust me, it’s worth it in the end!
Throughout the project, I also learned that it’s important to give each coat of paint and stain enough time to dry. Rushing through this process can lead to uneven results or smudging, which will only add more time and frustration. Don’t skip the drying timeyour hard work deserves it!
Finally, after the project was complete, I felt an incredible sense of pride every time I walked into my kitchen. The table became a conversation starter and the focal point of the room, drawing people in with its warm, inviting style. It wasn’t just a table anymoreit was a piece of my home, reflecting my personal style and creativity.
Conclusion
In the end, my farmhouse kitchen table makeover was a huge success. Not only did it transform my kitchen’s overall aesthetic, but it also gave me a new appreciation for the DIY process. With a little vision and some hard work, I turned an ordinary table into a stunning piece of functional art. Whether you’re looking to create a similar makeover or try your hand at another DIY project, remember that the most important part is to enjoy the journey and embrace the satisfaction that comes with creating something beautiful with your own two hands!
meta_title: Farmhouse Kitchen Table Makeover | Simple DIY Ideas
meta_description: Transform your old kitchen table into a farmhouse-inspired beauty with these simple DIY makeover tips. Learn how to refinish, paint, and style your table.
sapo: Discover how to give your kitchen table a stunning farmhouse makeover! From sanding and staining to adding personal touches, follow this DIY guide for a complete transformation.