Table of Contents >> Show >> Hide
- Why Asphalt Potholes Happen (So You Don’t Repair the Same One Forever)
- Pick the Right Repair: Cold Patch vs. Hot Mix vs. “Call a Pro”
- Tools and Materials for Asphalt Pothole Repair
- Best Weather and Timing for a Strong Patch
- Step-by-Step: How to Repair an Asphalt Pothole
- Step 1: Excavate the damaged area
- Step 2: Prepare (and rebuild) the base
- Step 3: Cut clean edges (square up the pothole)
- Step 4: Clean the hole like you’re about to paint a perfect wall
- Step 5: Fill with asphalt patch material (in layers for deeper holes)
- Step 6: Compact the patch (this is where “good enough” becomes “actually good”)
- Step 7: Finish the edges and let it cure
- Common Pothole Repair Mistakes (and How to Avoid Them)
- How Long Will an Asphalt Pothole Repair Last?
- After the Patch: Maintenance That Prevents Future Potholes
- Cost Reality Check: DIY vs. Professional Repair
- Real-World Experiences: What You Learn After Repairing a Few Potholes (Extra Field Notes)
- 1) The patch that popped out was an edge problem, not a material problem
- 2) “I compacted it” and “I compacted it enough” are two different sentences
- 3) Cold weather repairs can work, but warm materials work better
- 4) The “mystery pothole” usually has a water story
- 5) “Make it pretty” is good, but “make it shed water” is better
- Conclusion
- SEO Tags
Potholes are like that one cracked phone screen you keep pretending you “don’t really notice.” Except this one
eats tires, trips ankles, and invites water to move in rent-free. The good news: repairing an asphalt pothole
in a driveway or private lane is absolutely a DIY winif you do it the way asphalt wants to be treated:
with clean edges, a solid base, and unapologetically aggressive compaction.
This guide walks you through a proven asphalt pothole repair process (very much in the practical, no-nonsense
spirit homeowners love): you’ll excavate the damage, rebuild the base, patch with the right mix, compact like
you mean it, and finish so the repair blends in and holds up. Along the way, you’ll learn why patches fail,
how to avoid the “speed-bump patch,” and when it’s smarter to call in a pro.
Why Asphalt Potholes Happen (So You Don’t Repair the Same One Forever)
Asphalt is flexible, but it’s not magic. Most potholes start when water sneaks through cracks, edges, or a thin
spot and softens the base underneath. Add freeze-thaw cycles (water expands as it freezes), heavy loads, or poor
drainage, and the surface breaks, crumbles, and eventually caves in. The hole you see is usually the finale,
not the opening act.
The key takeaway: the patch material matters, but the base matters more. If the stone under the asphalt is
mushy, missing, or pumping water, your “repair” becomes a temporary plug that loosens, sinks, or pops out.
A long-lasting driveway pothole repair is a small construction projectjust one measured in shovels, not backhoes.
Pick the Right Repair: Cold Patch vs. Hot Mix vs. “Call a Pro”
Cold patch asphalt (best for DIY, especially small-to-medium driveway potholes)
Bagged asphalt cold patch is the most homeowner-friendly option. It’s ready to use, works in a wider range of
conditions than hot mix, and can handle light-to-moderate driveway traffic when properly compacted. It’s ideal
for potholes that are shallow to moderate and for quick repairs when you don’t have access to hot mix asphalt.
Hot mix asphalt (best longevity, usually requires access to a plant or paving crew)
Hot mix is the gold standard for durability when installed correctly. But it’s harder for homeowners to source
in small quantities, and temperature/handling matters. If your driveway has multiple potholes, widespread
alligator cracking, or base failures, hot mix repair (or a bigger rehab plan) may be the better investment.
When you should stop DIY and consider professional repair
- The pothole keeps coming back in the same spot (usually base/drainage failure).
- The surrounding asphalt is crumbling or cracked like a spiderweb across a large area.
- The hole is deep and wide, or the base is saturated/soft even after excavation.
- Water consistently pools there (fix drainage first, or you’re patching a puddle).
Tools and Materials for Asphalt Pothole Repair
Tools
- Work gloves, safety glasses, and a dust mask (asphalt dust is not a snack)
- Stiff broom and/or leaf blower
- Square shovel and hand trowel
- Cold chisel and hammer or a masonry blade in a circular saw (for clean edges)
- Hand tamper (highly recommended) or a rented plate compactor (even better)
- Optional: shop vacuum for extra-clean prep
Materials
- Asphalt cold patch (or hot mix if available and practical)
- Crushed stone / compactable gravel (for rebuilding the base)
- Optional but helpful: tack coat / asphalt primer (for better bonding)
- Optional: asphalt crack filler and sealcoat for follow-up maintenance
Best Weather and Timing for a Strong Patch
Asphalt repairs generally last longer when installed in mild, dry weather. Warm temperatures help asphalt
materials settle, conform, and bond. That said, many cold patch products are designed for use in less-than-perfect
conditions, including cooler weather and even damp surfacesespecially for emergency repairs. Your goal is still
the same: remove loose material, reduce moisture, build a firm base, and compact thoroughly.
Pro tip: if it’s cold outside, keep the bag of cold patch warm (garage, basement, sunny spot) before use.
Warm mix is easier to work, packs tighter, and compacts more cleanly.
Step-by-Step: How to Repair an Asphalt Pothole
This is the core process used in many best-practice approaches: excavate the damage, prepare the base, cut clean
edges, apply the patch, compact the patch, and allow for curing. Don’t skip stepspotholes love shortcuts.
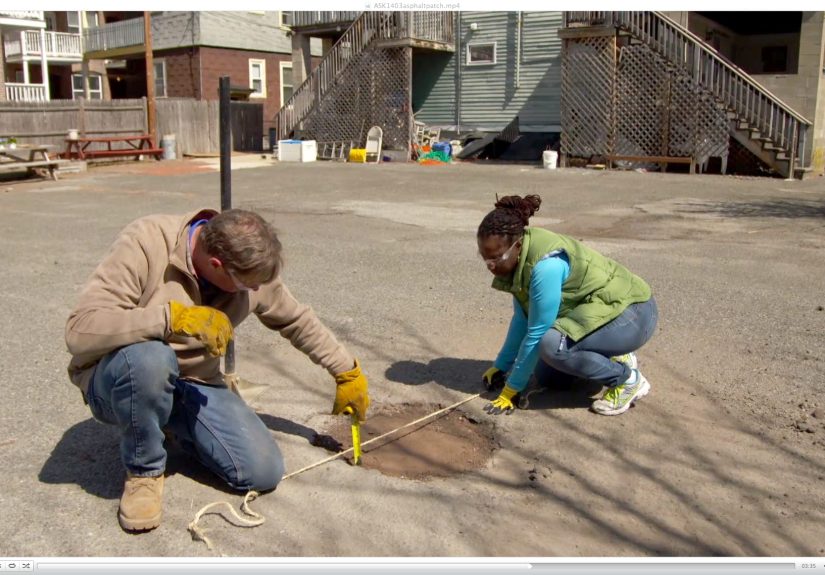
Step 1: Excavate the damaged area
Start by removing all loose, crumbling asphalt and debris from the pothole. Dig until you reach solid material
on the sides and bottom. If the edges are broken and feathered, widen the repair area to include stable asphalt.
You’re not being dramaticyou’re making room for the patch to “lock in.”
If you find muddy soil or soft, waterlogged base, keep digging until you reach firm material. A patch placed over
a squishy base will sink, crack, and reopen like it’s on a mission.
Step 2: Prepare (and rebuild) the base
A driveway pothole is often a base problem wearing an asphalt costume. After excavation, add compactable gravel
or crushed stone in thin lifts (layers) and compact each layer. The goal is a firm base that won’t shift under
tires. If you skip this, the patch material becomes the “base,” and it’s not designed to do that job alone.
Aim to leave room for your asphalt patch so the finished surface sits slightly proud (a little higher) before
final compaction. Asphalt settles under compaction and trafficplan for that.
Step 3: Cut clean edges (square up the pothole)
This is the step most DIYers skipand it’s why patches fail. Use a chisel and hammer or a saw with a masonry blade
to cut straight, vertical edges around the pothole. A squared repair area creates confinement, which helps the patch
resist shifting and raveling.
Think of clean edges like a frame around a picture. Without the frame, the picture slides off the wall. With it,
everything stays where it belongs.
Step 4: Clean the hole like you’re about to paint a perfect wall
Sweep, blow, or vacuum the pothole thoroughly. Remove dust, stones, leaves, and loose grit. If the area is wet, do
your best to dry it (towel, time, air). Some patch materials tolerate moisture, but standing water is not your friend.
Optional upgrade: apply a tack coat or asphalt primer to the sides and bottom. This can improve adhesion and help
reduce water intrusion around the patch edgesespecially helpful for a repair you want to last longer than a season.
Step 5: Fill with asphalt patch material (in layers for deeper holes)
Add cold patch asphalt into the pothole. For shallow repairs, you can fill in one go. For deeper holes, work in
layers so compaction reaches the full depth. Overfill slightlytypically about 1/2 inch above the surrounding surface
because compaction will bring it down.
Use your shovel or trowel to pack material into corners and against the vertical sides. The edges are where water
tries to sneak back in, so make those contact points tight and well-packed.
Step 6: Compact the patch (this is where “good enough” becomes “actually good”)
Compact the patch aggressively. A hand tamper works for small areas; a rented plate compactor is fantastic for larger
repairs. Compact until the patch is firm and level with the surrounding driveway surface. If the patch sinks low after
compaction, add more mix and compact again.
No tamper? In a pinch, you can compact with the flat end of a heavy 4×4, or carefully drive a vehicle tire over the
patch a few timesslowly and straightafter an initial tamp. (This is not the official “luxury spa treatment,” but it
does help seat the material.)
Step 7: Finish the edges and let it cure
Smooth the surface so it transitions cleanly to the surrounding asphalt. If possible, feather the edges slightly
to reduce tire impact. Many cold patch repairs can take traffic the same day, but they continue to firm up over time.
Avoid sharp turns on the patch for the first day or twospinning tires can twist fresh material.
Common Pothole Repair Mistakes (and How to Avoid Them)
- Skipping edge cutting: Feathered edges don’t confine the patch; it loosens and breaks apart.
- Not removing soft base: The patch sinks, dents, or cracks because the foundation fails.
- Under-compacting: Loose mix raveling is basically inevitable without serious compaction.
- Filling deep holes in one thick layer: The top compacts; the bottom stays spongy and settles later.
- Ignoring drainage: If water keeps pooling, even a great patch has a tough life.
How Long Will an Asphalt Pothole Repair Last?
Longevity depends on traffic, weather, water exposure, andmost importantlybase condition and compaction. A properly
prepared and compacted patch in a stable, well-drained driveway can last a long time. A patch placed into a wet, soft
pothole with crumbling edges may behave like a temporary plug.
If you want the repair to last, treat the edges and water management seriously. Consider sealing cracks nearby and
keeping water from pooling at the repair zone.
After the Patch: Maintenance That Prevents Future Potholes
Seal cracks early
Small cracks are potholes-in-training. Fill them before water can infiltrate and weaken the base. Crack repair is
cheaper, faster, and dramatically less annoying than rebuilding a pothole.
Keep water moving away
Clean nearby drains, adjust downspouts, and regrade edges if runoff sits on the driveway. Water is the #1 repeat
offender in driveway pothole repair cases.
Sealcoat on a sensible schedule
Sealcoating won’t fix structural problems, but it can help reduce water intrusion and slow surface oxidation in many
driveways. If your asphalt is aging but still structurally decent, sealcoat can be a smart part of a maintenance plan.
Cost Reality Check: DIY vs. Professional Repair
DIY asphalt pothole repair is usually affordable: the main costs are patch material and, if needed, a hand tamper or
a short-term plate compactor rental. Professional work costs more but can deliver longer lifeespecially when hot mix
asphalt and proper equipment are used, or when the repair requires base reconstruction across a larger area.
A practical rule: if you’re patching more potholes than you can count without taking your shoes off, it may be time to
consider a bigger fix (resurfacing, drainage correction, or full-depth repair in problem zones).
Real-World Experiences: What You Learn After Repairing a Few Potholes (Extra Field Notes)
The first pothole you repair teaches confidence. The second teaches humility. By the third, you’ll have strong opinions
about hand tampers, weather forecasts, and that one low spot where water always collects like it owns the place.
Here are some real-life, homeowner-style lessons that make a driveway pothole repair go from “looks good today” to
“still looks good next season.”
1) The patch that popped out was an edge problem, not a material problem
If you’ve ever watched a patch crumble at the perimeter first, you’ve seen what happens when the hole wasn’t squared
and the edges weren’t stable. Feathered asphalt behaves like a weak crustit breaks under compaction and traffic, and
water slips in around the patch. The fix is annoyingly simple: cut the edges clean, remove the weak asphalt, and give
the patch vertical walls to press against. It feels like “extra work,” but it’s actually the work.
2) “I compacted it” and “I compacted it enough” are two different sentences
Most DIY failures aren’t dramatic blowouts. They’re slow, sad settlingyour patch turns into a shallow dish that
collects water, and suddenly you’re right back where you started. The lesson: compaction is not a polite suggestion.
Tamp until the surface stops moving and feels like the surrounding driveway. And if the patch sinks after tamping,
don’t panicadd more material and compact again. Overfilling slightly before final compaction is normal.
3) Cold weather repairs can work, but warm materials work better
Plenty of cold patch products are designed for broad temperature ranges, but the experience is noticeably different
when the mix is warm and pliable. A bag stored in a cold garage can feel stiff and stubborn, making it harder to pack
tight. The easy win is to keep the bag in a warmer space beforehand. You’ll spend less time wrestling clumps and more
time achieving a dense, traffic-ready patch.
4) The “mystery pothole” usually has a water story
When a pothole appears in the same spot repeatedly, it’s rarely bad luck. It’s often runoff from a downspout, a low
spot that holds water, or an edge where soil has washed out. One homeowner fix that pays off is simply redirecting
waterextending a downspout, cleaning a clogged swale, or regrading the shoulder so the driveway edge is supported.
Patch first, yesbut also give the driveway a chance by reducing the water exposure that created the problem.
5) “Make it pretty” is good, but “make it shed water” is better
A perfectly flush patch looks great, but the best repairs also encourage water to move along. If the area is a known
low spot, shaping the surface just slightly to prevent puddling can extend the life of the repair. You’re not building
a ski slopejust avoiding a birdbath.
The big takeaway from experience is simple: the best asphalt pothole repair is less about fancy products and more
about good prep and good compaction. Do the unglamorous steps well, and the patch has a fighting chance to last.
Conclusion
Repairing an asphalt pothole isn’t complicated, but it does reward patience and proper technique. Remove all loose
material, rebuild the base if needed, cut clean edges, pack the patch in layers for deeper holes, and compact it like
you’re trying to impress a stern highway inspector. Add sensible drainage and crack maintenance, and you’ll spend far
less time doing repeat repairsand far more time enjoying a driveway that doesn’t try to swallow your tires.