Table of Contents >> Show >> Hide
- What Does “Redline” Mean in Word?
- Easy Way #1: Redline a Document with Track Changes
- Easy Way #2: Redline a Document with Compare
- Track Changes vs. Compare: Which Redlining Method Should You Use?
- Common Redlining Mistakes to Avoid
- How to Send a Clean Final Version
- Practical Example: The Fastest Way to Handle a Real Redline Request
- Real-World Experiences with Redlining in Word
- Final Thoughts
- SEO Tags
If you have ever been told to “redline the document” and immediately felt your soul leave your body, welcome. The good news is that redlining in Microsoft Word is nowhere near as scary as it sounds. You do not need secret lawyer powers, a monocle, or an office filled with people who say things like “per my last revision.” In plain English, redlining just means showing edits clearly so everyone can see what changed, who changed it, and whether those changes should stay.
In Microsoft Word, there are two especially easy ways to do this. The first is to use Track Changes while you edit the document live. The second is to use Compare to create a redlined copy from two versions of the same file. Both methods work well, but they solve slightly different problems. One is best when you are actively collaborating. The other is perfect when someone hands you two drafts and says, “Can you tell me what changed?”
This guide walks through both methods, explains when each one makes sense, and helps you avoid the classic redlining mishaps, like sending the wrong version, hiding markup by accident, or leaving comments behind like digital fingerprints at a crime scene.
What Does “Redline” Mean in Word?
In business, academic, and legal settings, a redlined document is a version that visibly shows revisions. That usually includes insertions, deletions, formatting changes, and comments. Word does not always use the word “redline” in its menus, which is why people get confused. Instead, Microsoft Word usually handles redlining through Track Changes or through the Compare feature, which is sometimes called a legal blackline.
So if your manager, editor, client, professor, or contract-loving coworker asks for a redline, they are usually asking for one of two things:
- A document where edits are visibly marked as they happen
- A comparison document that shows the differences between an original draft and a revised draft
That distinction matters. If you pick the wrong method, you may still get the job done, but you might make it way harder than it needs to be.
Easy Way #1: Redline a Document with Track Changes
If you are editing a document directly and want Word to record every addition, deletion, and formatting tweak, Track Changes is your best friend. It is the classic way to redline a document in Microsoft Word, and once you turn it on, Word starts keeping score for you.
How to Turn On Track Changes
Open the document in Word, then go to the Review tab. Click Track Changes. In current versions of Word, you may be able to choose whether to track everyone’s changes or just your own. Once it is on, the button is highlighted, and Word begins marking edits instead of silently replacing text.
That means if you add words, they appear as insertions. If you delete text, it does not vanish into the void. It usually stays visible with strikethrough formatting. If you change formatting, Word can track that too. In other words, nothing sneaks past the review process wearing a fake mustache.
How the Redline Looks on the Page
Word lets you control how markup appears. This is useful because sometimes you want a clean-ish view of the page, and other times you want every change screaming for attention. The most common display options are:
- Simple Markup: shows a cleaner view with change indicators in the margin
- All Markup: shows all edits directly on the page
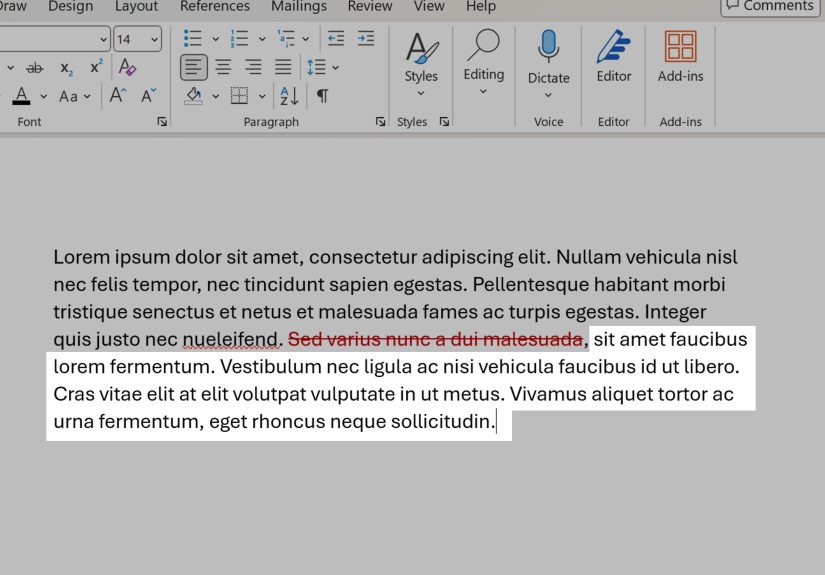
- No Markup: hides the visible markup but does not remove the tracked changes
This is where many people get tripped up. No Markup does not mean the edits are gone. It only means the edits are hidden from view. If you send that file to someone else, the tracked changes may still be sitting there, quietly waiting to reappear at the worst possible moment.
How to Make Edits in Redline Mode
Once Track Changes is on, edit normally. Seriously. Type, delete, replace, rephrase, and clean up awkward sentences like you usually would. Word handles the visual evidence. You do not need to manually color text red, underline things by hand, or create your own weird homegrown markup system from 2004.
For example, if you are revising a policy memo and you change “Employees may work remotely on Fridays” to “Eligible employees may work remotely up to two days per week,” Word will mark the deleted and inserted text so reviewers can see the exact language shift. That makes conversations much easier because everyone is looking at the same visible change instead of trying to remember what the sentence used to say.
How to Add Comments While Redlining
Comments are like sticky notes for your future self or other reviewers. They are perfect when you want to ask a question, explain why you changed something, or flag a section that needs a decision. Highlight the text, go to the Review tab, and add a comment.
Use comments when the edit needs context. For instance:
- “Updated to match the new pricing policy”
- “Please verify the deadline with Legal”
- “I rewrote this section for clarity, but the original data point may need to stay”
That extra note can save fifteen emails and one mildly dramatic meeting.
How to Review, Accept, or Reject Changes
After the edits are in, Word gives you control over what becomes final. On the Review tab, use Accept or Reject to move through changes one by one. Word will jump to the next change automatically, which is handy when you are doing a full review pass.
You can also accept or reject everything at once, but use that button with caution. “Accept All” is fantastic when the edits are minor and fully approved. It is less fantastic when you click it too quickly and accidentally bless a sentence that reads like it was drafted during a coffee shortage.
When Track Changes Is the Best Choice
Use Track Changes when:
- You are editing a document directly
- You want a visible history of live revisions
- Multiple people are reviewing the same working draft
- You want comments and edits in one place
If the document is still evolving and people are collaborating in real time, this is usually the easiest and smartest option.
Easy Way #2: Redline a Document with Compare
The second easy way to redline a document in Microsoft Word is to use Compare. This method is ideal when you already have two versions of a file, such as an original draft and a revised draft, and you want Word to generate a clear redlined version showing the differences.
This is especially useful when someone edited the document without Track Changes turned on. Instead of sighing dramatically and comparing paragraphs with your eyeballs, you can let Word do the detective work.
How Compare Works
Go to the Review tab, then click Compare. Choose the option to compare two versions of a document. Word will ask you for an Original document and a Revised document. Once you select both files, Word creates a third document that shows what changed. Your original files are not altered.
That is the magic of this method. You do not have to risk damaging either version. Word simply builds a separate comparison copy, which is why this feature is so useful for contracts, formal reports, board materials, academic drafts, and any situation where version control matters.
What “Legal Blackline” Means
In Word, the Compare function is often described as a legal blackline. Despite the name, you do not need to be working on a merger agreement in a glass conference room to use it. A legal blackline is just a document comparison that highlights differences between two versions. It is popular in legal and business workflows because it makes negotiations and approvals much easier to follow.
Think of it this way: Track Changes is what you use while editing; Compare is what you use after editing when you need Word to reveal what changed between drafts.
When Compare Is Better Than Track Changes
Choose Compare when:
- You have two saved drafts and need a redline fast
- Someone forgot to turn on Track Changes
- You need a clean before-and-after comparison
- You want to preserve both original files untouched
For example, imagine a coworker sends back “final_v7_really_final_THIS_ONE.docx.” You suspect changes were made, but none are marked. Compare lets you line that version up against the earlier file and instantly generate a redlined view. No guessing. No squinting. No detective corkboard required.
Compare vs. Combine
One important note: if you are working with multiple reviewers, Combine may be the better tool. Compare is meant to show the differences between two versions. Combine is designed to merge revisions from multiple authors into one document. So if three reviewers each send back their own edited copies, Combine can pull those revision paths into a single file that is easier to review.
That distinction saves time. Compare is one-against-one. Combine is one-against-many.
Track Changes vs. Compare: Which Redlining Method Should You Use?
If you are still deciding which route to take, here is the simplest answer:
- Use Track Changes when you are actively editing the document
- Use Compare when you already have two separate versions
That is really it. Both methods create a redlined result, but they start from different workflows. One begins before the editing. The other begins after the editing.
If you work in teams, you may end up using both. A document might start with Track Changes during collaborative drafting, then later get run through Compare to verify what changed between milestone versions. That is not overkill. That is being the organized person everyone else secretly depends on.
Common Redlining Mistakes to Avoid
1. Thinking “No Markup” Removes the Edits
It does not. It just hides them. If you need a truly clean document, you must accept or reject the changes and delete comments.
2. Sending the Wrong Version
Name your files clearly. “Agreement_redline.docx” and “Agreement_clean.docx” are much better than “agreement_new2_finalish.docx.” Be kind to your future self.
3. Forgetting to Check Comments
Sometimes comments are hidden because the display settings are off. If comments seem to vanish, switch to All Markup and make sure comments are enabled in Show Markup.
4. Leaving Hidden Information in the File
Tracked changes, comments, author names, and other metadata can remain in a Word document even after you think you are finished. If the document is headed outside your team, inspect it before sharing.
5. Redlining in the Wrong Tool
If you only need to compare two completed drafts, do not manually turn one into a redline line by line. Word already has a built-in feature for that. Let software earn its paycheck.
How to Send a Clean Final Version
Once the edits are approved, create a polished final copy. Here is the safe process:
- Make sure all changes are visible in All Markup
- Accept or reject the tracked changes
- Delete comments
- Use Document Inspector if needed to remove hidden revisions, comments, and personal information
- Save the clean version with a clear file name
This matters more than many people realize. A document can look clean on screen while still carrying hidden revision history or comments in the file. If the document is sensitive, formal, or client-facing, spend the extra minute cleaning it up. That one minute can prevent a surprisingly memorable disaster.
Practical Example: The Fastest Way to Handle a Real Redline Request
Let’s say your boss emails and says, “Please redline the updated handbook and send me both the marked version and a clean version.” Here is the fastest sane workflow:
If you are editing the existing handbook yourself, open the file, turn on Track Changes, make the edits, add comments where needed, then save that as the redline. After approval, accept all changes, remove comments, inspect the file, and save a second copy as the clean version.
If someone already made changes in a separate file without tracking them, open Word, use Compare with the old handbook as the original and the new handbook as the revised copy, then save the generated comparison as the redline. After review, create a final clean copy from the approved revised document.
That is the whole game: one marked file for transparency, one clean file for final use.
Real-World Experiences with Redlining in Word
The funny thing about redlining is that it seems like a tiny technical skill until you actually need it. Then suddenly it becomes the difference between a smooth review process and a very awkward “Why does this policy still say casual Fridays are mandatory?” conversation.
One of the most common experiences people have with Word redlining is discovering Track Changes about five minutes too late. Maybe they already spent an hour editing a document, only to realize none of the changes were tracked. That is exactly where Compare becomes a lifesaver. It turns a moment of panic into a manageable fix. Instead of starting over, you compare the original and revised drafts and let Word build the redline for you.
Another very real experience is working with people who all review differently. One person edits directly in the sentence. Another person leaves ten comments on one paragraph. A third person changes formatting, headings, and spacing like they are remodeling a kitchen. In those situations, Track Changes is incredibly helpful because it shows not only what changed, but also helps reviewers understand the scale of the edit. A single rewritten sentence is one thing. A full structural rewrite is another.
Redlining also becomes surprisingly emotional in workplace settings. That may sound dramatic, but anyone who has sent a draft for review already knows the truth. When you see your document come back covered in markup, it can feel a little personal at first. The smart way to handle that is to remember what redlining is actually for: clarity, collaboration, and better decisions. A redline is not an insult. It is a map of the conversation.
In academic settings, Word redlining is often the difference between vague feedback and useful feedback. A professor, advisor, or editor can say, “This section needs work,” but a tracked revision plus a short comment is far more helpful. Students and writers can see the exact wording that changed, the note explaining why, and the specific places that need revision. That is much easier to act on than a mysterious margin comment that basically translates to “make it better somehow.”
Then there is the universal experience of almost sending the wrong file. Nearly everyone who works with redlines long enough has had a close call. Maybe the clean version still had comments buried in it. Maybe the redline got sent to the client when the final was requested. Maybe “No Markup” was on, so the document looked clean, but the hidden tracked changes were still there. That is why experienced Word users get almost comically careful with file names, review settings, and final inspections. It is not paranoia. It is survival.
Over time, using redlines well becomes less about clicking buttons and more about developing a workflow you trust. You learn when to use Track Changes, when to compare two drafts, when to add comments, and when to stop editing and finalize the file. Once that workflow clicks, Microsoft Word redlining goes from intimidating to routine. And honestly, that is the best kind of software skill: one that makes you look calm, capable, and mysteriously organized when everyone else is still hunting for “final_final_v9.”
Final Thoughts
If you want to redline a document in Microsoft Word, you really only need to remember two easy methods. Use Track Changes when you are editing live and want Word to mark every revision as it happens. Use Compare when you have two versions of a document and need Word to generate a redlined copy showing the differences.
That simple choice will handle most redlining situations you run into, whether you are revising a contract, editing a report, reviewing a policy, or trying to make sense of a mystery draft someone emailed at 11:47 p.m. Add comments when context helps, review changes carefully, and always create a clean final copy before you share the finished file.
Do that, and you will not just know how to redline a document in Microsoft Word. You will know how to do it without chaos, confusion, or accidental public sharing of your coworker’s very honest margin note.