Table of Contents >> Show >> Hide
- Quick Cheat Sheet: The Screenshot Shortcuts You’ll Actually Use
- How to Print Screen on a Windows Laptop (PC Methods)
- 1) Press the Print Screen key: copy now, paste later
- 2) Win + PrtSc: auto-save a full-screen screenshot (no pasting required)
- 3) Alt + PrtSc: capture only the active window
- 4) Win + Shift + S: the precision tool (Snipping Tool overlay)
- 5) “My Print Screen key opens snipping now”and that’s normal
- 6) No dedicated PrtSc key? Try these laptop-friendly combos
- 7) Taking screenshots in games: Xbox Game Bar shortcuts
- 8) When built-in tools aren’t enough: power-user screenshot apps
- How to Print Screen on a Mac Laptop (Mac Methods)
- 1) Capture the entire screen: Shift + Command + 3
- 2) Capture a specific area: Shift + Command + 4
- 3) Capture a window: Shift + Command + 4, then Space
- 4) Open the screenshot toolbar: Shift + Command + 5
- 5) Touch Bar screenshot (if your Mac has one): Shift + Command + 6
- 6) Copy to clipboard instead of saving a file: add the Control key
- 7) Where Mac screenshots go (and how to find them)
- Edit, Mark Up, and Share Like a Pro (Without Installing Anything)
- Common Screenshot Problems (and the “Why is my laptop like this?” Fixes)
- Screenshot Etiquette: Crop, Redact, and Don’t Accidentally Leak Your Life
- Real-World Screenshot Experiences (500-ish Words of “Yep, Been There”)
- Conclusion
Screenshots are the modern-day equivalent of yelling “I SAW IT!” and immediately producing evidence.
Whether you’re reporting a bug, saving a recipe before it vanishes behind a paywall, or proving (politely)
that yes, you did click “Submit,” knowing how to print screen on a laptop is a tiny skill with
big “thank-goodness-I-had-this” energy.
The fun part: there’s not just one way to take a screenshot. Windows laptops can
copy to clipboard, auto-save to a folder, or open snipping tools with a single shortcut. MacBooks
have screenshot combos that feel like secret handshakes (in a good way). This guide breaks it all down
with clear steps, practical examples, and minimal keyboard gymnastics.
Quick Cheat Sheet: The Screenshot Shortcuts You’ll Actually Use
If you only remember one section, make it this one. (And yes, you can screenshot itconsider that your first assignment.)
| Goal | Windows (PC Laptop) | Mac (MacBook) |
|---|---|---|
| Capture entire screen | PrtSc (copies) or Win + PrtSc (saves) | Shift + Command + 3 (saves) |
| Capture a selected area | Win + Shift + S (snip menu) | Shift + Command + 4 (crosshair) |
| Capture one window | Alt + PrtSc (copies active window) | Shift + Command + 4, then Space (camera) |
| Screenshot toolbar / more options | Snipping Tool (shortcut: Win + Shift + S) | Shift + Command + 5 (toolbar + recording) |
| Copy to clipboard (no file saved) | Most methods copy; paste with Ctrl + V | Add Control (e.g., Control + Shift + Command + 3) |
How to Print Screen on a Windows Laptop (PC Methods)
On Windows, “Print Screen” isn’t just one buttonit’s a whole screenshot ecosystem. Here are the best
ways to capture your screen, whether you want a quick copy, a neatly saved file, or a precise snip.
1) Press the Print Screen key: copy now, paste later
On many laptops, the key is labeled PrtSc, PrtScn, or something equally cryptic
that looks like it was abbreviated by a time traveler. Pressing it typically captures your entire screen and
copies it to your clipboard.
What to do next: Open an app that accepts images (Paint, Word, PowerPoint, Google Docs, email),
then press Ctrl + V to paste. Save from there if you want a file.
Best for: Quick “here’s what I’m seeing” momentsespecially if you’re already pasting into a document or chat.
2) Win + PrtSc: auto-save a full-screen screenshot (no pasting required)
If you want Windows to do the saving for you, use Windows key + Print Screen. Your screen may dim briefly
(Windows’ way of saying, “Screenshot acquired.”).
Where it goes: Usually Pictures > Screenshots. This is the “I’m taking five screenshots in a row and
I refuse to paste anything” method.
Best for: Step-by-step tutorials, receipts, and any situation where you need multiple shots fast.
3) Alt + PrtSc: capture only the active window
Got 27 tabs open and a desktop full of secrets? Alt + Print Screen grabs just the
active window (the one you’re currently using) and copies it to the clipboard.
Next step: Paste with Ctrl + V into your destination.
Best for: Cleaner screenshotsespecially when you don’t want your entire desktop cameoing in the background.
4) Win + Shift + S: the precision tool (Snipping Tool overlay)
If Print Screen is a hammer, Win + Shift + S is a Swiss Army knife. It opens a snipping overlay
so you can choose exactly what to capturerectangle, window, full screen, or freeform.
- Rectangular snip: drag a box around what you want.
- Window snip: click the app window you want to capture.
- Full-screen snip: capture everything, instantly.
- Freeform snip: draw around a shape like you’re outlining a treasure map.
After you snip, the image is usually copied to your clipboard, and you’ll often get a notification you can click to
edit, annotate, and save.
Best for: Highlighting a specific error message, grabbing just a chart, or capturing a menu that disappears the second you click away.
5) “My Print Screen key opens snipping now”and that’s normal
On some Windows setups, pressing PrtSc triggers screen snipping behavior (basically acting like a shortcut to the snip overlay).
If you prefer the old-school clipboard-only behavioror you’re trying to use a third-party screenshot toolyou can usually change
the Print Screen behavior in Windows keyboard/accessibility settings.
Best for: People who want one key to start snipping without memorizing extra shortcuts.
6) No dedicated PrtSc key? Try these laptop-friendly combos
Laptop keyboards love to hide important keys behind the Fn key like it’s a VIP lounge.
If your Print Screen key is combined with another key (often in the function row), try:
- Fn + PrtSc (common on many laptops)
- Fn + Windows key + Spacebar (helpful on some devices without a PrtSc key)
- Fn + (the key that has PrtSc printed on it) (often an F-key, depending on your laptop)
If one combo doesn’t work, don’t panic. Keyboard layouts vary wildly across brands, and the “right” key might be
printed in tiny letters that require the eyesight of a hawk.
7) Taking screenshots in games: Xbox Game Bar shortcuts
For games (and some full-screen apps), Windows has the Xbox Game Bar. Press Win + G to open it, then capture from the
on-screen controlsor use Win + Alt + PrtSc to take a screenshot quickly.
Where it goes: Typically Videos > Captures, which is a very “of course that’s where it goes” Windows choice.
8) When built-in tools aren’t enough: power-user screenshot apps
Built-in screenshot shortcuts are greatuntil you need things like scrolling screenshots, automatic upload workflows,
or consistent annotation tools. That’s where third-party tools shine:
- ShareX: free, powerful workflows, and even scrolling capture for long pages.
- Greenshot: lightweight and straightforward screenshot capture with quick edit options.
- Snagit: polished capture + editing and share features (popular for work documentation).
If you install one of these, it may take over the Print Screen keywhich is convenient until you’re wondering why
Windows stopped behaving the way your muscle memory demands.
How to Print Screen on a Mac Laptop (Mac Methods)
MacBooks don’t have a “Print Screen” key, but they do have screenshot shortcuts that are fast, reliable,
and (once you learn them) weirdly satisfying. Think of it like learning a magic spellexcept the spell
creates PNGs instead of turning your roommate into a frog.
1) Capture the entire screen: Shift + Command + 3
Press Shift + Command + 3 and macOS captures the whole screen. If you have multiple displays, it will typically capture each display.
Best for: Full-screen receipts, “look at this” moments, or capturing your whole layout for troubleshooting.
2) Capture a specific area: Shift + Command + 4
Press Shift + Command + 4 and your cursor becomes a crosshair. Click and drag to select the area you want. Release to capture.
Press Esc if you change your mind (no shame).
Pro move: While selecting, you can often hold Space to reposition the selection box without changing its size
handy when your aim is “close enough” but your standards are “not embarrassing.”
3) Capture a window: Shift + Command + 4, then Space
Start with Shift + Command + 4, then tap Space. Your cursor becomes a camera icon. Click a window to capture it.
This method usually includes the window shadow for a nice “it’s official” look.
Best for: Clean app screenshots for tutorials, presentations, and “my browser is doing that thing again” messages.
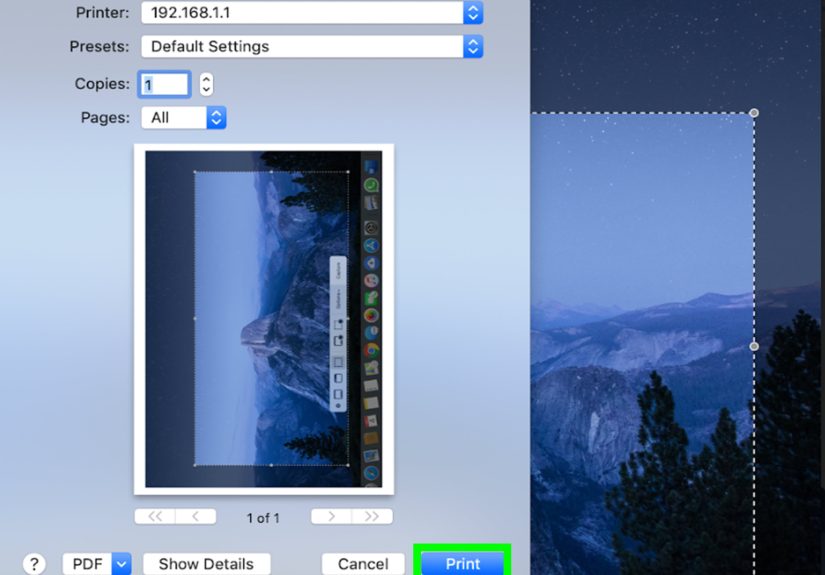
4) Open the screenshot toolbar: Shift + Command + 5
This is the Mac screenshot control center. Press Shift + Command + 5 to bring up a toolbar where you can:
- Capture the entire screen, a window, or a selected portion
- Record your screen (entire or selected portion)
- Set a timer (great for capturing menus or hover states)
- Choose where screenshots are saved
Best for: People who want options, timers, and screen recording without extra software.
5) Touch Bar screenshot (if your Mac has one): Shift + Command + 6
On certain MacBook Pro models with a Touch Bar, Shift + Command + 6 captures the Touch Bar itself.
It’s niche, but if you need it, you really need it.
6) Copy to clipboard instead of saving a file: add the Control key
Want to paste your screenshot straight into an email, Slack message, or note? Hold Control in addition to your usual screenshot shortcut.
Example: Control + Shift + Command + 3 copies a full-screen screenshot to the clipboard instead of saving it.
Best for: Sharing fast without littering your desktop with 47 “Screenshot 2026-01-30 at 10.14.22 AM” files.
7) Where Mac screenshots go (and how to find them)
By default, macOS typically saves screenshots to your Desktop. If you see a thumbnail preview in the corner, you can click it to edit immediately
(crop, markup, sign documents like a dramatic movie character, etc.).
Can’t find your screenshot? Try searching in Finder for “Screenshot” or use Spotlight. If you changed the save location in the toolbar options, check that folder.
Edit, Mark Up, and Share Like a Pro (Without Installing Anything)
Taking a screenshot is only half the job. The other half is making sure the screenshot is actually useful to whoever’s looking at it
(including Future You, who will not remember what “IMG_thing-final-final2.png” means).
Windows: annotate with Snipping Tool
After a snip, open it in the Snipping Tool window (often via the notification). Use built-in markup to highlight, draw arrows, crop, and save.
This is perfect for pointing out “this button right here” without writing a paragraph of directions that nobody will read.
Mac: Preview and the screenshot thumbnail
On a Mac, click the screenshot thumbnail to open quick editing tools. You can crop, draw, add text, and even sign documents. If you miss the thumbnail,
double-click the screenshot file to open it in Preview and edit there.
Common Screenshot Problems (and the “Why is my laptop like this?” Fixes)
Problem: Print Screen does nothing
- Try Fn: On many laptops, you need Fn + PrtSc or Fn + (key with PrtSc on it).
- Check function lock: Some keyboards toggle Fn behavior with an Fn Lock key (often Fn + Esc).
- Use Win + Shift + S: If your PrtSc is being weird, snip overlay usually works.
Problem: The screenshot didn’t save anywhere
This is usually a clipboard-vs-file mix-up:
- PrtSc or Alt + PrtSc usually copies to clipboard. You must paste and save.
- Win + PrtSc usually saves automatically (often to Pictures > Screenshots).
- Game Bar often saves to Videos > Captures.
- Mac usually saves to Desktop unless you changed it in the screenshot toolbar options.
Problem: Print Screen now opens screen snipping (and I want it back)
Windows can route the Print Screen key to screen snipping. If you’d rather use classic behavior or a third-party tool,
check keyboard/accessibility settings and change the Print Screen shortcut behavior.
Problem: I can’t screenshot a streaming video / protected app
Some apps and services block screenshots for copyright or privacy reasons. If you capture a black screen, that’s not your laptop failing
it’s the app politely (or not-so-politely) refusing.
Problem: I need a scrolling screenshot (a whole page, not just what’s visible)
Built-in tools often capture only what’s on screen. For long web pages or chat logs, consider a tool like ShareX (Windows) that can do scrolling captures,
or use a browser extension designed for full-page screenshots. (Yes, your browser has opinions about this. It’s fine.)
Screenshot Etiquette: Crop, Redact, and Don’t Accidentally Leak Your Life
Before you hit “Send,” do a quick safety scan:
- Crop aggressively: If it’s not relevant, remove it.
- Blur sensitive info: Names, email addresses, order numbers, addresses, and anything that looks like it could summon customer support.
- Watch the browser tabs: Nobody needs to know you have “how long to boil an egg” open three times.
- Check notifications: Screenshots have impeccable timing when it comes to capturing pop-ups from your group chat.
Real-World Screenshot Experiences (500-ish Words of “Yep, Been There”)
Let’s talk about screenshots the way they actually happen in real life: under pressure, slightly panicked, and usually while someone is waiting for you to
“just send a quick pic of the error.” If screenshots had a theme song, it would be the Jeopardy music.
Experience #1: The Disappearing Dropdown Menu. You know the onehover menus that vanish the second you move your mouse. This is where timers and snipping tools
become heroes. On Mac, Shift + Command + 5 lets you set a timer so you can open the menu first, then let the screenshot happen on schedule.
On Windows, Win + Shift + S is great, but the trick is practice: open the menu, then snip quickly before it disappears like a shy woodland creature.
Once you learn the rhythm, you’ll feel like a keyboard ninja. A nerdy keyboard ninja, but still.
Experience #2: Tech Support Translation. Ever tried describing an error message over email? It’s like explaining a dream.
“There’s a box… it’s kind of blue… it says something about a DLL… and I think it’s mad at me.” A screenshot turns chaos into clarity.
The best method here is usually Alt + PrtSc on Windows (captures just the active error window), because nobody needs your entire desktop
plus 19 open tabs as supporting evidence. On Mac, use Shift + Command + 4 and drag just around the message.
Your IT team will silently thank you. (They won’t say it out loud. They have a reputation.)
Experience #3: The “Where Did It Save?!” Spiral. This is a rite of passage. You press a screenshot shortcut, you see a quick flash, and then you go hunting
like a raccoon searching for a shiny object. The fix is learning which method you used:
clipboard methods require pasting, auto-save methods create files, and game captures may hide in a totally different folder.
Once you internalize this, you stop blaming your laptop for “eating” screenshots and start blaming… your past self’s shortcut choice. Growth!
Experience #4: Screenshot Cleanup Day. Mac users know the “Desktop Screenshot Snowdrift” phenomenon. Windows users get the “Pictures/Screenshots folder that
became a time capsule.” The solution is boring but magical: pick a dedicated folder and stick to it.
On Mac, set your screenshot save location in the screenshot toolbar. On Windows, consider using a consistent workflow:
snip, annotate, save to a “Screenshots” folder inside your project folder. You’ll feel organized. Briefly. Until the next week happens.
Experience #5: The Accidental Overshare. Most of us have done it: you screenshot something to share a detail, then realize your screenshot also included a notification,
a calendar reminder, or a tab you definitely did not mean to broadcast. The cure is a two-second habit: before sending, zoom in and scan the corners.
Crop, blur, and re-save. Screenshots are powerful. Use them like Spider-Man would: with great power comes great responsibility (and also great memes).
Conclusion
Once you know the right shortcut, taking a screenshot becomes effortless: full screen when you need context, window-only when you want it clean, and snipping tools
when you need precision. On Windows laptops, the Print Screen family (PrtSc, Win + PrtSc, Alt + PrtSc, Win + Shift + S) covers nearly every scenario.
On MacBooks, the Shift-Command combos (3, 4, and 5) are fast, flexible, and surprisingly fun once they’re in muscle memory.
Bookmark the cheat sheet, practice the one shortcut you’ll use most, and you’ll never again have to take a blurry photo of your laptop screen with your phone
like it’s 2009. (No judgment. Okay, tiny judgment. But mostly love.)