Table of Contents >> Show >> Hide
- What You’ll Learn
- Step 0: Choose Your Installation Method (Yes, This Is a Real Step)
- Tools and Materials Checklist
- Step 1: Condition the Jobsite (Your Floor Hates Surprises)
- Step 2: Subfloor Prep (Where Good Floors Are Born)
- Step 3: Plan Your Layout (So the Last Row Isn’t Comedy-Club Narrow)
- Step 4: Underlayment and Vapor Control
- Step 5: How To Lay Engineered Wood Floors (Three Ways)
- Step 6: Finishing Touches That Make It Look “Finished”
- Common Mistakes (and How to Avoid Becoming a Cautionary Tale)
- Basic Care After Installation
- Experience-Based Lessons From the Project (500+ Words)
- 1) The first row sets the toneliterally and emotionally
- 2) Subfloor prep feels like procrastination… until it saves you
- 3) Door jambs are where confidence goes to get humbled
- 4) Glue-down installs teach you time management like a strict gym coach
- 5) The last row is always a math problem you didn’t study for
- 6) The “perfect pattern” is the enemy of a natural-looking floor
- Conclusion
- SEO Tags
Engineered wood flooring is like the “smart casual” outfit of the flooring world: it looks like real hardwood,
performs well in more places than solid wood, and can be installed a few different ways depending on your room,
your subfloor, and your patience level. The tricky part isn’t the clicking, gluing, or nailingit’s all the
unglamorous prep work that keeps your floor from turning into a noisy, gappy, wavy regret.
This guide walks you through the full processchoosing an installation method, prepping the subfloor, handling
moisture, laying the planks, and finishing cleanlyso your engineered hardwood installation looks like a pro did it
(even if you watched three videos and then started anyway).
Step 0: Choose Your Installation Method (Yes, This Is a Real Step)
Engineered hardwood can typically be installed as a floating floor, a glue-down,
or a nail/staple-down floor. Which one you choose affects cost, feel underfoot, sound, and how
forgiving the project is when your subfloor isn’t perfectly behaved.
Option A: Floating (Click-Lock or Glue-Together)
A floating engineered wood floor locks together plank-to-plank and “floats” over underlayment instead of being
attached to the subfloor. This is popular for DIY because it’s fast, clean, and doesn’t require a nailer or buckets
of adhesive. It also makes future plank replacement less dramatic.
- Best for: Many above-grade rooms, apartments/condos (sound mats help), DIY installs.
- Watch-outs: Subfloor must be very flat; bounce and squeaks usually mean prep was skipped.
Option B: Glue-Down
Glue-down means troweling adhesive onto the subfloor and pressing planks into it. It’s often used over concrete and
is frequently recommended when you want a more “solid” feel. It can also work well over certain radiant heating
setups when approved by the flooring manufacturer.
- Best for: Concrete slabs, wide planks, areas where you want a stable, quiet feel.
- Watch-outs: Messy if rushed; moisture limits must be respected; adhesive choice matters.
Option C: Nail-Down or Staple-Down
Nail/staple installs use a flooring nailer/stapler to fasten planks to a wood subfloor (typically plywood/OSB over
joists). This is traditional, strong, and feels great underfootassuming the subfloor is solid and squeak-free.
- Best for: Plywood/OSB subfloors, many main-floor installs, classic hardwood “feel.”
- Watch-outs: Not for bare concrete unless you build a plywood system; tools add cost.
Tools and Materials Checklist
Your exact list depends on the method, but here’s the practical starter kit.
For Any Method
- Measuring tape, pencil, chalk line
- Safety gear: eye protection, hearing protection, dust mask/respirator
- Utility knife, straightedge
- Spacers for expansion gap
- Rubber mallet + tapping block + pull bar (for tight edges)
- Miter saw or circular saw (plus a fine-tooth blade)
- Jamb saw (or oscillating tool) for undercutting door casings
- Moisture meter (wood) + concrete moisture test method if installing over slab
Floating Method Adds
- Underlayment (sound/moisture as required)
- If glue-together: wood glue approved for flooring joints (if manufacturer requires)
Glue-Down Adds
- Approved flooring adhesive (often urethane-based; follow your flooring/adhesive specs)
- Notched trowel sized per adhesive instructions
- Painters tape + adhesive remover wipes (because gravity loves fresh glue)
Nail/Staple-Down Adds
- Flooring nailer/stapler + compressor (or manual nailer where needed)
- Approved fasteners for your plank thickness
- Rosin paper/felt (when required) or other vapor retarder approved for your situation
- Finish nails + nail set (for the first/last rows)
Step 1: Condition the Jobsite (Your Floor Hates Surprises)
Most flooring failures don’t start with “bad wood.” They start with “the room wasn’t ready.”
Before your first plank goes down, get the space to normal living conditions and keep it there.
Target temperature and humidity
Many manufacturers call for a conditioned space with HVAC running and a stable temperature/humidity range before and
during installation. As examples, some engineered wood guidelines specify roughly 60–80°F and
35–55% relative humidity as service-like conditions, with moisture content checks performed and
recorded. (Your product may differfollow the paperwork in your boxes.)
Acclimation: do you need it?
Engineered wood is more dimensionally stable than solid hardwood, but “more stable” is not the same thing as
“immune to physics.” Many pros still store the flooring in the installation area before install so it can adjust to
the home’s conditions. Think of it as letting the boards meet their future roommates before committing.
Do the wet work first
Flooring should be among the last items installed in new construction or renovations. Painting, drywall mud,
plumbing, and anything else that adds moisture to the building should be completeand drybefore flooring arrives.
Step 2: Subfloor Prep (Where Good Floors Are Born)
A beautiful engineered hardwood floor can still feel terrible if the subfloor is uneven, damp, or loosely fastened.
Prep is not glamorous, but it’s cheaper than tearing out an entire room because you “thought it was probably fine.”
Flatness matters more than “level”
Your floor does not need to be perfectly level like a science lab. It does need to be flatno hills and
valleys. A commonly cited benchmark in wood-floor prep is around 3/16 inch over a 6-foot span
(and tighter for some floating floors). Check your specific product requirements, then use a long straightedge or
level and mark trouble spots.
Fix squeaks, bounce, and loose panels
- Screw down loose subfloor panels into joists.
- Replace water-damaged or delaminated plywood/OSB.
- Sand down high seams; fill low areas with an approved floor patch/leveler (as allowed for your method).
Moisture testing: non-negotiable
Moisture is the #1 villain in the engineered wood installation story. Retailer and manufacturer instructions
commonly require moisture testingpin meters for wood subfloors and approved test methods for concrete slabswith
results documented before installation.
Concrete slabs: curing and moisture limits
- New concrete needs time: Some installation instructions note a minimum of 6 weeks drying time for new slabs before covering with wood flooring.
- Test, don’t guess: In-situ relative humidity testing (ASTM F2170) often uses a 72-hour equilibration period, and typical acceptance limits for wood-based products are often cited around 75% RH unless your adhesive/system allows more.
- Use the right barrier/system: If moisture readings are too high, you may need a manufacturer-approved moisture barrier system rather than “hoping the underlayment handles it.”
Wood subfloors: moisture content and differences
Manufacturer instructions frequently set limits for wood subfloors (often in the low teens) and may require that
the difference between subfloor moisture and flooring moisture stay within a specific range. One set of published
installation instructions, for example, calls for a maximum subfloor moisture content and no more than a few percent
difference between subfloor and flooring moistureyour product may have its own numbers, so verify before you start.
Radiant heat: follow the rules
Many engineered hardwood products can be installed over hydronic radiant heat when approved by the
manufacturer, with common limits like keeping the surface temperature at or below about 85°F and
running the system to drive off residual moisture before installation. Radiant heat installs are not the place for
improvisation.
Step 3: Plan Your Layout (So the Last Row Isn’t Comedy-Club Narrow)
Layout is where you save yourself from the classic DIY ending: “Everything looked great until the last row, and then
I had to rip 27 planks into toothpicks.”
- Pick direction: Many installers run planks parallel to the longest wall or along the main light source for a clean look. If you’re on a joist system and nailing down, direction may be influenced by joist orientation and product specs.
- Dry lay a few rows: Open multiple cartons to blend color/variation naturally and avoid a “striped” floor.
- Check your final row: Measure the room width and divide by plank width. Adjust your starting row so the last row is not a skinny sliver.
- Set your expansion gap: Use spacers along the perimeter. Baseboards/shoe molding cover the gapso you don’t need to “make it tight.”
Staggering joints (aka: avoiding the dreaded “H-pattern”)
Most installation instructions require end joints to be staggered from row to row for strength and appearance. A
common requirement is a minimum stagger of several inches (often around 6 inches or more), and wider
planks may require larger offsets. Read your flooring’s instructions and follow the stricter rule.
Step 4: Underlayment and Vapor Control
Underlayment is not just “the squishy stuff.” Depending on the product, it can provide sound reduction,
minor cushioning, and moisture vapor control. Some manufacturers require specific
underlayments to maintain warranty coverage.
- Floating installs: Often use an underlayment layer (foam, cork, rubber, etc.), sometimes with an integrated moisture barrier for slabs. Follow the underlayment specs and tape seams as directed.
- Nail/staple installs: May use rosin paper or felt as a slip sheet/vapor retarder (product-dependent) to help reduce friction noises and manage minor moisture migration.
- Glue-down installs: Typically do not use standard floating underlayment. If moisture control is required, use a compatible liquid-applied barrier/system approved for your adhesive and flooring.
Step 5: How To Lay Engineered Wood Floors (Three Ways)
Option A: Floating Engineered Hardwood (Click-Lock or Glue-Together)
- Install underlayment: Roll it out perpendicular to the plank direction if recommended, trim to fit, and tape seams per manufacturer instructions.
- Set spacers: Place spacers along walls to maintain the expansion gap specified by your flooring.
- Start with your straightest boards: A crooked first row creates a crooked life. If the wall is wavy, snap a chalk line and keep the first row straight to that line.
- Assemble row 1: For glue-together floating floors, apply glue to the joint as directed (some products are click-lock and require no glue). Keep the tongue facing into the room when required by the product profile.
- Build additional rows: Connect tongue-and-groove/click joints and tap gently with a tapping blocknever directly with a hammer unless you enjoy replacing planks.
- Cut around obstacles: Undercut door casings so planks slide underneath for a clean look. Leave expansion space around pipes and cover with trim rings.
- Fit the last row: Measure from the board face to the wall and subtract the expansion gap before ripping the final row width.
- Finish and wait: Install transitions, then reinstall baseboard/shoe molding (fasten to the wall, not the floor). If glue was used in joints, avoid heavy traffic and furniture until the recommended cure time.
Option B: Glue-Down Engineered Hardwood
Glue-down is wonderfully solid when done right and wonderfully miserable when rushed. Work in small sections and keep
your lines straight.
- Prep the slab/subfloor: It must be clean, dry, and within moisture limits. Remove dust thoroughly (vacuum is your best friend here).
- Snap a guideline: Because your wall may not be perfectly straight. Start off a reference line so your rows stay true.
- Spread adhesive in manageable areas: Many guides recommend only spreading enough for two to three rows at a time. Hold the notched trowel at about a 45° angle so the ridges are consistent.
- Lay the first row carefully: Use the straightest planks and align to your guideline. This row controls everything after it.
- Set planks without sliding: Press planks into the adhesive and tap into place. Sliding through wet adhesive can reduce transfer and create hollow spots.
- Check transfer occasionally: Lift a plank now and then to confirm you’re getting good adhesive contact (per adhesive requirements).
- Clean as you go: Wipe off adhesive squeeze-out immediately using approved cleaner. “I’ll clean it later” is how you end up sanding dried glue off a finished plank at midnight.
- Let it cure: Keep traffic light until the adhesive cures per manufacturer instructions, then install transitions and trim.
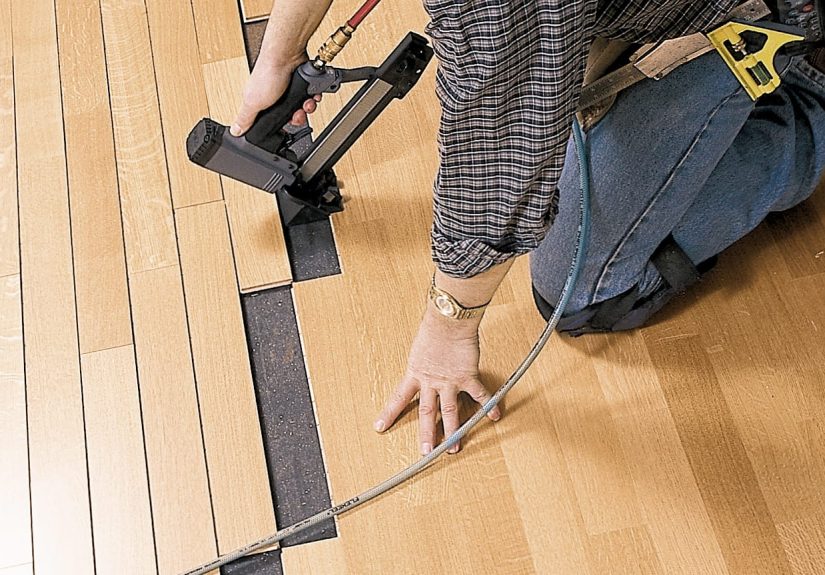
Option C: Nail-Down / Staple-Down Engineered Hardwood
If your subfloor is wood and solid, nail/staple installs feel classic and sturdy. The key is a squeak-free base and
consistent fastening.
- Install slip sheet/vapor retarder if required: Roll out felt/rosin paper per instructions and overlap seams as directed.
- Mark joists (optional but helpful): Especially near walls where you’ll face-nail and want solid bite.
- Lay the first row: Pre-drill and face-nail near the wall (you won’t fit the flooring nailer there). Use a nail set to sink heads and fill holes with matching filler.
- Blind-nail subsequent rows: Once you have clearance, use the flooring stapler/nailer at the correct angle into the tongue, keeping fastener spacing per your flooring instructions.
- Stagger joints: Keep end joints offset to avoid weak points and repeating patterns.
- Handle the last rows: When the nailer no longer fits, return to hand nailing/finishing nails and a nail set.
- Remove spacers and trim out: Install baseboards/shoe molding to the wall, not the floor, so the floor can expand and contract.
Step 6: Finishing Touches That Make It Look “Finished”
- Transitions: Use T-moldings, reducers, and thresholds at doorways and where flooring meets tile/carpet.
- Trim: Reinstall baseboards and add shoe molding if needed. Fasten to the wall, not the floor, to preserve the expansion gap.
- Furniture protection: Add felt pads to chair and table legs and use floor-safe casters when needed.
- Rugs: Wait until any adhesives are cured before covering large areas with rugs.
Common Mistakes (and How to Avoid Becoming a Cautionary Tale)
“My floor feels bouncy”
Floating floors will telegraph subfloor dips. Re-check flatness and fix low spots per product-approved methods. If
you’re on a wood subfloor, tighten panels to joists and eliminate movement before installing.
“I’m getting squeaks”
Squeaks usually come from subfloor movement, improper fastener schedule, or debris under planks. The fix is almost
never “push harder on the plank.” It’s fastening/flattening/cleaning the base properly.
“There are gaps between boards”
Small seasonal gaps can happen, but big gaps often come from poor joint engagement, damaged tongues/grooves, or
installing outside the recommended humidity range. Ensure tight connections during install and maintain steady indoor
RH afterward.
“My seams are peaking or cupping”
This points to moisture imbalance (too wet below, too dry above), insufficient expansion space, or installing over a
slab/subfloor that wasn’t within limits. Moisture testing and proper vapor control prevent most of this.
Basic Care After Installation
Engineered hardwood is tough, but it’s not a fan of standing water, gritty shoes, or furniture legs that behave like
chisels. Keep it happy with a few simple habits:
- Wipe spills promptly and avoid wet-mopping.
- Use mats in high-spill zones (kitchen sink, entry doors) and move rugs occasionally to prevent uneven aging.
- Use felt glides on furniture and keep pet nails trimmed to reduce scratching.
Experience-Based Lessons From the Project (500+ Words)
Below are “experience” lessons you’ll recognize if you’ve ever installed a floor (or watched someone do it while
holding a flashlight and offering unhelpful opinions). These aren’t personal war storiesthink of them as the
greatest hits of what homeowners and installers commonly learn the hard way.
1) The first row sets the toneliterally and emotionally
A common DIY experience is realizing that the first row is 90% geometry and 10% existential dread. If your starting
wall is even slightly out of square, blindly following it can create a slow-motion disaster where each new row
“mysteriously” drifts. The fix is delightfully boring: snap a chalk line and build off a straight reference. Once
your first two rows are locked in correctly, your stress level drops by approximately 47% and you start making jokes
again.
2) Subfloor prep feels like procrastination… until it saves you
People often underestimate how loud an imperfect subfloor can become. Tiny ridges, a couple of loose screws, or a
hollow dip can translate into squeaks, clicks, and that “why does it sound like a haunted ship?” vibe. The lesson
many learn: when you spend an extra hour flattening and tightening the subfloor, you don’t just improve the finish
you improve the feel. It’s the difference between a floor that looks good and a floor that feels expensive every
time you walk across it.
3) Door jambs are where confidence goes to get humbled
Nearly everyone has a moment where they stare at a door casing and think, “Surely the plank will just slide under
there,” and then it doesn’t. Undercutting door jambs feels intimidating until you do it once. After that, it becomes
strangely satisfyinglike giving your flooring a perfectly tailored suit. The pro move is using a scrap piece of
flooring as a height guide so you don’t cut too high. The emotional move is remembering to remove the tiny cut-off
bits before you step on them barefoot.
4) Glue-down installs teach you time management like a strict gym coach
With glue-down, you quickly learn the meaning of “open time.” Spread too much adhesive and you’ll be racing against
tackiness while trying not to step in glue, not smear glue, and not say words your neighbors can hear. The win is to
work in small sectionstwo or three rows at a timeand keep a cleanup plan ready. Many installers keep painter’s tape
handy for holding seams snug and wipes nearby for squeeze-out. The best advice is simple: if you’re already tired,
stop for the day before you spread fresh adhesive. Glue does not care about your timeline.
5) The last row is always a math problem you didn’t study for
The final row is where good layout planning pays rent. Without planning, you can end up ripping an entire row into a
narrow strip that’s hard to fit, hard to keep straight, and easy to damage. A common “aha” moment is learning to
measure from the board face (not the tongue) and subtract your expansion gap before cutting. Another lesson:
sometimes you need a pull bar and a little patience instead of more force. Your floor should click into place, not
be bullied into it.
6) The “perfect pattern” is the enemy of a natural-looking floor
DIYers often start by trying to make every row “match” visually, and that’s how you accidentally create repeating
patterns (the infamous H-joint look). Most instructions push for randomization and proper staggering, and there’s a
reason: real wood looks best when it looks… real. Open multiple boxes, mix planks, vary lengths, and step back
occasionally to scan the room. The moment you stop obsessing over perfection and start aiming for natural variation,
the floor begins to look like it belongs there.
Conclusion
Laying engineered wood floors is absolutely DIY-friendlyif you treat prep like part of the install, not a warm-up
you can skip. Choose the method that fits your subfloor and skill level, control moisture like your warranty depends
on it (because it does), keep the subfloor flat, and take your time on the first rows. Do that, and your engineered
hardwood floor won’t just look greatit’ll feel solid, sound quiet, and age gracefully instead of dramatically.