Table of Contents >> Show >> Hide
- Before You Start: What “Low Voltage” Actually Means
- Tools and Materials Checklist
- Design Smarts: Plan Like a Pro (So You Don’t Re-Dig Like a Rookie)
- How to Install Low Voltage Lighting: 12 Steps
- Step 1: Sketch your layout (and do a nighttime test)
- Step 2: Confirm power and location for the transformer
- Step 3: Size the transformer correctly
- Step 4: Pick the right cable gauge
- Step 5: Dry-fit and position fixtures
- Step 6: Lay the cable on the ground first
- Step 7: Make safe, weather-resistant connections
- Step 8: Connect cable to the transformer terminals
- Step 9: Test the system before burying anything
- Step 10: Adjust aiming, shielding, and spacing
- Step 11: Bury or conceal the cable
- Step 12: Program controls (timer/photocell) and do a final nighttime walk-through
- Troubleshooting: When the Lights Don’t Behave
- Maintenance Tips to Keep It Looking Great
- Common Experiences and Lessons (The Extra You’ll Be Glad You Read)
- Conclusion
- SEO Tags
Low voltage lighting is the rare home project that delivers “wow” without demanding a whole weekend, a whole paycheck, or a whole new vocabulary of electrical terms.
Whether you’re lighting a walkway, showing off your favorite tree, or making your patio feel like an outdoor living room, a 12-volt system can be safe, flexible, and surprisingly forgivingif you plan it like a grown-up and install it like you mean it.
This guide focuses on the most common setup in the U.S.: a plug-in transformer connected to a GFCI-protected outdoor outlet, feeding low-voltage cable that runs to landscape fixtures (path lights, spotlights, deck lights, step lights).
If your plan involves hardwiring a transformer into household wiring, adding a new circuit, or working inside a service panel, that’s your cue to hire a licensed electrician. No shameelectricity is not a hobby.
Before You Start: What “Low Voltage” Actually Means
Most residential low voltage lighting systems run at 12 volts (sometimes 14–15V taps on the transformer to help fight voltage drop). The transformer steps down standard household power to a lower, safer output for the fixtures.
The system is still subject to electrical and product safety rules, so use listed components and follow the manufacturer instructions like they’re the secret recipe.
Tools and Materials Checklist
- Low-voltage transformer (power supply) with timer/photocell options
- Low-voltage outdoor-rated cable (commonly 12/2 or 14/2)
- Fixtures (LED recommended for efficiency and lower wattage)
- Wire strippers/cutters, screwdriver, tape measure
- Connectors (piercing-style, twist-on, or heat-shrink/gel-filleduse outdoor-rated types)
- Shovel or trenching tool, garden staples (optional but handy)
- Multimeter (optional, but great for diagnosing dim lights)
Design Smarts: Plan Like a Pro (So You Don’t Re-Dig Like a Rookie)
Pick what you want the light to do
Great outdoor lighting isn’t “bright everywhere.” It’s intentional: guide footsteps (path lights), highlight features (spotlights), add comfort (patio/deck), and improve security (dark corners and entries).
A good rule of thumb is to light destinations and transitionsfront door, driveway edge, stepsthen add accents sparingly for drama.
Do a quick load calculation
Add up the wattage of every fixture on the transformer. LED fixtures often use 2–7 watts each, which makes life easier. Many installers keep the total load at or below about 80% of the transformer rating to reduce stress and leave room for future additions.
Example: 10 path lights at 3W (30W) + 2 spotlights at 5W (10W) = 40W total. A 60W transformer gives breathing room; a 100W transformer gives “I might add more later” room.
Choose a wiring layout that matches your yard
The simplest method is a daisy chain (one line from light to light), but it’s also the most likely to show voltage drop on long runs. If your yard is spread out, consider:
- T method: One run that splits into two branches.
- Hub method: Multiple runs from a central connection point.
- Loop method: Cable leaves the transformer and returns, helping balance voltage.
Your goal is consistent brightness, not a system where the first light is “Vegas” and the last one is “candle in a jar.”
How to Install Low Voltage Lighting: 12 Steps
-
Step 1: Sketch your layout (and do a nighttime test)
Draw a quick map of where you want fixtures and where cable will run. Then place the fixtures on the ground (not installed yet) and wait until dusk.
Shine a flashlight from fixture height to simulate beams. This helps you avoid lighting the neighbor’s bedroom like it’s an interrogation room. -
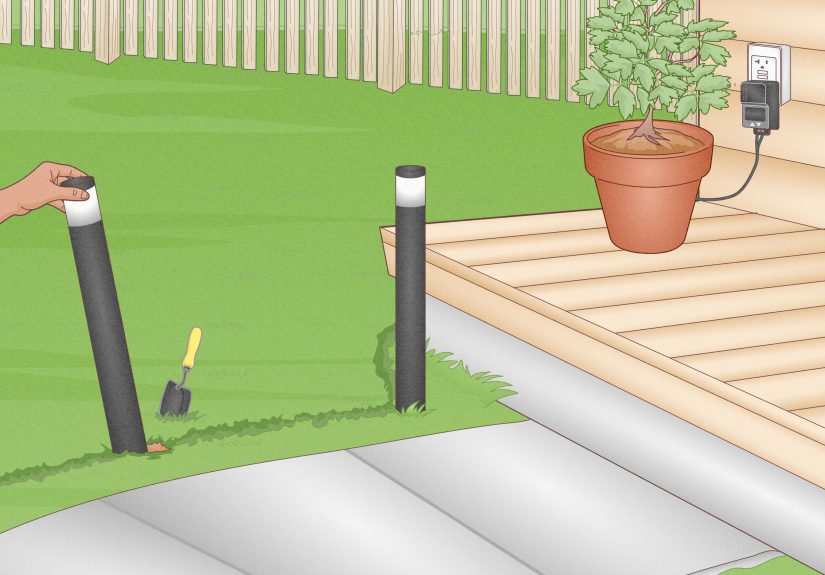
Step 2: Confirm power and location for the transformer
Most homeowner-friendly systems plug into a weather-protected, GFCI outdoor outlet. Mount the transformer on a wall, post, or sturdy surface near that outlet,
following the manufacturer’s height and orientation rules (often vertical, above grade). Keep it accessibleyou’ll thank yourself when adjusting timers later. -
Step 3: Size the transformer correctly
Choose a transformer rated above your total wattage (with room to grow). If your run is long, consider a multi-tap transformer (12V, 13V, 14V, 15V taps).
Those higher taps can compensate for voltage drop so distant lights don’t look like they’re slowly falling asleep. -
Step 4: Pick the right cable gauge
Thicker cable (lower gauge number) reduces voltage drop. For many landscape installs, 12-gauge is a common “safe bet,” especially for longer runs or higher wattage.
Shorter, low-load runs may work fine with 14-gaugecheck your transformer and fixture guidance. When in doubt, go thicker. Nobody regrets buying better cable. -
Step 5: Dry-fit and position fixtures
Place each fixture where it will live. Keep path lights slightly back from the edge of a walkway so they illuminate the path without getting kicked, tripped over,
or attacked by your lawnmower (which has the emotional stability of a toddler). -
Step 6: Lay the cable on the ground first
Run cable from the transformer to each fixture following your planned layout. Leave slackat least a little coil near each lightso you can reposition fixtures later
without performing cable surgery. Avoid tight bends and keep cable away from areas likely to be aerated, edged, or repeatedly dug up. -
Step 7: Make safe, weather-resistant connections
Turn the transformer off and keep it unplugged while you connect the low-voltage side. Strip cable ends neatly and use outdoor-rated connectors.
Cheap connectors are like cheap umbrellas: they work until the first storm, then they create a personal situation.If your fixtures use quick-connect/piercing connectors, make sure the cable is seated fully and the connector is locked tightly.
If you’re using twist-ons or splices, use connectors designed for burial/wet locations (often gel-filled or heat-shrink styles). -
Step 8: Connect cable to the transformer terminals
Follow the transformer instructions for wiring the secondary terminals. Tighten screws firmly and avoid mixing wire types under the same screw if your manual warns against it.
If you’re using multiple runs, label them so future troubleshooting doesn’t become an archaeological dig. -
Step 9: Test the system before burying anything
Plug in the transformer and turn the system on. Walk the line and check brightness consistency. If lights are dim at the far end, you may need a different wiring method,
thicker cable, shorter runs, or a higher-voltage tap (if available). Testing now saves you from digging up your yard twice, which is a special kind of character building. -
Step 10: Adjust aiming, shielding, and spacing
For spotlights, aim the beam at the featurenot at your eyes when you step off the porch. For path lights, check glare from typical viewing angles.
Small adjustments make a huge difference in “looks expensive” versus “looks like a parking lot.” -
Step 11: Bury or conceal the cable
Once everything tests well, bury the cable shallowly in mulch beds and a bit deeper where it crosses open lawndeep enough to protect it from foot traffic and yard tools.
You can also tuck cable under edging, behind stones, or along planting lines. Keep the cable route memorable (or take photos), so future planting projects don’t become cable roulette. -
Step 12: Program controls (timer/photocell) and do a final nighttime walk-through
Set your timer and/or photocell so lights come on at dusk and off at a reasonable hour. Then do the final test at night.
Look for dark gaps, hotspots, and accidental “uplight the underside of the mailbox” moments. Fine-tune now, then enjoy the glow.
Troubleshooting: When the Lights Don’t Behave
Problem: Some lights are dimmer than others
- Likely cause: voltage drop from long runs, too many fixtures on one run, or cable that’s too thin.
- Fix: switch to thicker wire, split into multiple runs, use a loop/hub layout, or move distant fixtures to a higher transformer tap (if allowed).
Problem: A section doesn’t turn on at all
- Likely cause: a loose connector, mis-seated quick connect, cut cable, or reversed/poor splice.
- Fix: recheck connections, test voltage with a multimeter, and inspect cable where it crosses high-risk zones (edges, shovel territory, mower paths).
Problem: Lights flicker or fail after rain
- Likely cause: water intrusion in connectors or non-burial-rated splices.
- Fix: replace with waterproof connectors and remake splices with proper strain relief and sealing.
Maintenance Tips to Keep It Looking Great
- Clean lenses a couple times a seasondirt and mulch can “dim” lights more than you’d think.
- Trim plants so foliage doesn’t swallow beams (unless you like the “mysterious glowing shrub” aesthetic).
- Recheck connections annually, especially in freeze/thaw climates where soil movement can tug on cable.
- Upgrade to LED if you haven’tlower wattage reduces voltage drop pressure and expands your design options.
Common Experiences and Lessons (The Extra You’ll Be Glad You Read)
People tend to think the hardest part of low voltage lighting is the wiring. In reality, the “hard” part is deciding where the lights should goand resisting the urge to install
a fixture every three feet like you’re trying to guide airplanes. The most common experience DIYers report is that their first draft layout changes dramatically after the first
nighttime test. In daylight, it’s easy to underestimate how far a beam travels, how bright an LED can look at eye level, and how quickly glare can ruin the mood. That’s why a dusk
dry-run feels like cheatingin the best way.
Another very real experience: you’ll discover the secret life of your yard. Mulch beds hide cable beautifully until you start raking. Edging looks tidy until you realize it’s also
a cable “pinch point.” And that corner of the lawn you never noticed? That’s where everyone walks, and therefore where cable will get stressed unless you bury it thoughtfully.
Many homeowners end up snapping a few quick photos of cable routes before covering them, because the future version of you will absolutely forget where everything goes.
(Future-you is nice, but also forgetful. Help them out.)
Voltage drop is the other big “aha” moment. It often shows up as a personality shift: the first two fixtures glow confidently, the middle ones look normal, and the last ones whisper
their light into existence. People commonly fix this in one of three ways: using thicker cable, splitting one long run into two shorter runs, or moving the far run to a higher-voltage
tap if the transformer supports it. The lesson is simple: brightness consistency is designed, not wished for. Even a small changelike moving one spotlight from the end of a run to a
nearer branchcan make the entire system look more professional.
There’s also a surprisingly emotional moment when you first turn the system on and walk outside. It’s not just “lights.” It’s the feeling that your home has a welcome mat made of
glow. People often notice they start using outdoor spaces moretaking out the trash feels less like entering a haunted movie set, and patios become usable after dinner without dragging
a lamp to the window like a lighthouse keeper.
Finally, expect small tweaks over the first few weeks. A path light will look perfect until a plant grows into it. A spotlight might need a subtle rotation because it’s catching shiny
leaves and creating hot spots. This isn’t failureit’s normal. Low voltage lighting is forgiving by nature, and the best-looking systems are the ones that evolve. Think of it like
landscaping: you don’t “finish” it once; you tune it until it feels effortless.
Conclusion
Installing low voltage lighting is equal parts planning, basic wiring, and good taste. Use listed components, size your transformer with breathing room, choose cable that won’t sabotage
you with voltage drop, and always test before burying. Do those things, and you’ll get that clean, welcoming look that makes a house feel upgradedwithout turning your yard into a
construction zone for the next month.