Table of Contents >> Show >> Hide
- First: A Safety Reality Check (and Why It’s Worth It)
- Hardwired vs. Battery Smoke Alarms: What “Hardwired” Actually Means
- Pick the Right Alarm Before You Touch a Screwdriver
- Plan Placement Like You’re Designing a Safety Net
- Compatibility: The #1 Thing That Makes Replacements Annoying
- What You’ll Need (and What the Electrician Usually Brings)
- How To Install a Hardwired Smoke Detector: Step-by-Step Overview
- Step 1: Confirm your system type (single alarm vs. interconnected)
- Step 2: Choose compatible alarms (and decide whether to replace one or all)
- Step 3: Power down the circuit (professionally) and remove the old alarm
- Step 4: Install the new mounting bracket
- Step 5: Connect the new harness and secure the alarm
- Step 6: Restore power and test (yes, all of them)
- Step 7: Label the install date and set a maintenance rhythm
- Troubleshooting: When Your Smoke Alarm Is Being “That Guy”
- Maintenance That Actually Gets Done (No Gold Stars Required)
- Upgrade Ideas That Make Sense in Real Homes
- Real-World Experiences (and the Takeaway) About
If a smoke alarm could talk, it would say: “I’d like to do my job today, please.” A hardwired smoke detector (also called an AC-powered smoke alarm) is designed to be that dependable roommatealways on, always alert, and dramatically loud at exactly the worst possible time (like when you tried to “just quickly” sear something).
This guide walks you through how hardwired smoke detectors are typically installed in U.S. homeswhat to buy, where to place them, what the installation process looks like, and how to avoid nuisance alarms that turn perfectly good devices into ceiling decorations. Because hardwired alarms connect to household electricity, the safest move is to have a licensed electrician (or a qualified adult professional) handle the wiring portion. You can still do a lot of the planning and setup, and you’ll know exactly what to ask for.
First: A Safety Reality Check (and Why It’s Worth It)
Hardwired smoke alarms tie into your home’s electrical system. That’s great for reliabilityand also a strong reason not to “learn wiring” by improvising on a ladder. In many areas, electrical work may require a permit or must be performed by a licensed electrician. If you’re replacing existing hardwired smoke alarms, the job is often straightforward for a pro. If you’re adding new ones where none exist, that can involve running new cable and meeting local code requirements.
When to call a pro (no guilt, only wisdom)
- If there’s no existing smoke alarm wiring in the ceiling box
- If the circuit label is unclear, the wiring looks old/damaged, or you see signs of overheating
- If you need interconnected alarms (so one alarm triggers all) and your current setup is inconsistent
- If you live in a rental, condo, or multi-family building with specific compliance rules
Even if you hire the wiring out, you’ll save time and money by planning placement, choosing compatible devices, and understanding how interconnected systems work.
Hardwired vs. Battery Smoke Alarms: What “Hardwired” Actually Means
A hardwired smoke alarm runs on 120V household power and usually includes a battery backup. The backup matters because fires love power outages. In many homes, hardwired smoke alarms are also interconnected, meaning when one sounds, they all soundupstairs, downstairs, and in the basement where your laundry is quietly plotting against you.
Why homeowners like hardwired smoke alarms
- Continuous power (no “oops, I forgot batteries” moment)
- Interconnection (you hear the alarm wherever you are)
- Battery backup (protection during outages)
Battery-only alarms can still be excellentespecially modern sealed 10-year battery modelsbut hardwired, interconnected coverage is often the gold standard for whole-home warning.
Pick the Right Alarm Before You Touch a Screwdriver
This part is surprisingly important: you don’t want to install the “wrong kind” of smoke alarm and then blame it for doing exactly what it was built to do. Start with these choices:
1) Smoke sensing type: photoelectric vs. ionization (and the “why not both?” question)
- Photoelectric smoke alarms tend to respond well to smoldering, smoky fires (think: couch ember drama) and often have fewer cooking-related nuisance alarms.
- Ionization smoke alarms can respond quickly to fast-flaming fires (think: paper or grease catching fast).
- Dual-sensor models exist, but the bigger story today is that newer performance standards aim to improve detection while reducing nuisance alarmsso the “best” choice is often a modern, code-listed alarm from a reputable manufacturer, installed in the right location.
2) Look for current safety listings and nuisance-alarm improvements
Newer smoke alarm standards and testing emphasize better performance in modern home fire conditions and reduce nuisance alarming from cooking. Practically, that means shopping for newer, properly listed alarms (and not grabbing an ancient dusty box from the clearance shelf that looks like it remembers flip phones).
3) Decide on features you’ll actually use
- Interconnect capability (wired or listed wireless)
- Battery backup type (replaceable vs. sealed)
- Hush/silence button (your relationship with toast crumbs will improve)
- Voice alerts (helpful for familiesless “BEEP BEEP,” more “SMOKE IN HALLWAY”)
- Combination smoke/CO alarms (great in some locations, but placement rules still apply)
Plan Placement Like You’re Designing a Safety Net
Placement is where smoke alarms become life-saving or just… decorative. The baseline guidance in the U.S. is consistent: install smoke alarms inside each bedroom, outside each sleeping area, and on every level of the home (including the basement).
Placement basics (the “where” and “why”)
- Bedrooms: Fires can start anywhere; sleeping people need the earliest warning.
- Hallways outside bedrooms: Covers escape routes and nearby rooms.
- Every level: Smoke can move fast; stairways act like chimneys.
How to reduce nuisance alarms without reducing safety
- Keep smoke alarms a reasonable distance from cooking appliances to avoid frequent false alarms.
- Avoid placing alarms right next to bathrooms, where steam can trigger them.
- Don’t install alarms near supply vents, ceiling fans, or open windows where airflow can delay smoke reaching the sensor.
Example layout: two-story, three-bedroom home
Here’s a common setup homeowners use as a starting point:
- One smoke alarm inside each bedroom (3 alarms)
- One smoke alarm in the hallway outside bedrooms (1 alarm)
- One smoke alarm on the main level near living areas (1 alarm)
- One smoke alarm in the basement (1 alarm)
If your home layout is long, has split levels, or includes finished attic space, you may need additional alarms to avoid “dead air” pockets and improve coverage.
Compatibility: The #1 Thing That Makes Replacements Annoying
If you’re replacing an existing hardwired smoke detector, you’re usually dealing with a mounting bracket and a plug-in harness that connects the alarm to the wiring in the electrical box. The trick is that interconnected systems often work best when alarms are compatible and from the same manufacturer family. Mixing brands can cause problems because interconnect “communication” methods may differ.
Replacement options that save time
- Replace like-for-like: Same brand, same series if possible. Often the easiest.
- Use a listed adapter plug: Some manufacturers offer adapter plugs designed to fit existing harnesses (helpful for retrofits), but compatibility must be verified.
- Replace all interconnected alarms as a set: Often the cleanest solutionespecially if your alarms are near end-of-life.
What You’ll Need (and What the Electrician Usually Brings)
For planning and installation day, here’s a realistic checklist.
You can handle these
- New hardwired smoke alarm(s) with battery backup (and any required batteries)
- Manufacturer instructions for each model (print or save them)
- A step ladder
- Small screwdriver set (for mounting plates, battery doors)
- A marker to write the install date on the alarm
Your electrician will typically bring these (and the license to use them safely)
- Electrical test equipment and the right hand tools
- Approved connectors and fittings (as required)
- Any needed replacement wiring harnesses or junction box parts
- Experience navigating local permit/code requirements
How To Install a Hardwired Smoke Detector: Step-by-Step Overview
This is the “how it normally goes” sequence. The wiring steps should be performed by a licensed electrician or a qualified adult professionalespecially if anything looks different than expected.
Step 1: Confirm your system type (single alarm vs. interconnected)
Look at how many alarms you have and whether they all sound when you test one. Interconnected systems are common in newer homes and often required in new construction or major renovations.
Step 2: Choose compatible alarms (and decide whether to replace one or all)
If your alarms are approaching 10 years old, replacing the full set is often smarter than patching one at a time. It keeps features consistent and reduces the chance of compatibility surprises.
Step 3: Power down the circuit (professionally) and remove the old alarm
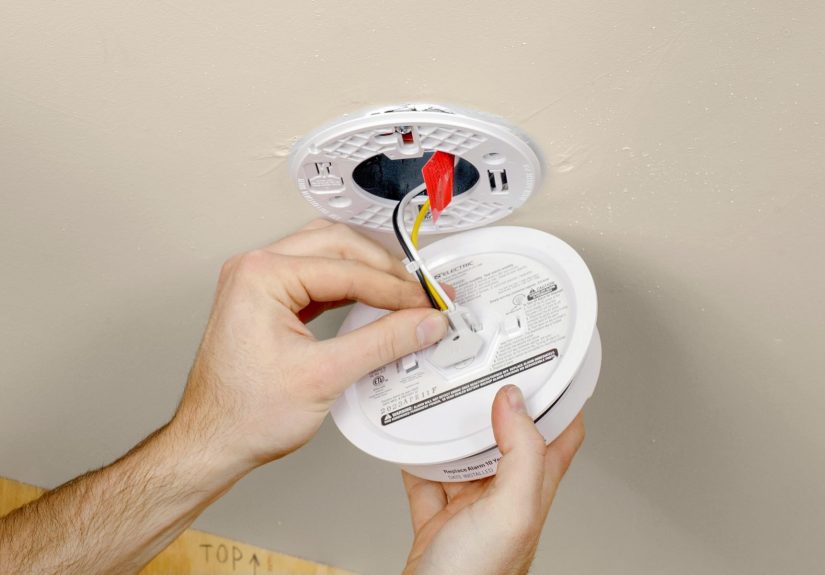
A qualified person will shut off power to the alarm circuit and confirm it’s off. The old alarm typically twists off or releases from its mounting plate, then the harness plug is disconnected.
Step 4: Install the new mounting bracket
Most alarms include a bracket that screws into the existing electrical box. If the bracket matches the old one, this can be quick. If not, it’s still usually a simple swap.
Step 5: Connect the new harness and secure the alarm
The electrician connects the harness per the manufacturer’s instructions and local code, ensuring the alarm is properly seated and locked onto the bracket. Then the backup battery is installed (if required) and the battery door is fully closed.
Step 6: Restore power and test (yes, all of them)
After power is restored, each alarm should be tested using the built-in test button. If alarms are interconnected, test that one alarm triggers the others.
Step 7: Label the install date and set a maintenance rhythm
Write the install date on the alarm (or inside the battery door). This makes the “How old is this thing?” question a 2-second problem instead of a ladder-and-squint adventure.
Troubleshooting: When Your Smoke Alarm Is Being “That Guy”
Smoke alarms are supposed to be sensitive. But there’s a difference between “life-saving” and “I burned one tortilla and now the whole house is auditioning for a disaster movie.” Here are common issues and what they usually mean:
Chirping (the tiny beep that destroys sleep)
- Low backup battery (common even on hardwired alarms)
- End-of-life signal (many alarms chirp when they’re due for replacement)
- Dust or debris (gentle cleaning per the manual can help)
- Loose seating on the bracket or harness (have a qualified person check)
Frequent nuisance alarms
- Alarm is too close to the kitchen or bathroom (steam and cooking aerosols are sneaky)
- Wrong device type for the location (some homes do better with photoelectric near kitchens)
- Ventilation patterns push cooking steam directly at the alarm
If nuisance alarms are frequent, many people disable alarms (which is exactly what safety standards are trying to prevent). Better fixes include adjusting placement (if allowed), improving kitchen ventilation, or choosing a newer model designed to reduce nuisance triggeringwithout sacrificing real fire detection.
Maintenance That Actually Gets Done (No Gold Stars Required)
Once installed, smoke alarms still need basic care. The good news: you don’t have to pamper them. You just have to remember they exist.
A simple schedule
- Test monthly using the test button.
- Replace the backup battery at least yearly (unless your model uses a sealed battery designfollow the manufacturer instructions).
- Replace the entire alarm about every 10 years (or per the manufacturer guidance).
If your home has a mix of alarm ages, consider “synchronizing” replacements so you don’t end up changing one every year forever like a weird home-safety subscription service.
Upgrade Ideas That Make Sense in Real Homes
1) Listed wireless interconnection
Some codes allow wireless interconnection if the alarms are listed for that purpose and all units sound when one activates. This can be helpful when running new interconnect wiring is difficult.
2) Add a heat alarm in the garage (instead of a smoke alarm)
Garages often produce nuisance smoke and exhaust that can trigger smoke alarms. Many homeowners use a heat alarm in garages and place smoke alarms just outside, in code-appropriate areas.
3) Consider combination smoke/CO alarms strategically
Combo alarms can reduce device clutter, but you still need correct placement for both hazards. Not every location that’s great for smoke detection is ideal for CO detection and vice versaso plan deliberately.
Real-World Experiences (and the Takeaway) About
Homeowners tend to remember their smoke alarm installation for one of two reasons: it went smoothly and they forgot about it (the best outcome), or it went “memorable” in the way that makes you Google things at 2:00 a.m. while standing on a chair in socks.
One common experience: people replace a single alarm in an interconnected system and suddenly the house acts like it’s haunted. A test button triggers only one unit. Or worse, a nuisance alarm in the hallway sets off every device at onceturning a slightly smoky pan into a full-home percussion concert. What’s usually happening is compatibility mismatch or aging alarms that don’t “talk” to the new one the same way. The lesson many homeowners share is simple: if your alarms are old enough to have seen multiple smartphone generations, replacing the whole interconnected set can be less stressful (and sometimes less expensive in the long run) than piecemeal swaps.
Another frequent story: the “mystery chirp.” People change the battery in the alarm they can see, feel proud for five minutes, and then the chirp returnsbecause it was actually coming from a different unit down the hall. In multi-level homes, sound bounces in weird ways. Folks often solve this by testing alarms systematically (one by one), writing install dates on the devices, and replacing aging alarms together. It’s not glamorous, but it prevents the annual tradition of “Which one is it?” that can make even calm people consider moving to a yurt.
Placement regrets show up a lot, tooespecially alarms installed too close to kitchens. Many homeowners discover that “open concept” also means “smoke and steam travel wherever they want.” If an alarm is constantly triggered by normal cooking, the risk is that someone disables it out of frustration. The better outcome is rethinking placement (where allowed), improving kitchen ventilation, and choosing a modern alarm designed to reduce nuisance alarms while still responding quickly to real fires. People often say they didn’t realize how much installation location affects daily life until they lived with an alarm that screamed every time pasta water boiled enthusiastically.
And then there’s the quietly satisfying experience: the first successful full-system test after installing or upgrading. Homeowners describe a weird sense of relief when every alarm sounds as intendedbecause it’s proof that if something goes wrong at 3:00 a.m., the house will shout loud enough to wake everyone. That’s the real takeaway. Installing a hardwired smoke detector isn’t just a home improvement project; it’s a safety system for your future self.
Bottom line: Plan smart placement, choose compatible listed alarms, and let a qualified professional handle the wiring. You’ll end up with reliable, interconnected protectionand a kitchen that doesn’t trigger a neighborhood-wide alarm every time you make toast.