Table of Contents >> Show >> Hide
- What Are Christmas Cookie Candle Holders?
- Supplies You’ll Need
- Step-by-Step: How to Make Christmas Cookie Candle Holders
- Safety Tips You Shouldn’t Skip
- How to Store and Reuse Your Cookie Candle Holders
- Design Ideas to Try
- Troubleshooting Common Cookie Candle Holder Problems
- Real-Life Experiences & Extra Tips for DIY Cookie Candle Holders
- Wrap-Up: Let Your Cookies Shine (Literally)
If you’ve ever looked at a tray of beautiful Christmas cookies and thought, “These are almost too pretty to eat,” good news: you don’t have to. You can turn them into adorable Christmas cookie candle holders that glow on your table, twinkle on your mantel, and smell like all your holiday nostalgia rolled into one cozy project.
This DIY is part baking project, part craft night, and part clever holiday decorating hack. You’ll make sturdy “display” cookies, decorate them like mini gingerbread masterpieces, and then pair them with safe tea lights to create the most charming Christmas candle holders you’ve ever seen.
We’ll walk through how to choose the right dough, shape and bake the cookies so they don’t slump over, decorate them like a pro, and assemble them into gorgeous, gift-worthy candle holders. Whether you’re a serious baker or just someone who loves an excuse to play with icing, you can absolutely pull this off.
What Are Christmas Cookie Candle Holders?
Christmas cookie candle holders are exactly what they sound like: cookies that act as a decorative screen, backdrop, or mini “wall” behind or around a tea light. Think gingerbread houses, snowflakes, or Christmas trees that stand upright while a candle glows behind them, making the icing details light up.
You can make them in two basic ways:
- Cookie screens: Flat, sturdy cookies (like a tree, star, or house shape) stand in front of an LED tea light. The glow peeks around the edges and through cutouts.
- Cookie wraps or houses: Several cookie pieces are “glued” together (with royal icing or non-edible glue, depending on your plan) to wrap around or surround the candle holder.
Important safety note: For anything made with real cookies, it’s best to use flameless LED tea lights. Real flame plus sugar, flour, and icing is a risky combo. If you absolutely want a real candle, keep it inside a separate glass votive so the flame never touches the cookie.
Supplies You’ll Need
Cookie & Baking Ingredients
To build sturdy Christmas cookie candle holders, you want a dough that bakes up crisp and not too puffy. Gingerbread is a classic choice because it smells like Christmas and holds its shape well.
- Sturdy gingerbread cookie dough (homemade or store-bought, “house-building” style if possible)
- All-purpose flour (for dusting and rolling)
- Parchment paper or silicone baking mats
- Egg, powdered sugar, and lemon juice or meringue powder (for royal icing)
Tools & Cutters
- Rolling pin
- Assorted cookie cutters: trees, houses, stars, snowflakes, hearts, circles
- Sharp knife or small round cutter (for candle “windows” and notches)
- Baking sheets
- Cooling racks
Decorating & Assembly
- Royal icing in piping bags (medium and small round tips)
- Sprinkles, sanding sugar, and candy decorations (optional)
- Food-safe gel colors (if tinting icing)
- Small glass votive holders or clear shot glasses (for extra safety)
- LED tea lights (highly recommended)
- Hot glue gun (for non-edible versions or attaching cookies to glass holders you don’t plan to eat)
Step-by-Step: How to Make Christmas Cookie Candle Holders
1. Mix a Strong, No-Nonsense Dough
If you have a favorite gingerbread recipe that makes crisp, snappable cookies, you’re already halfway there. For this project, you want:
- Less puff, more structure: Avoid recipes with a ton of baking powder or baking soda, which can cause the cookies to rise and distort.
- Firm, chilled dough: After mixing, chill the dough for at least an hour. Cold dough spreads less and keeps its shape better in the oven.
If you’d rather skip from-scratch baking, look for a “gingerbread house” mix in the baking aisle; these are often formulated to bake up strong and crisp for decorating and display.
2. Roll, Cut, and Create Candle Windows
Lightly flour your surface and roll the dough to about 1/4 inch thick. Too thin and your cookies may crack; too thick and they’re heavy and harder to stand.
Now, get creative with shapes:
- Tree silhouettes: Use a Christmas tree cutter, then use a tiny star or circle cutter to make “ornament” cutouts where light can shine through.
- Gingerbread houses: Cut houses or simple rectangles. Use a small knife to cut windows and a door. These look amazing when a tea light glows behind them.
- Snowflakes: Use snowflake cutters and gently reinforce thin arms, since these can be delicate once baked.
For standing cookies, cut a small straight “base” on the bottom of each cookie so it sits flat. You can also cut slot-style bases from extra dough (like mini stands) that connect to the bottom of the cookie once baked.
3. Bake Until Crisp (and Then a Little More)
Place cookies on parchment-lined baking sheets, leaving a little space between them. Bake according to your recipe, but plan to go an extra few minutes after they look done so they dry out fully.
You’re not aiming for chewy herethis is décor, not a gooey dessert. The cookies should feel firm at the edges and not bend when you lift one with a spatula. If they still seem soft once cooled slightly, you can pop them back in for another 2–3 minutes.
Let them cool completely on a wire rack. Warm gingerbread is fragile and can break if you move it too soon.
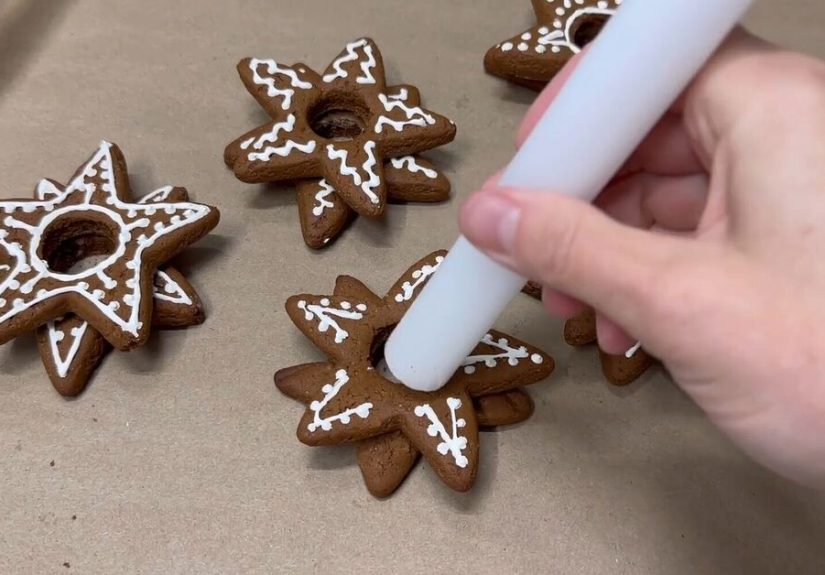
4. Decorate Like Mini Gingerbread Masterpieces
Once cookies are fully cool, whip up a batch of royal icing. This hard-drying icing is crucial for decorations that won’t slide off or sag when the candle warms the air around them.
- Mix your icing to a thick, pipeable consistency for outlines and details.
- Use a slightly thinner version if you want to flood larger areas.
- Pipe outlines around windows, roofs, ornaments, stars, and snowflakes.
Try simple gingerbread-house style designs: snowy roof lines, dots and dashes of “icing lights,” and scallops along edges. Keep details bold enough that they’ll show up when backlit by candlelight.
Let decorated cookies dry for several hours or overnight so the icing is rock solid before you assemble the candle holders.
5. Assemble Your Cookie Candle Holders
Now the fun structural part: turning your decorated cookies into candle-ready décor.
Option A: Simple Cookie Screen
- Set an LED tea light in a small glass votive or clear shot glass.
- Prop a large cookie (tree, star, or house shape) just behind or slightly in front of the votive.
- Use a bit of royal icing on the base or a small “cookie stand” piece to keep it upright.
This option is great if you’re nervous about breakage and want to keep things flexible for storage or transport.
Option B: Cookie + Glass Votive Wrap
- Choose a plain glass votive or small cylinder vase.
- Arrange cookies around the glass, like a little cookie fence.
- Use dots of royal icing (if you want to keep things food-safe) or tiny dots of hot glue (if these are purely decorative and not for eating) to attach the cookies to the glass.
The candle sits inside the glass; the cookies stay outside, safe from direct flame, but still catch the glow.
Option C: Gingerbread House Candle Holder
- Cut house-shaped panels (front, back, and sides) and let them cool and dry completely.
- Use thick royal icing as “mortar” to glue the walls together into a small open-top house or chapel.
- Once set, place an LED candle inside. The light will shine through the windows and doors.
This is a show-stopper centerpiece for the dining table or buffet.
6. Style Your Display
Once assembled, style your cookie candle holders on a tray, mantel, or sideboard.
- Scatter faux snow (Epsom salt, kosher salt, or white sugar) for a snowy effect.
- Add real evergreen sprigs, cinnamon sticks, and dried orange slices for a rustic look.
- Group candle holders in odd numbers (three or five) for a balanced, designer-approved arrangement.
Turn down the lights, flip on the LEDs, and enjoy watching the cookie details glow.
Safety Tips You Shouldn’t Skip
Cookies and candles are a magical combo, but safety has to come first.
- Use LED candles: Flameless tea lights give you all the ambience with zero risk of catching your cookie on fire.
- If you use real flame: Keep the candle inside a heat-safe glass votive. The cookie should never be close enough for the flame or hot wax to touch it.
- Watch heat-sensitive decorations: Chocolate, soft candies, and some glues can melt or warp if placed too close to heat.
- Never leave candles unattended: Whether LED or real flame, don’t leave them on overnight or when you’re not in the room.
- Keep away from pets and little hands: They might think your décor is snack time.
How to Store and Reuse Your Cookie Candle Holders
Are these edible? Technically, yesif you use only food-safe ingredients and attach everything with royal icing. But because they’re baked dry, handled a lot, and exposed to room air, most people treat them as décor, not dessert.
To make them last:
- Keep them cool and dry: Humidity is the enemy of gingerbread. Store in a cool, dry room away from stovetops, dishwashers, and steamy bathrooms.
- Cover between displays: If you want to reuse them over several days or weeks, gently wrap them in plastic wrap or place them in an airtight container.
- Watch for “soft spots”: If the cookies start to bend or feel sticky, they’ve absorbed moisture. It may be time to retire them.
With good storage, decorative gingerbread pieces can last through the season as display-only décor.
Design Ideas to Try
Once you’ve mastered the basic method, have fun with different themes and color palettes.
- Nordic snowflake set: White-on-brown snowflake cookies in varying sizes, arranged in front of a row of tea lights.
- Cozy village mantel: Several gingerbread house cookies, each with different window patterns and roof designs, lined up like a little town.
- Name or initial holders: Large initial cookies (one per person) standing in front of a tea light for personalized place settings.
- Mini advent row: Twenty-four small cookies with cutouts, each in front of an LED candle, to count down the days to Christmas.
- Mixed-metal glam: White icing with gold or silver luster dust for a chic, grown-up look.
Troubleshooting Common Cookie Candle Holder Problems
“My cookies warped and won’t stand up.”
This usually means the dough was too thick in some places or didn’t dry out enough. Next time, roll evenly, bake a bit longer, and trim the bottoms straight while the cookies are still warm and soft.
“The icing slid right off.”
If your icing is too thin or you’re decorating warm cookies, gravity wins. Make the icing stiffer (thicker) and wait until the cookies are completely cool and dry before decorating.
“The structure collapsed overnight.”
Blame humidity or underbaked cookies. Really dry bakes, solid royal icing, and a low-humidity room help keep everything upright. Avoid displaying these right next to a humidifier or dishwasher vent.
“The candlelight doesn’t show through.”
Use more cutouts or thinner areas where the light can shine. Clear glass votive holders also help amplify the glow behind the cookies.
Real-Life Experiences & Extra Tips for DIY Cookie Candle Holders
The magic of Christmas cookie candle holders isn’t just in how they lookit’s in the stories that come with them. Here are some lived-in, tested-through-holiday-chaos tips and experiences that many home bakers and crafters share after trying this project.
Start with a “Test Batch” Night
The first time you make cookie candle holders, consider it a dress rehearsal. Bake a small batch of cookies and try out one or two shapes. You’ll quickly see which cutters give you strong, stable silhouettes and which ones have too many delicate arms and points that like to snap off.
Many people find that simple shapestrees, stars, and basic housesare the easiest to turn into candle holders. Intricate snowflakes look beautiful but can be fragile, especially if kids or pets are doing laps around the coffee table.
Make It a Low-Stress Family Craft
Christmas cookie candle holders are ideal for a family craft night. Adults can handle rolling, cutting, and baking; kids can go wild with icing and sprinkles. If you’re worried about little hands near glass or hot candles, set up a “kids’ version” that uses only LED tea lights and plastic holders.
One fun tradition is letting each person design their own cookie holder for their place at the holiday table. Grandma might choose a classic house with white icing “snow,” while the youngest kids mix all the sprinkles in one glorious chaos. When the candles are lit at dinner, everyone can spot their creation glowing back at them.
Embrace the Imperfections
No matter how many tips you follow, you’ll probably get a few crooked doors, lopsided trees, or slightly leaning houses. That’s okay. In fact, those “perfectly imperfect” pieces are often the most charming, especially when grouped together with twinkling lights.
If a cookie breaks, don’t panic. You can hide cracks with icing, lean a smaller cookie in front of it, or crumble it over ice cream later. In a dimly lit room with candles going, nobody will notice that one roof tile is a little off.
Turn It into a Gifting Moment
Cookie candle holders make surprisingly memorable gifts. Wrap a small glass votive with a custom cookie cookie “screen,” tie it with a ribbon, and include an LED candle. It’s thoughtful, handmade, and doesn’t add to anyone’s storage burdenthey can enjoy it through the season and then decide whether to keep or compost the cookie pieces.
If you’re gifting to teachers, neighbors, or coworkers, pack the cookie separately from the candle in a sturdy box so nothing breaks in transit. A little card that explains how to set up and light the holder is a sweet touch.
Work Around Your Climate
Humidity is the secret villain of gingerbread and decorative cookies. In a dry, cool climate, your cookie candle holders may last weeks. In a warm, humid kitchen, they might start to soften after just a few days.
If you live somewhere humid, try these tricks:
- Store finished cookie pieces in airtight containers until you’re ready to display them.
- Assemble and display closer to your event rather than weeks in advance.
- Choose shapes without very thin parts so a little softening won’t cause collapse.
Try a “Faux Cookie” Version for Long-Term Use
Once people fall in love with the look of cookie candle holders, many end up making a second, non-edible set that they can reuse year after year. Air-dry clay, salt dough, or even painted glass can mimic the look of frosted gingerbread without worrying about butter and sugar breaking down.
You can still follow the same designshouses, trees, starsbut paint them in gingerbread brown and add “icing” details with white craft paint. Pair them with real or LED candles, and you get the same cozy effect with less maintenance. Meanwhile, you save your actual baking energy for cookies that are meant to be devoured.
Make It a Tradition, Not Just a Project
The first year you make Christmas cookie candle holders, there’s a learning curve. The second year, you’ll have favorite recipes, shapes, and tricks that make the whole process feel natural and fun. Many families turn this into a yearly ritualan evening where the oven runs, holiday music plays, and someone is always shouting, “Who stole my piping bag?”
By the time the season is in full swing, you’ll have a row of glowing, cookie-framed candles that don’t just look festivethey remind you of the laughter, flour storms, and late-night icing sessions that made them.
Wrap-Up: Let Your Cookies Shine (Literally)
DIY Christmas cookie candle holders are the sweet spot where baking, crafting, and decorating meet. With a sturdy gingerbread dough, crisp bakes, solid royal icing, and a few LED candles, you can create centerpieces and mantel displays that feel custom, cozy, and totally unique to your home.
Whether you make a simple tree-shaped cookie to sit in front of a tea light or an entire glowing gingerbread village, the end result is the same: a warm, twinkling reminder that the best holiday décor is the kind you make with your own two hands (and probably a little flour on your sweater).