Table of Contents >> Show >> Hide
- What Is a “Blooming Cabbage” Centerpiece?
- Why Cabbage Works So Well for St. Patrick’s Day Decor
- Supplies You’ll Need
- Step-by-Step: How to Make a Blooming Cabbage Vase
- Step 1: Pick the right cabbage (yes, size matters here)
- Step 2: Create a stable base
- Step 3: Peel and save your best outer leaves
- Step 4: Mark the opening for your hidden jar
- Step 5: Hollow out the center (slow and steady wins the centerpiece)
- Step 6: Insert the jar and test stability
- Step 7: Reattach leaves for a “blooming” look
- Step 8: Add flowers (like you mean it)
- Best Flower Pairings for a St. Patrick’s Day Blooming Cabbage
- Design Upgrades That Make It Look “Store-Bought”
- How to Keep Your Blooming Cabbage Centerpiece Fresh Longer
- Troubleshooting: Quick Fixes for Common Problems
- St. Patrick’s Day Styling Ideas: 3 Centerpieces, 3 Different Vibes
- What to Do With the Cabbage After the Party
- Conclusion
- Experience Notes: What It’s Really Like to Make a Blooming Cabbage ( of Real-World Feel)
St. Patrick’s Day decorating has a predictable personality: shamrocks, rainbows, “Kiss Me I’m Irish” signs, and at least one person wearing a neon-green hat
that looks like it was designed by a leprechaun with a glue gun addiction. If you want something fresher (and weirdly elegant), meet the blooming cabbage:
a real head of cabbage turned into a lush, ruffled “vase” that looks like a giant green peonythen topped with flowers like it’s ready for its close-up.
This is a St. Patrick’s Day DIY that hits the sweet spot: it’s budget-friendly, unexpectedly classy, and it makes guests do a double-take.
(“Is that… produce?” “Yes. And it’s thriving.”) In this guide, you’ll learn how to build a blooming cabbage centerpiece step-by-step, pick flowers that play nicely
with cabbage, keep it looking good for days, and avoid the one mistake that can make your centerpiece smell like a forgotten gym bag.
What Is a “Blooming Cabbage” Centerpiece?
A blooming cabbage centerpiece is a DIY cabbage vase: you hollow out the middle of a cabbage, tuck a jar or glass inside to hold water,
then reattach or “fluff” cabbage leaves around the top to create a layered, blooming look. Once your hidden jar is in place, you arrange fresh flowers as you would
in any vaseonly now your vase is a gorgeous green statement piece.
Think of it as St. Patrick’s Day table decor with a twist: it feels seasonal (green!), a little whimsical, and surprisingly high-end when styled with
soft whites, pale greens, or spring pastels.
Why Cabbage Works So Well for St. Patrick’s Day Decor
1) It’s naturally lush and sculptural
Cabbage leaves stack and curl like petals, giving you that full “flower” effect without any fancy mechanics. It’s basically Mother Nature’s ruffle factory.
2) It’s hardy (by flower standards)
A cabbage can handle a party table better than many delicate décor elements. It won’t wilt in an hour like cut herbs sometimes do, and it holds its shape beautifully.
3) It instantly screams “Irish spring” without screaming
The color is on theme, but it doesn’t feel like you dipped your dining room in green frosting. Pair it with white flowers and subtle gold accents and you’ll get
festive without going full parade float.
Supplies You’ll Need
- 1 large green cabbage (bigger = easier to carve and more dramatic on the table)
- A small jar or glass (wide-mouth works best; it’s your hidden “vase”)
- A sharp paring knife or sturdy small knife (sharp = safer and cleaner cuts)
- A cutting board (your countertop deserves better)
- Paper towels (for drying and keeping things tidy)
- Floral pins / greening pins (optional, but great for reattaching leaves)
- Fresh flowers (we’ll cover the best options below)
- Floral food packet (optional but helpful for longevity)
- Decor accents (optional: ribbon, gold tea lights, mini shamrocks, or a tiny pot of “gold” candy)
Step-by-Step: How to Make a Blooming Cabbage Vase
Step 1: Pick the right cabbage (yes, size matters here)
Choose a cabbage that feels heavy for its size with tight, crisp leaves. Skip any with slimy spots or strong odors. If you want extra texture, consider a savoy
cabbage (crinkly leaves), but classic green cabbage is the easiest and most “bloom-like.”
Step 2: Create a stable base
Set the cabbage on your cutting board and slice a thin layer off the bottom so it sits flat and doesn’t wobble. This keeps your centerpiece from doing the
“tipsy leprechaun” move mid-dinner.
Step 3: Peel and save your best outer leaves
Remove the loose outer leavesespecially any that look torn or wilted. Don’t toss the good ones: you can use them to cover cut edges later or
add extra “petals” for a fuller bloom.
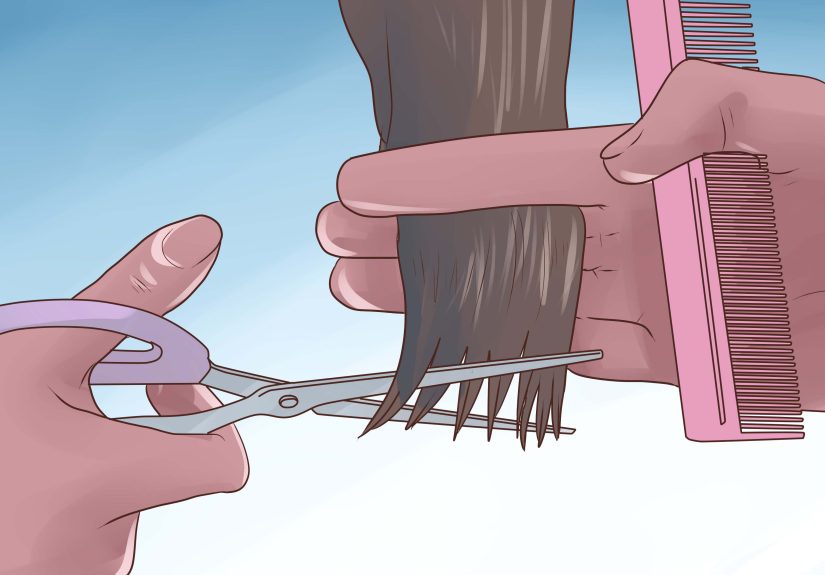
Step 4: Mark the opening for your hidden jar
Place your jar or glass on the top center of the cabbage and lightly trace the outline with the tip of your knife. You want the hole to be snug enough that the
jar doesn’t slide around, but not so tight that you have to wrestle it in like a cork in a wine bottle.
Step 5: Hollow out the center (slow and steady wins the centerpiece)
Carefully cut into the traced circle, then begin carving downward. Work in small cuts, pulling out chunks as you go. Your goal is a cavity deep enough for your
jar to sit securely. If the cabbage is especially dense, you may find it easier to cut partway from the top, then flip the cabbage and cut up from the bottom to
meet in the middle.
Important: Keep the water-holding container inside the cabbage. Don’t pour water directly into the cabbage cavitystanding water against
cabbage can cause odors faster than you can say “Who left the corned beef out?”
Step 6: Insert the jar and test stability
Add fresh water (and floral food if you’re using it) to your jar. Insert it into the cabbage so the rim sits slightly below the cabbage’s top surface. If it sits
too high, trim the cavity deeper. If it sits too low, you can pad the bottom with a folded paper towel (kept dry) or adjust by carving less.
Step 7: Reattach leaves for a “blooming” look
Now the fun part: styling the cabbage so it looks like it’s blooming. Use your saved leaves to cover any cut edges around the opening. If you have floral pins,
secure leaves by pinning them into the cabbage at a slight angle. If you don’t have pins, you can often “tuck” leaves into neighboring layers so they hold
naturally.
Step 8: Add flowers (like you mean it)
Arrange your flowers in the jar just as you would in a normal vase. Start with your largest blooms around the edges to conceal the jar and soften the opening,
then fill in with medium blooms and airy accents.
Best Flower Pairings for a St. Patrick’s Day Blooming Cabbage
You don’t need rare florist flowers to make this look gorgeous. Grocery-store bundles can look upscale with the right combo. Here are easy pairings that photograph
beautifully and match the holiday vibe.
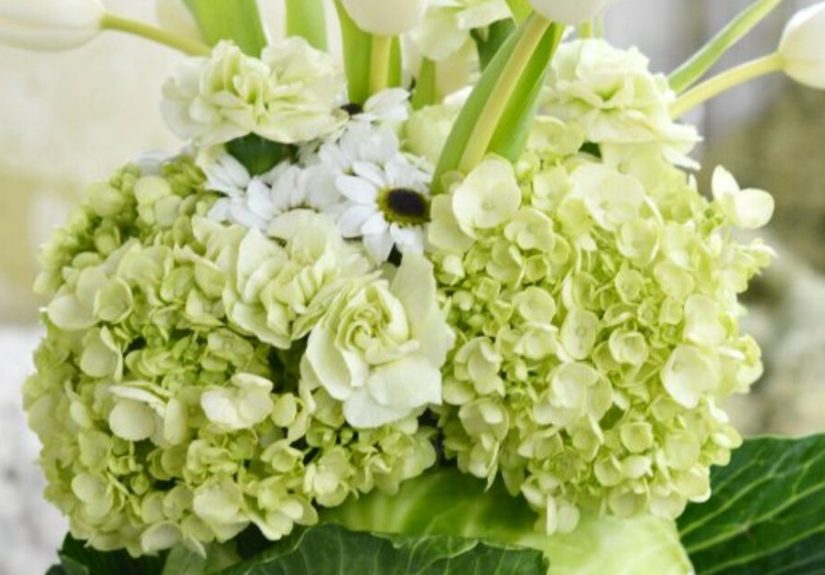
Classic “Irish Spring” (clean, fresh, elegant)
- Green hydrangea (great for hiding edges and adding volume)
- White tulips (simple, modern, springy)
- White mums or chrysanthemums (long-lasting and affordable)
- Pale green carnations (budget-friendly filler)
- Fresh greenery (eucalyptus or seeded eucalyptus if you like that spa vibe)
Soft Pastel (festive but not loud)
- White or blush roses
- Light purple lisianthus or lavender stock
- Ranunculus (if you find themtotal show-offs in the best way)
- Wax flower or baby’s breath for airy texture
Modern Minimal (for people who own matching linen napkins)
- All-white tulips or calla lilies
- One statement bloom (like a single hydrangea head)
- Simple greenery tucked low so the cabbage stays the star
Design Upgrades That Make It Look “Store-Bought”
Hide the mechanics
The easiest way to level up your DIY floral centerpiece is to make the jar disappear. Use large blooms (like hydrangea) near the rim, then angle stems outward so
flowers spill slightly over the cabbage. It looks abundant and it disguises the opening.
Add a little gold (because St. Patrick’s Day)
You don’t need glitter. Add a few small gold tea lights, gold-wrapped chocolates, or a tiny “pot of gold” bowl near the centerpiece. It reads festive without
looking like a craft store exploded.
Create a mini tablescape moment
Place the blooming cabbage on a simple tray or charger with a few scattered accents: mini shamrocks, a short strand of soft fairy lights, or a ribbon in satin
green. Keep it low so guests can still see each otherSt. Patrick’s Day should include conversation, not just cabbage-based eye contact.
How to Keep Your Blooming Cabbage Centerpiece Fresh Longer
This is the difference between “Wow, stunning!” and “Is that… fermenting?” Here’s how to keep your cabbage vase centerpiece looking crisp and your flowers perky.
- Keep water only in the jar, not touching the cabbage.
- Trim flower stems before arranging so they drink easily.
- Remove leaves below the waterline in the jar (less bacteria, happier bouquet).
- Change water when it looks cloudy and refresh stems with a small re-cut if needed.
- Keep the arrangement cool and away from direct sun, heat vents, and fruit bowls.
- Refrigerate overnight if possible (even a few hours in a cool spot helps).
Troubleshooting: Quick Fixes for Common Problems
Problem: The cabbage is wobbling
Slice a thinner, flatter base. If it’s already sliced, set it on a small plate with a folded paper towel underneath (dry) to stabilize it.
Problem: The jar won’t fit
Widen the cavity slowly, shaving off small bits. For very tight spots, carve a little, test-fit, carve again. Patience is cheaper than replacing a cracked jar.
Problem: The cabbage edges look hacked (because they are)
Cover cut edges with saved outer leaves, then place big blooms around the rim. Nobody will notice your “rustic hand-carved” opening.
Problem: Odor
This usually happens when moisture sits against cabbage. Make sure water isn’t spilling into the cabbage. If you used floral foam directly in the cabbage, switch
to foam placed inside a container (or skip foam and use a jar vase instead).
St. Patrick’s Day Styling Ideas: 3 Centerpieces, 3 Different Vibes
1) “Luck of the Irish” dinner party centerpiece
Use green-and-white flowers, add gold tea lights, and keep the arrangement low and wide. Perfect for a dining table where you want conversation to flow.
2) Kid-friendly centerpiece (still cute, less fragile)
Use sturdier flowers (mums, carnations), keep stems shorter, and surround the cabbage with chocolate “gold coins.” It looks intentional and doubles as dessert
décorgenius behavior.
3) Modern entryway statement
Go minimal: white tulips + greenery, then let the cabbage be the art piece. Set it on a tray with one small candle. Chic enough for an entry table, easy enough
for a weeknight.
What to Do With the Cabbage After the Party
If the cabbage stayed dry and clean (no water contact, no funky smell), you can compost it or use outer layers for cooking if you’re comfortable. Most people treat
it as décor and compost it afterward. Either way, it lived a glamorous life and deserves a respectful retirement.
Conclusion
A blooming cabbage for St. Patrick’s Day is one of those rare DIYs that looks expensive, feels fresh, and doesn’t require special skillsjust a
cabbage, a jar, and the confidence to carve produce like you’re auditioning for a home-and-garden show. Build your cabbage vase, choose a simple green-and-white
flower palette, and focus on hiding mechanics while keeping water contained. The result is festive, elegant, and memorable (in a good way).
Experience Notes: What It’s Really Like to Make a Blooming Cabbage ( of Real-World Feel)
Here’s what most first-timers discover when they try a blooming cabbage DIY: the cabbage is both easier and more stubborn than you expect. On one hand, it’s
forgivingif your hole is slightly off-center, nobody will know once you add flowers. On the other hand, cabbage is dense. The first few cuts can feel like you’re
carving a tiny green boulder. This is why a sharp knife matters. With a dull blade, you’ll push harder, the cabbage will roll, and suddenly you’re living inside a
cautionary tale. With a sharp blade, it’s more like sculpting: slice, lift out chunks, test-fit the jar, repeat.
Another common experience: you’ll peel off outer leaves and think, “Oh no, I ruined it.” You didn’t. Those first leaves are often the messiest, and removing them
actually makes the cabbage look cleaner and more “floral.” The magic moment usually happens when you start re-tucking leaves around the opening. The cabbage goes
from “vegetable” to “centerpiece” in about thirty seconds. It’s deeply satisfyinglike seeing a bed made with crisp hospital corners, except you can’t nap on it.
Flower arranging in a cabbage vase tends to be easier than arranging in a tall glass vase because the cabbage visually supports you. It’s already full and rounded,
so you don’t need to create volume from scratch. Most people find the best approach is to start with one or two big blooms near the rim, then step back. That step
back is important. Up close, you’ll overthink every stem angle. From three feet away, the arrangement suddenly looks cohesive and intentional. If you’ve ever plated
food and thought it looked weirdthen looked again from above and thought it looked greatsame energy.
Temperature is the sneaky factor. If you build your blooming cabbage near a warm oven or sunny window, you may notice the outer leaves relax and soften faster.
In cooler spots, the cabbage stays crisp longer and the flowers drink more steadily. That’s why people who make these for gatherings often assemble them a few hours
ahead, keep them in a cool room, and then place them on the table closer to party time. If you have fridge space, even a short chill can make everything feel
“fresh from the florist.”
The biggest “aha” moment is realizing this DIY is less about perfection and more about illusion. Your carving doesn’t have to be prettyyour flowers will cover it.
Your leaves don’t need to be symmetricalnatural shapes look better anyway. And if someone asks why you made a cabbage centerpiece, you can say the truth: because
it’s St. Patrick’s Day, and you wanted your décor to be green, gorgeous, and slightly unhinged. That’s the holiday spirit.