Table of Contents >> Show >> Hide
- Pick Your Lamp Style (So You Don’t Build a Problem)
- Materials and Tools Checklist
- Step 1: Dry Your Flowers the Right Way (Because Wet Flowers Are Drama)
- Step 2: Seal the Flowers So They Don’t Turn Into Bubble Magnets
- Step 3: Choose or Build a Mold That Won’t Betray You
- Step 4: Mix Resin Like a Calm Person, Not a Cappuccino Barista
- Step 5: Pour in Layers and “Stage” Your Flowers
- Step 6: Bubble Control (Where the Magic Happens)
- Step 7: Cure, Demold, Sand, and Polish
- Step 8: Add Lighting Without Making It Complicated
- Troubleshooting: Fixes for the Most Common “Why Is It Doing That?” Moments
- Design Ideas That Look Custom (Not Craft-Store Random)
- Care and Longevity
- Real-World Maker Experiences: What People Learn After Their First Epoxy Flower Lamp (500+ Words)
- Conclusion
If you’ve ever looked at a bouquet and thought, “I wish you could stay exactly like this forever”, you’re not alone. An epoxy-and-flowers lamp is basically a tiny time capsule that also happens to glow. Done well, it looks like boutique décor. Done poorly… it looks like a jellybean trapped your wedding centerpiece. Let’s aim for the first one.
This guide walks you through a proven, beginner-friendly approach: preserve and seal real dried flowers, cast them in clear epoxy (in layers to keep things crisp and cool), then add a safe, low-voltage LED base. You’ll get the “floating botanical” look without the heartbreak of cloudy resin, runaway bubbles, or a lamp that feels like a science fair project held together by hope.
Important safety note: Resin and its hardeners can irritate skin and lungs, and some people can become sensitized over time. Work in a well-ventilated area, protect your skin and eyes, and follow your resin brand’s instructions and safety data sheet. If you’re a teen, ask an adult to superviseespecially for any heat tools and anything electrical.
Pick Your Lamp Style (So You Don’t Build a Problem)
Before buying supplies, decide what kind of lamp you’re making. The build steps change a little depending on the design. Here are three popular styles, from easiest to most “wow”:
1) Resin block + lighted base (best for beginners)
You cast a solid resin block with flowers inside, then place it on a pre-made LED base (puck light or wood base with an LED strip). This avoids complicated wiring and keeps the electronics separate from the resin.
2) Edge-lit slab (modern, super bright)
You cast a flat slab and shine LEDs into the edge. Light travels through the clear resin and makes petals glow. This looks sleek but needs careful sanding/polishing for good light spread.
3) Resin shade (advanced)
A hollow shade is lightweight and dramatic, but molds are trickier and thin walls can warp or trap bubbles. Save this for version 2.0your first lamp deserves a fair chance.
Materials and Tools Checklist
Resin + flower supplies
- Clear casting epoxy (choose a casting/deep-pour formula if your piece is thick)
- Dried flowers (pressed flowers or silica-gel dried blooms; fully dry is non-negotiable)
- Flower sealer (clear acrylic spray, craft sealer, or a thin “pre-coat” of resin)
- Mixing cups (graduated if your resin requires precise measuring), stir sticks
- Nitrile gloves, safety glasses, and a workspace covering (plastic sheet or silicone mat)
- Painter’s tape, tweezers, toothpicks (for positioning flowers)
Mold + finishing supplies
- Silicone mold (cube/cylinder) or mold material (melamine/HDPE) + packing tape for a DIY mold
- Sandpaper (a range of grits), optional polishing compound
- Microfiber cloths for final polish and dust control
Lighting (keep it simple and safe)
- Low-voltage LED base (USB LED base, LED puck, or LED strip mounted in a base)
- Certified power supply matched to your LED voltage (often 5V USB, 12V, or 24V)
- Optional diffuser material (frosted acrylic, vellum, or a pre-made LED base with diffuser)
Step 1: Dry Your Flowers the Right Way (Because Wet Flowers Are Drama)
Resin and moisture do not get along. Flowers that feel “mostly dry” can still hold enough moisture to cause cloudiness, discoloration, or curing issues. The goal is fully dried flowers with stable color.
Option A: Pressed flowers (flat, clean, great for slabs)
- Press between absorbent paper (like blotting paper) in a heavy book or press.
- Change paper if it becomes damp.
- Best for delicate petals and leafy silhouettes.
Option B: Silica gel drying (keeps shape, best for “3D” blooms)
- Gently bury blooms in silica gel so petals keep their form.
- Let them dry until they feel papery and lightno cool, soft spots.
- Use for roses, ranunculus, small daisies, and “full” flowers that you want to keep dimensional.
Quick dryness check
A reliable rule: if the flower still feels flexible or cool-to-the-touch in the thickest part, it’s not ready. When fully dry, petals are lighter, stiffer, and sound slightly crisp when tapped.
Step 2: Seal the Flowers So They Don’t Turn Into Bubble Magnets
Flowers are porous. If you drop them straight into resin, they can release tiny air bubbles from every little vein and petal edge. Sealing helps in three ways: it reduces bubbles, locks in color, and improves clarity.
Sealing methods that work
- Clear spray sealer: Light coats, fully dry between coats. Great for pressed flowers.
- Brush-on sealer: Thin layers only; thick globs can show.
- Resin “pre-coat”: Brush a thin layer of mixed resin onto the flower and let it gel before embedding.
Keep it thin. You’re not frosting a cupcakeyou’re just giving the flower a raincoat.
Step 3: Choose or Build a Mold That Won’t Betray You
Silicone molds are easiest and usually give a glossy finish right out of the mold. If you want a custom size, you can build a mold box. The key is a smooth interior and leak-proof seams.
Beginner-friendly mold choices
- Silicone cube: Great for “botanical paperweight” lamps.
- Silicone cylinder: Looks like a boutique candlebut it glows.
- Shallow tray mold: Perfect for edge-lit slabs.
If you DIY a mold box
- Use a smooth, non-porous board (melamine or HDPE are common favorites).
- Line surfaces with smooth packing tape to help release and reduce sticking.
- Seal seams carefully (resin will find the one gap you missed, like it’s being paid to do so).
Step 4: Mix Resin Like a Calm Person, Not a Cappuccino Barista
Most epoxy failures come from measuring mistakes or under-mixing. Your resin brand’s instructions are the final boss here: ratio, pot life, and cure time depend on the exact formula.
Mixing habits that save projects
- Measure accurately using the method your resin requires (volume or weight).
- Mix slowly to reduce bubblesscrape the sides and bottom as you stir.
- Use smaller batches for thick casts to reduce heat buildup.
- Transfer-and-mix trick: After mixing, pour into a second clean cup and mix again briefly. This helps avoid unmixed resin clinging to the first cup’s sides.
If you only remember one thing: your resin doesn’t care about vibes. It cares about ratio and mixing.
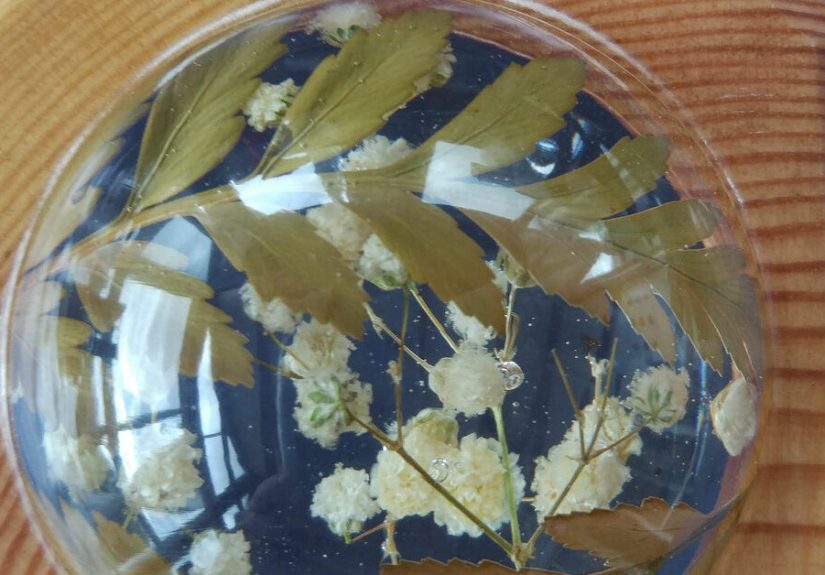
Step 5: Pour in Layers and “Stage” Your Flowers
Layering is how you keep flowers positioned (instead of floating), control bubbles, and avoid excessive heat. Think of it like building a tiny botanical diorama inside glass.
Layering workflow (for a block lamp)
- Pour a thin base layer and let it thicken to a gel-like stage (not fully hard, not fully liquid).
- Place flowers with tweezers. Press gently so they “grab” the tacky layer.
- Pour the next layer slowly down a stick or along the mold wall to reduce trapped air.
- Repeat until you reach your final height.
How to keep flowers from floating
- Use smaller flower pieces or thinner blooms for the top layers.
- Anchor stems or leaves with a tiny dot of tacky resin (gel stage) before the next pour.
- Pour slowly and avoid dumping resin directly onto petals.
Choosing the right resin type
If your lamp is thick (a deep block), a casting/deep-pour resin typically cures slower and produces less heat than a fast “coating” resin. This reduces cracking and yellowing risk in chunky pours.
Step 6: Bubble Control (Where the Magic Happens)
Bubbles come from mixing, porous flowers, and air trapped in tight petal folds. You can’t eliminate them by yelling at the cup. Here are methods that actually help:
Low-risk bubble reduction
- Let the mixed resin rest for a few minutes before pouring so bubbles rise.
- Warm the resin bottles in lukewarm water beforehand (sealed bottles only) to reduce viscosity.
- Pour in thin layers so bubbles have a shorter distance to travel.
Heat tools (use with caution)
Gentle heat can pop surface bubbles, but it’s easy to scorch resin, push dust into the surface, or create ripples. If you use a heat gun, keep it moving and use the lowest effective setting. Avoid open flames unless an experienced adult is supervising in a safe setup.
Pressure casting (best results, most equipment)
A pressure pot compresses bubbles so they’re too small to see. This can produce incredibly clear casts, especially with flowers. It’s optionalbut if you’re chasing that “gallery-quality” look, this is the shortcut.
Step 7: Cure, Demold, Sand, and Polish
Cure times vary by resin type and room temperature. Don’t rush demoldingsoft resin dents easily and sanding gummy resin is a special kind of misery.
Finishing for a crystal-clear look
- Demold carefully and inspect for sticky spots. If it’s tacky, give it more cure time.
- Sand progressively (coarse to fine). Wet sanding helps reduce dust and scratches.
- Polish with a plastic polish or polishing compound for a glass-like shine.
- Optional: Apply a thin clear top coat (compatible with your resin) for extra gloss.
Pro tip: Most “cloudy resin” complaints are actually “micro-scratches from skipping sanding grits.” Slow down. Your lamp is not going anywhere. (Except maybe to your friend’s house once they see it.)
Step 8: Add Lighting Without Making It Complicated
The safest DIY route is low-voltage LEDs with a certified power supplyno custom mains wiring, no exposed connections, no stress. Many pre-made LED bases are designed specifically for acrylic/resin displays and run on USB or a small adapter.
Easy lighting setups
- USB LED display base: Place the resin block on top and plug in. Done.
- LED puck under a base plate: Great for a cylinder lamp; adds a soft glow upward.
- LED strip in a wood base: Hide the strip in a routed groove and point light into the resin edge or bottom.
Make the light look “expensive”
- Use a diffuser to avoid harsh hotspots.
- Consider warm white for romantic florals and cool white for modern botanicals.
- Keep the resin’s bottom surface polishedlight loves clarity.
Keep electronics away from uncured resin and don’t seal power supplies inside the lamp. Let heat escape, and keep components serviceable.
Troubleshooting: Fixes for the Most Common “Why Is It Doing That?” Moments
Problem: Resin is cloudy
- Flowers may not be fully dry or were not sealed well.
- Resin may have been mixed too aggressively (micro-bubbles) or cured too cold.
- Finishing may need more sanding grits and polishing.
Problem: Sticky spots or soft areas
- Most often caused by inaccurate measuring or incomplete mixing.
- Let it cure longer; if still sticky after the full cure window, the section may need removal and recasting.
Problem: Cracks or overheating
- Pours may have been too thick or done too fast.
- Switch to a deep-pour resin and cast in thinner layers.
- Keep room temperature stable and avoid large mixed batches.
Problem: Flowers float or shift
- Use gel-stage layering to “lock” placement before adding more resin.
- Choose lighter, smaller elements for top layers, and anchor with tacky resin.
Design Ideas That Look Custom (Not Craft-Store Random)
- Color story: Choose one dominant color (like blush) plus two supporting tones (cream + sage).
- Negative space: Don’t pack the mold. Airy placement looks more modern.
- Layered depth: Place flowers at different heights so the lamp feels “3D” from every angle.
- Botanical theme: Wildflower meadow, minimalist eucalyptus, or “one hero bloom” (like a single rose centered perfectly).
- Subtle tint: A tiny amount of transparent tint can make petals popthink “museum display” not “sports drink.”
Care and Longevity
Resin is durable, but it’s not invincible. Keep your lamp out of harsh direct sunlight to reduce yellowing over time. Dust with a soft cloth, avoid abrasive cleaners, and treat it like the fancy décor item it now is.
Real-World Maker Experiences: What People Learn After Their First Epoxy Flower Lamp (500+ Words)
The most common “experience gap” with resin projects is that people expect the process to feel like baking: measure, mix, pour, and then voilà. In reality, resin feels more like a slow dance with chemistryone where impatience steps on your toes. Many DIYers report that the biggest upgrade to their final result wasn’t a new tool; it was simply giving each stage more time: more time for bubbles to rise, more time for a layer to reach the gel stage, and more time for the full cure before sanding.
Flower prep is another place where expectations get politely humbled. Dried flowers can look “ready” and still hold moisture deep in the thicker partsespecially around stems, centers, and layered petals. Crafters often discover that the prettiest blooms are not always the easiest to preserve. Dense flowers can trap air and resin, and that can translate into tiny bubbles that show up exactly where your eye wants to focus. Over time, makers tend to become strategic: they use fuller blooms as focal points only when they’ve been carefully dried and sealed, and they fill the rest of the design with flatter petals, small leaves, or thin sprigs that behave more predictably in resin.
Another common experience is learning the difference between “clear” and “clear enough.” Resin can look perfectly transparent until you add light and then every micro-scratch, dust speck, and trapped bubble becomes the main character. That’s why people who make a second lamp usually change their finishing routine. They sand through more grits instead of jumping ahead. They wet sand to keep dust down. They polish longer than feels necessary. And they start treating their workspace like a mini clean room: wiping surfaces, covering curing pieces, and avoiding “just one quick pour” under a ceiling fan.
The lighting step also tends to evolve with experience. Beginners often want to embed LEDs inside the resin (because it sounds cool), but experienced makers typically move toward external, low-voltage bases. It’s easier to troubleshoot, easier to replace parts, and easier to keep everything safe and cool. People also learn that diffusion matters. A raw LED can create harsh hotspots that make your lamp look unfinished. A simple diffuser layeror even a well-designed display baseturns the glow into something smooth and intentional, like it belongs in a cozy reading corner instead of a gadget drawer.
Finally, there’s the emotional experiencebecause resin flower lamps are often made from meaningful flowers: a wedding bouquet, a memorial arrangement, a prom corsage, a “first garden” bloom. Makers who’ve done this once often recommend doing a practice run with inexpensive dried flowers first. Not because you can’t handle the real project, but because you deserve to learn the quirks of your resin, your mold, and your bubble-control method before you commit sentimental material to the pour. The payoff is huge: a lamp that doesn’t just decorate a room, but quietly tells a story every time it lights up.
Conclusion
Building an epoxy-and-flowers DIY lamp is part craft, part chemistry, and part interior design. The best results come from three habits: fully dry flowers, sealed petals, and layered casting with careful bubble control. Finish your resin like you would a piece of furniturepatient sanding, thoughtful polishingand keep lighting safe with low-voltage LED bases and certified power supplies. The result is a glowing keepsake that looks like it came from a boutique shop… and feels like it came from a memory.