Table of Contents >> Show >> Hide
- Why Industrial / Modern Wainscoting Is Perfect for an Entryway
- Pick a Modern/Industrial Wainscoting Style (With “High-Traffic” in Mind)
- Decide the Height: The One Choice That Changes Everything
- Materials That Hold Up in a High-Traffic Entryway
- Tools & Supplies Checklist (A.K.A. The Trip You’ll Make to the Store Twice)
- Step-by-Step: Install Industrial / Modern Wainscoting (Board-and-Batten Method)
- Step 1: Prep the Wall Like a Grown-Up (It’s Annoying but Worth It)
- Step 2: Choose Spacing That Looks Intentional, Not Accidental
- Step 3: Snap a Level Line for the Top Rail
- Step 4: Install the Bottom and Top Pieces (The “Frame”)
- Step 5: Install Vertical Battens (The Part That Makes It Look Expensive)
- Step 6: Add a Cap or Ledge (Optional, But It Adds “Finished”)
- Finishing for High Traffic: Caulk, Sand, Prime, Paint (Your Wall’s Glow-Up)
- Industrial / Modern Design Moves That Make It Look Custom
- Common Mistakes (So You Don’t Learn Them the Hard Way)
- Maintenance: Keep It Looking New Without Babying It
- Conclusion: Your Entryway Just Leveled Up
- Real-World Experiences & Lessons DIYers Share (Extra Practical Wisdom)
Entryways are where your house meets real life: wet boots, flying backpacks, dog shake-offs, grocery-bag corner
scrapes, and the occasional “who parked a scooter in my hallway?” moment. If your walls could talk, they’d ask
for armor. Industrial / modern wainscoting is that armorclean-lined, durable, easy to wipe down, and stylish
enough to make your entryway feel intentional (instead of “we’re still figuring it out”).
This guide walks you through planning, building, and finishing wainscoting that can handle high traffic while
still looking crisp and modern. We’ll keep it beginner-friendly, tool-realistic, and design-forwardwith a few
jokes, because sanding dust in your hair deserves emotional support.
Why Industrial / Modern Wainscoting Is Perfect for an Entryway
Traditional wainscoting was built to protect walls. Your entryway still needs that, but you probably don’t want
ornate curves and fancy profiles competing with your minimalist console table and black metal hooks. Industrial /
modern wainscoting gives you:
- Impact protection: Battens, rails, or applied trim take the hits instead of drywall paper.
- Easy cleaning: A quality finish lets you wipe scuffs without repainting the whole wall.
- Stronger visual structure: It “frames” the space and makes narrow halls feel designed.
- Modern style control: Square edges, symmetrical spacing, and flat stock keep it sleek.
Pick a Modern/Industrial Wainscoting Style (With “High-Traffic” in Mind)
Wainscoting isn’t one thingit’s a category. The most entryway-friendly options are the ones that are sturdy,
simple, and easy to patch or repaint later.
Option A: Modern Board-and-Batten (Fast, Strong, and Very Forgiving)
This is the crowd favorite for DIY. It’s basically a top rail and base with evenly spaced vertical battens.
For modern/industrial vibes, use flat, square stock (no fancy beading), keep the spacing consistent,
and choose a bold color or a crisp two-tone.
Option B: Flat Panel “Shadow Box” Wainscoting (Most Polished)
This is the “built-in architect” look: rectangular frames applied to a smooth wall or thin backer panel.
It takes a little more measuring, but the finished result is very modernespecially when you use thin,
sharp-edged molding and a matte or satin finish.
Option C: Beadboard/Panel Sheets (Quick Coverage, Great for Bumps)
If your entryway walls are a little wavy (older homes, we see you), a panel system can be simpler because it
creates a uniform surface quickly. You can still make it feel modern by capping it with a square top rail
and using minimal trim.
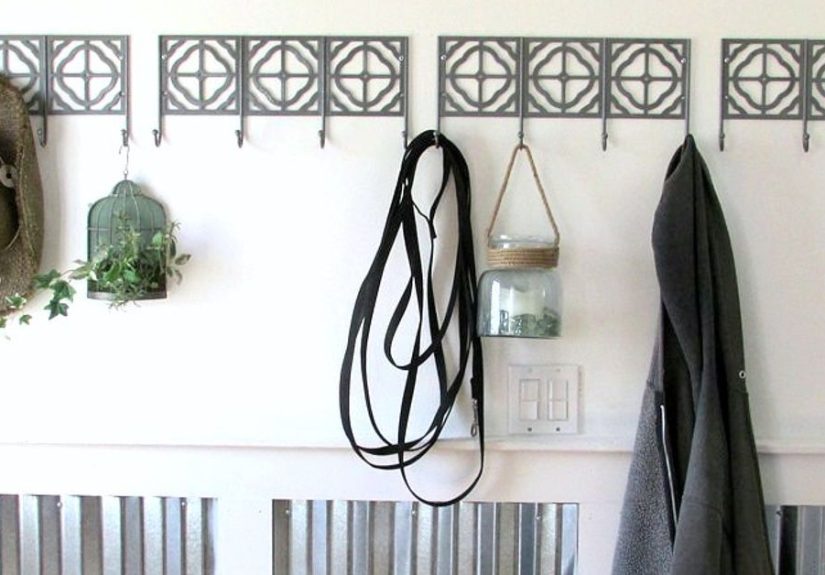
Industrial tip: Pair any of these with black hardware, a chunky hook rail, or a thin ledge shelf
in stained wood. Industrial style is all about contrast: warm + cool, smooth + gritty, clean lines + functional
details.
Decide the Height: The One Choice That Changes Everything
Wainscoting height is where DIY projects go from “magazine” to “why does this feel… short?” A classic rule is
placing the cap about one-third of the wall height (roughly 36 inches on a 9-foot wall). That’s a
great starting point for a high-traffic entryway because it lines up with backpacks and elbows.
If you want a more modern look, you can go tallerthink 40 to 48 inchesespecially in a long hallway.
Taller wainscoting can feel more architectural and less “dining room chair rail.” The key is to commit:
don’t choose a height just because you bought 48-inch panels. Choose it because it looks right in your space.
Quick Height Cheats
- Small entryway with low ceilings: 30–36 inches keeps it light.
- Standard 8–9 ft ceilings: 36–42 inches is the sweet spot.
- Wide hall or open stair wall: 42–48 inches looks intentional and modern.
- Lots of hooks/bench: Set the top rail above the bench back or hook line for a clean “zone.”
Materials That Hold Up in a High-Traffic Entryway
Your entryway isn’t a formal living room. It’s a durability test lab. Choose materials that won’t dent if you
look at them wrong.
Best Choices
- Poplar or pine (paint-grade): Great for battens and rails; stable and takes paint well.
- Primed MDF (for dry areas): Smooth, straight, budget-friendly. Use caution near wet boots.
- Plywood backer (¼–½ inch): Adds toughness and helps cover wall texture.
- PVC baseboard (optional): If wet shoes live here, PVC at the base can be a lifesaver.
Reality check: MDF is popular for painted wainscoting because it’s straight and smooth, but it can
swell if it gets soaked. In an entryway, that doesn’t mean “never MDF,” it means “prime well, caulk smart, and
don’t leave puddles hugging your baseboard like it pays rent.”
Tools & Supplies Checklist (A.K.A. The Trip You’ll Make to the Store Twice)
Tools
- Stud finder
- Level (2–4 ft) or laser level
- Tape measure + pencil
- Miter saw (or miter box for small trim)
- Brad nailer (or finish nailer) + compressor OR a cordless nailer
- Caulk gun
- Random orbit sander (or sanding block)
Supplies
- Construction adhesive (panel/trim rated)
- Wood filler or spackle (paintable)
- Paintable caulk
- Primer (especially important if using MDF or patching drywall)
- Durable interior paint (satin/semigloss for wipeability; more on that below)
- Trim boards / MDF strips / paneling (based on your style)
Step-by-Step: Install Industrial / Modern Wainscoting (Board-and-Batten Method)
This is the most DIY-friendly method that still looks like a pro did it. You can adapt the same steps for
flat-panel frames, but board-and-batten gives you fewer math nightmares.
Step 1: Prep the Wall Like a Grown-Up (It’s Annoying but Worth It)
- Remove existing baseboards if you want the cleanest look (recommended for modern installs).
- Patch holes, sand bumps, and clean the wall (paint hates dust almost as much as you do).
- Find and mark studslight pencil marks above your future top rail line are easy to hide later.
- If your wall is heavily textured, consider a thin plywood or hardboard backer for a smoother modern finish.
Step 2: Choose Spacing That Looks Intentional, Not Accidental
Modern spacing is usually consistent and calm. Common batten spacing is 12–18 inches between battens,
but don’t pick a numberpick a layout. Start by deciding how many “spaces” you want, then calculate the spacing
so the ends look balanced.
A simple layout approach:
Total wall width minus (number of battens × batten width) = remaining space.
Remaining space ÷ number of gaps = spacing between battens.
Pro move: Dry layout with painter’s tape. It’s fast, and it saves you from installing a whole wall
and then realizing the end battens look like they were added as an apology.
Step 3: Snap a Level Line for the Top Rail
Measure your chosen height from the floor in multiple spots (floors are rarely level), then use a laser level
or a long level to draw a straight line. The line is your truth. Trust it more than your baseboard.
Step 4: Install the Bottom and Top Pieces (The “Frame”)
- If you removed baseboards, install a new, taller baseboard first or use a flat base board as your bottom rail.
- Cut your top rail board to length and attach it along your level line.
- Use construction adhesive on the back, then brad nail into studs when possible.
- Check for level again before you fully commit with nails (because wood loves to drift).
Step 5: Install Vertical Battens (The Part That Makes It Look Expensive)
Cut battens to fit between the base and top rail. Apply a thin bead of construction adhesive, press into place,
and tack with brad nails. Work from one end to the other, checking spacing as you go.
- Square-cut ends keep the look modern (no fancy angles needed).
- Nail into studs when possible for strength, but adhesive helps everywhere.
- Use a spacer block (scrap wood cut to your spacing) to keep gaps consistent.
Step 6: Add a Cap or Ledge (Optional, But It Adds “Finished”)
For a modern look, skip ornate chair rail profiles. Use a simple flat cap (like a 1×2 or 1×3) or
a shallow ledge. In an entryway, a ledge can double as a drop zone for keysjust don’t blame me when it becomes
the “mail mountain.”
Finishing for High Traffic: Caulk, Sand, Prime, Paint (Your Wall’s Glow-Up)
Fill and Sand
- Fill nail holes with wood filler/spackle.
- Lightly sand filled areas until smooth.
- Vacuum dust and wipe with a damp cloth.
Caulk the Seams (Yes, Even the Tiny Ones)
Caulk is what makes wainscoting look built-in instead of “stuck on.” Caulk along the edges where trim meets
wall and at inside corners. Keep it neatindustrial/modern style highlights clean lines.
Prime for Durability
Primer matters more in an entryway because you’ll clean these walls more often. Prime raw wood/MDF and patched
drywall so the finish paint bonds evenly. If you used MDF, primer also helps seal edges (the part that loves to
puff up if moisture shows up uninvited).
Pick the Right Paint Sheen
For high-traffic entryways, most DIYers land on satin or semi-gloss for wainscoting because it’s
easier to wipe and more resistant to scuffs. Matte can look very modern, but it may show marks sooner unless you
choose a paint designed for scuff resistance.
Industrial / Modern Design Moves That Make It Look Custom
1) Keep Profiles Flat and Square
Industrial and modern styles love straight edges. Choose flat stock boards and minimal caps. The more ornate the
trim, the more traditional the vibe.
2) Use Contrast Strategically
- Two-tone classic: white or warm off-white wainscoting + greige wall above.
- Modern monochrome: same color above and below, different sheen (subtle, very chic).
- Industrial statement: deep charcoal/black wainscoting with warm wood accents (bench, shelf).
3) Add “Function Hardware” Like It Means It
A row of matte black hooks mounted into a rail (ideally into studs) feels industrial because it’s practical and
bold. If you’re adding a bench, align the bench height with the wainscoting lines so the whole wall reads as a
system.
4) Protect the Corners
Entryway corners take the most abuse. Consider thicker corner trim, modern outside corner guards, or wrapping the
wainscoting around the corner so the edge isn’t just painted drywall.
Common Mistakes (So You Don’t Learn Them the Hard Way)
- Skipping layout: Uneven end spacing screams “DIY” louder than your nail gun.
- Ignoring the floor’s slope: Level your top rail; let the baseboard handle the floor’s drama.
- Under-priming MDF edges: Seal them well for longevityespecially near wet shoes.
- Rushing caulk and sanding: Finish work is the difference between “nice” and “wow.”
- Cheap paint in a high-traffic zone: You’ll pay later in touch-ups and frustration.
Maintenance: Keep It Looking New Without Babying It
The best part of wainscoting is that it’s meant to be cleaned. For routine maintenance:
- Wait until paint fully cures before heavy cleaning (usually a couple weeks for maximum hardness).
- Use a soft cloth or sponge with mild soap and water for most scuffs.
- Keep a small container of the finish paint for quick touch-ups.
- Add felt pads to nearby furniture (benches, shoe cabinets) to prevent constant rubbing.
Conclusion: Your Entryway Just Leveled Up
Industrial / modern wainscoting is one of those projects that looks high-end but is secretly just careful layout,
straight cuts, and patient finishing. When you choose a practical height, use durable materials, and paint with
high-traffic life in mind, you get a wall that can take a beating and still look sharp.
And the next time someone drags a suitcase down your hallway, you can smile calmlybecause your walls are wearing
protective gear now.
Real-World Experiences & Lessons DIYers Share (Extra Practical Wisdom)
Once the wainscoting is up and the paint is dry, the real test begins: living with it. DIYers who install
industrial/modern wainscoting in a high-traffic entryway tend to report the same “I’m glad I did that” momentsand
the same “I wish I’d known” surprises.
1) The Height Feels Different Once You Live With It
On install day, 36 inches can look perfect. Two weeks later, you realize your kids’ backpacks hit at 40 inches,
not 36. A common lesson: if your entryway is truly chaotic (busy family, pets, sports gear), a slightly taller
wainscoting height often feels more practical. Many DIYers say they’d go taller next timeespecially in long
hallways where the extra height looks more architectural and less like a decorative stripe.
2) Corners Are the “Battle Zones”
People love the look of clean, modern corners… right up until the first moving box scrapes the edge. The
experience most DIYers share is that corners take way more abuse than the flat wall sections. If you’re on
the fence about beefier corner trim, a wrapped return, or extra protection, the lived-in perspective is: do it.
It’s not overkillcorners are where your wall meets reality at full speed.
3) The Finish Matters More Than the Build (Yes, Really)
A lot of first-timers assume the carpentry is the hardest part. Then they get to filling, sanding, caulking, and
paintingand realize the finish is what everyone actually sees. DIYers often mention that the wainscoting looked
“fine” before caulk and looked “custom” afterward. The most common regret is rushing the finish because they were
tired. If you’re exhausted, stop. The wall will still be there tomorrow. Your patience is the secret ingredient.
4) Scuff Resistance Saves Your Sanity
Entryways don’t just get dirty; they get marked. Shoe scuffs, stroller rubs, dog leans, and the occasional
mysterious black streak that appears overnight like a prank from the universe. DIYers who choose durable,
wipeable paint say they clean less, touch up less, and stress less. People also note that the wrong sheen can be
a pain: too flat can hold onto marks, too glossy can show every bump. The shared experience trend is that satin or
semi-gloss on wainscoting strikes a practical balance, especially when paired with a paint built for durability.
5) The “Industrial” Look is Won in the Details
Many homeowners discover that the wainscoting alone looks goodbut the industrial/modern vibe really “clicks” when
they add functional hardware and intentional contrast. A black hook rail, a simple wood ledge, a slim bench, or a
minimalist light fixture can make the whole wall feel designed, not just decorated. DIYers often say the wall
became their favorite part of the entryway after they added a practical element that matched the style.
6) Expect the Entryway to Get Messier Before It Gets Better
This is the emotional truth: during the project, your entryway becomes a construction zone where shoes, mail,
tools, and trim scraps all coexist in a fragile ecosystem. DIYers regularly joke that their house looked worse
for a weekbut the payoff felt immediate once everything was put back. A small planning tip that comes from lived
experience: designate a temporary “drop zone” in another room during the build. Otherwise, your hallway will try
to multitask as a workshop and a walkway, and neither job will go well.
The takeaway from these shared experiences is simple: build it straight, finish it patiently, choose durability on
purpose, and protect the corners like you’re designing for a tiny demolition crew. Because you are. And once the
wainscoting is in, you’ll notice something subtle: your entryway feels calmer. It looks cleaner. It’s easier to
maintain. And it quietly signals, “Yes, we have our life together.” Even if the shoe pile says otherwise.